Woodshop Diaries

  • Shop
  • About
    • Work With Me
    • Frequently Asked Questions
  • DIY Projects
    • DIY Furniture Plans
      • DIY Bed Plans
      • DIY Dresser Plans
      • DIY Nightstand Plans
      • DIY Desk Plans
      • DIY TV Stand Plans
      • Coffee and Side Table Plans
      • Tables
      • Shelves and Bookcase Plans
      • DIY Storage Trunk Plans
      • DIY Bench Plans
      • DIY Storage Cabinet Plans
      • DIY Bathroom Vanity Plans
      • Kids Projects and Furniture
    • DIY Scrap Wood Projects
    • DIY Workshop Projects
    • DIY Home Decor Projects
  • Getting Started
    • Cabinet Building
    • Woodworking Basics
    • Furniture Finishing Tips
    • Tool Guides & Reviews
  • Blog
menu icon
go to homepage
  • Shop
  • About
    • Work With Me
    • Frequently Asked Questions
  • DIY Projects
    • DIY Furniture Plans
      • DIY Bed Plans
      • DIY Dresser Plans
      • DIY Nightstand Plans
      • DIY Desk Plans
      • DIY TV Stand Plans
      • Coffee and Side Table Plans
      • Tables
      • Shelves and Bookcase Plans
      • DIY Storage Trunk Plans
      • DIY Bench Plans
      • DIY Storage Cabinet Plans
      • DIY Bathroom Vanity Plans
      • Kids Projects and Furniture
    • DIY Scrap Wood Projects
    • DIY Workshop Projects
    • DIY Home Decor Projects
  • Getting Started
    • Cabinet Building
    • Woodworking Basics
    • Furniture Finishing Tips
    • Tool Guides & Reviews
  • Blog
search icon
Homepage link
  • Shop
  • About
    • Work With Me
    • Frequently Asked Questions
  • DIY Projects
    • DIY Furniture Plans
      • DIY Bed Plans
      • DIY Dresser Plans
      • DIY Nightstand Plans
      • DIY Desk Plans
      • DIY TV Stand Plans
      • Coffee and Side Table Plans
      • Tables
      • Shelves and Bookcase Plans
      • DIY Storage Trunk Plans
      • DIY Bench Plans
      • DIY Storage Cabinet Plans
      • DIY Bathroom Vanity Plans
      • Kids Projects and Furniture
    • DIY Scrap Wood Projects
    • DIY Workshop Projects
    • DIY Home Decor Projects
  • Getting Started
    • Cabinet Building
    • Woodworking Basics
    • Furniture Finishing Tips
    • Tool Guides & Reviews
  • Blog
×
Home

How to Seal and Paint an Exterior Door

November 16, 2021 by Shara, Woodshop Diaries

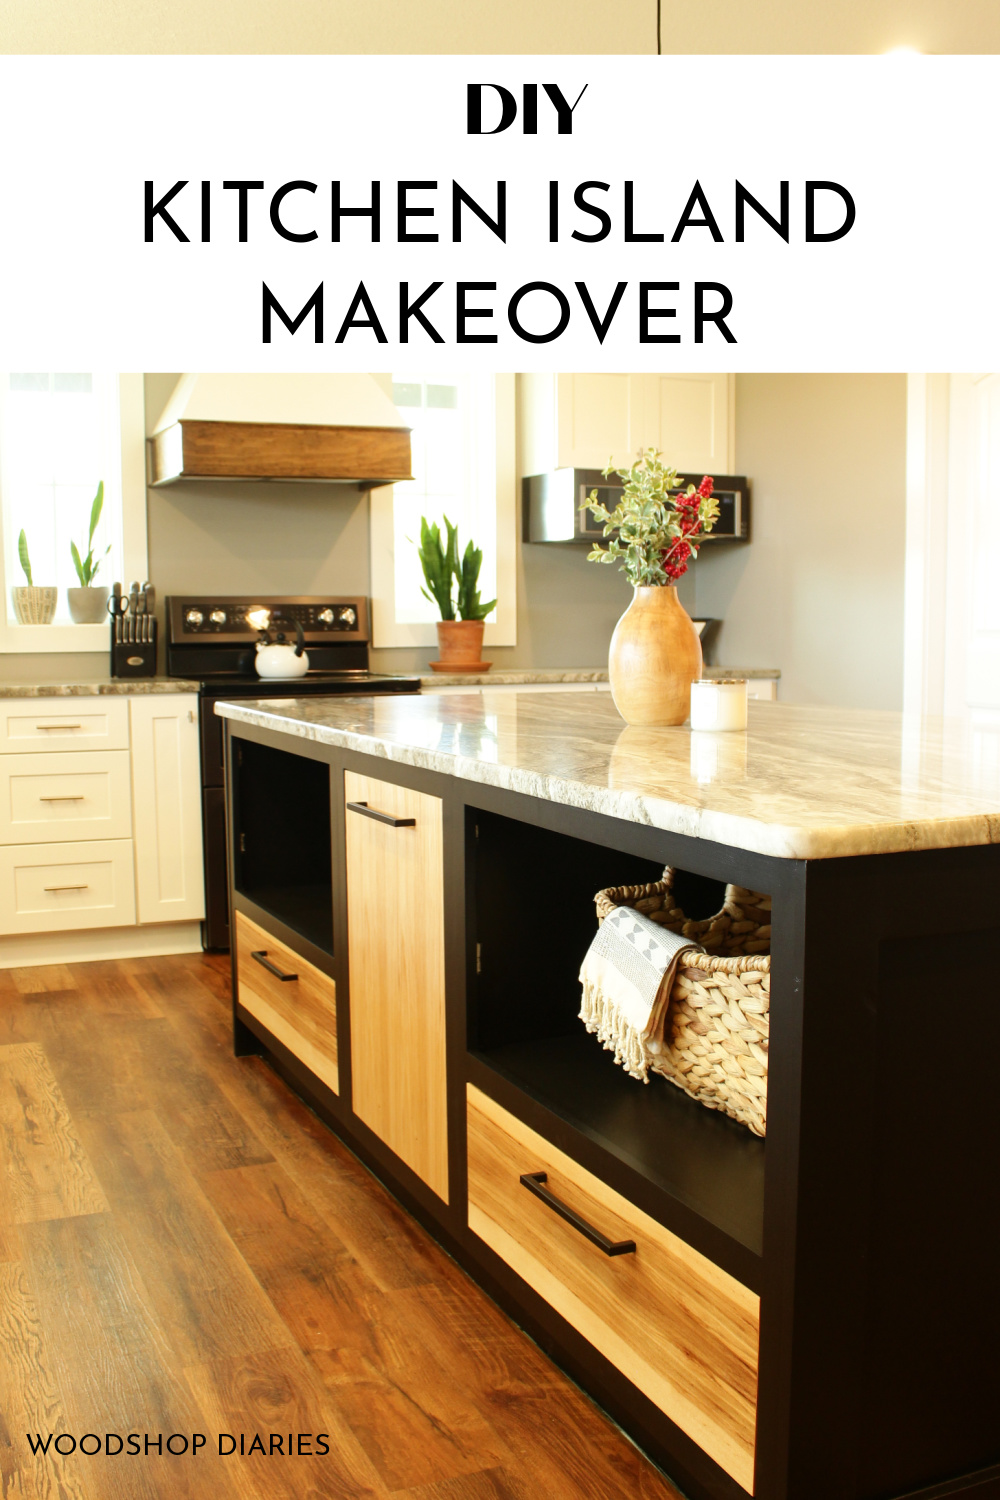
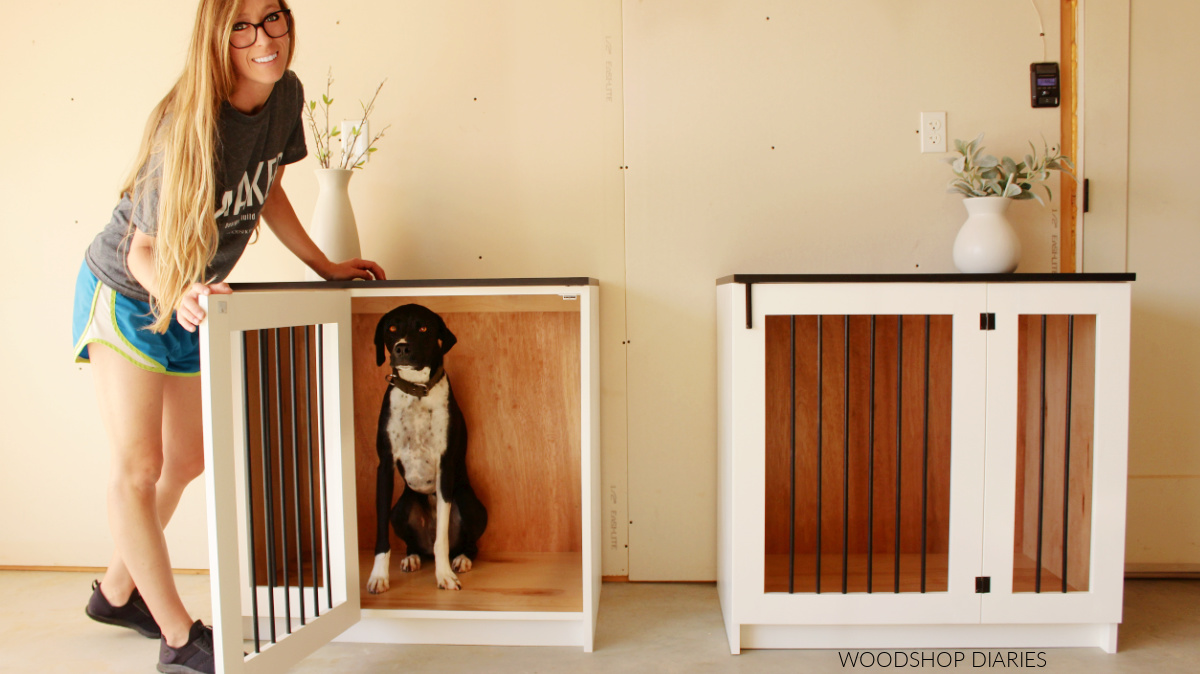
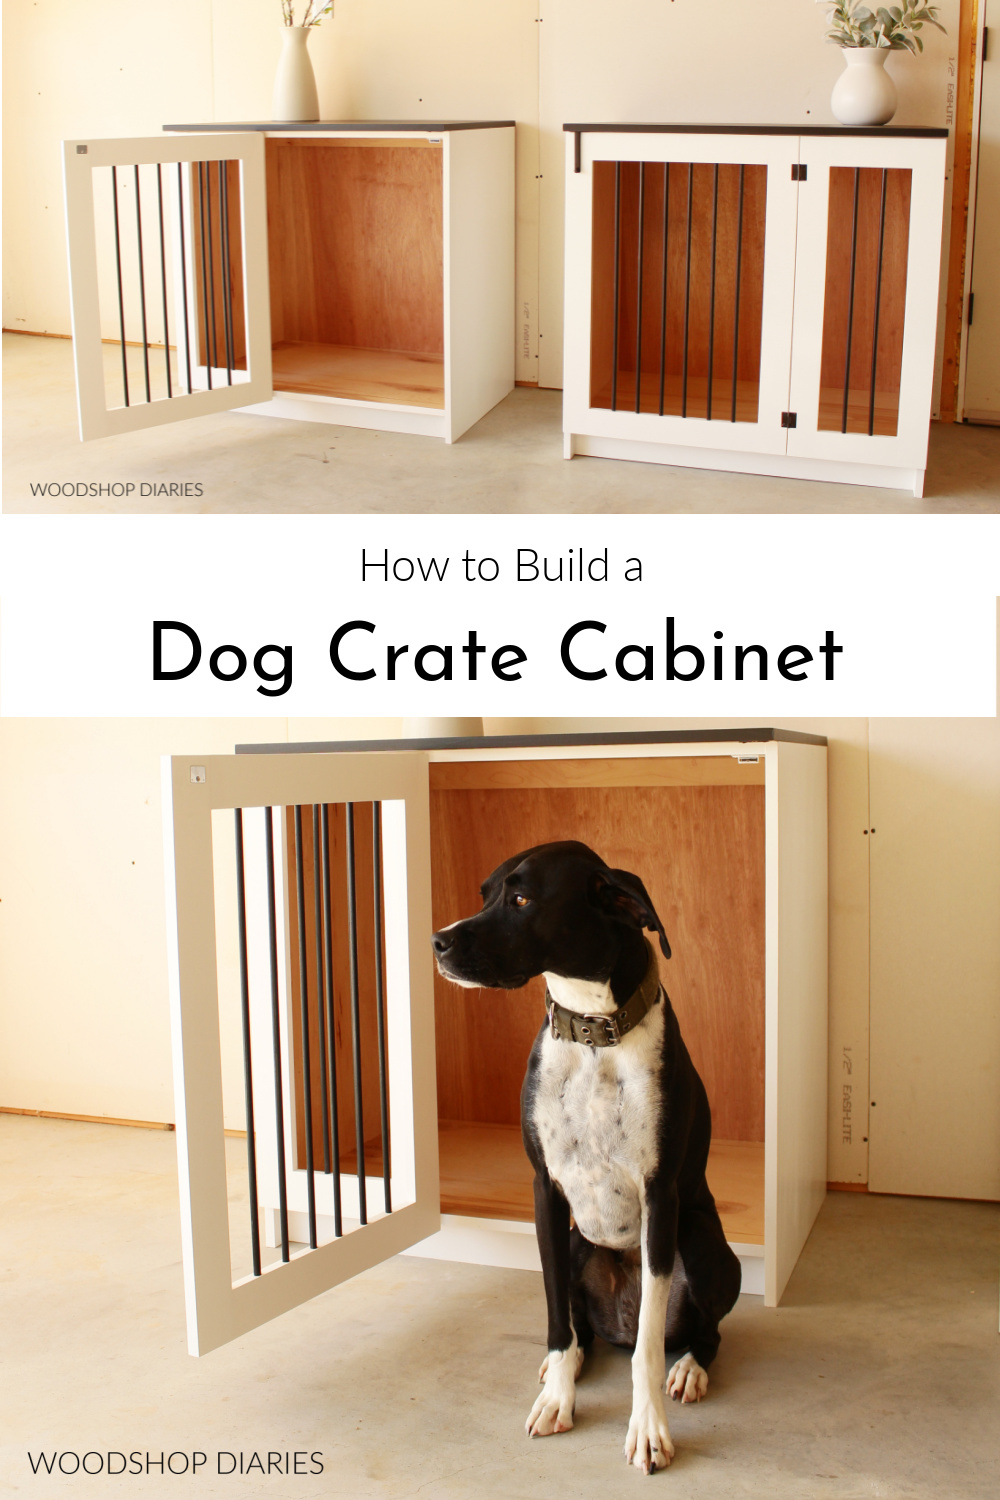
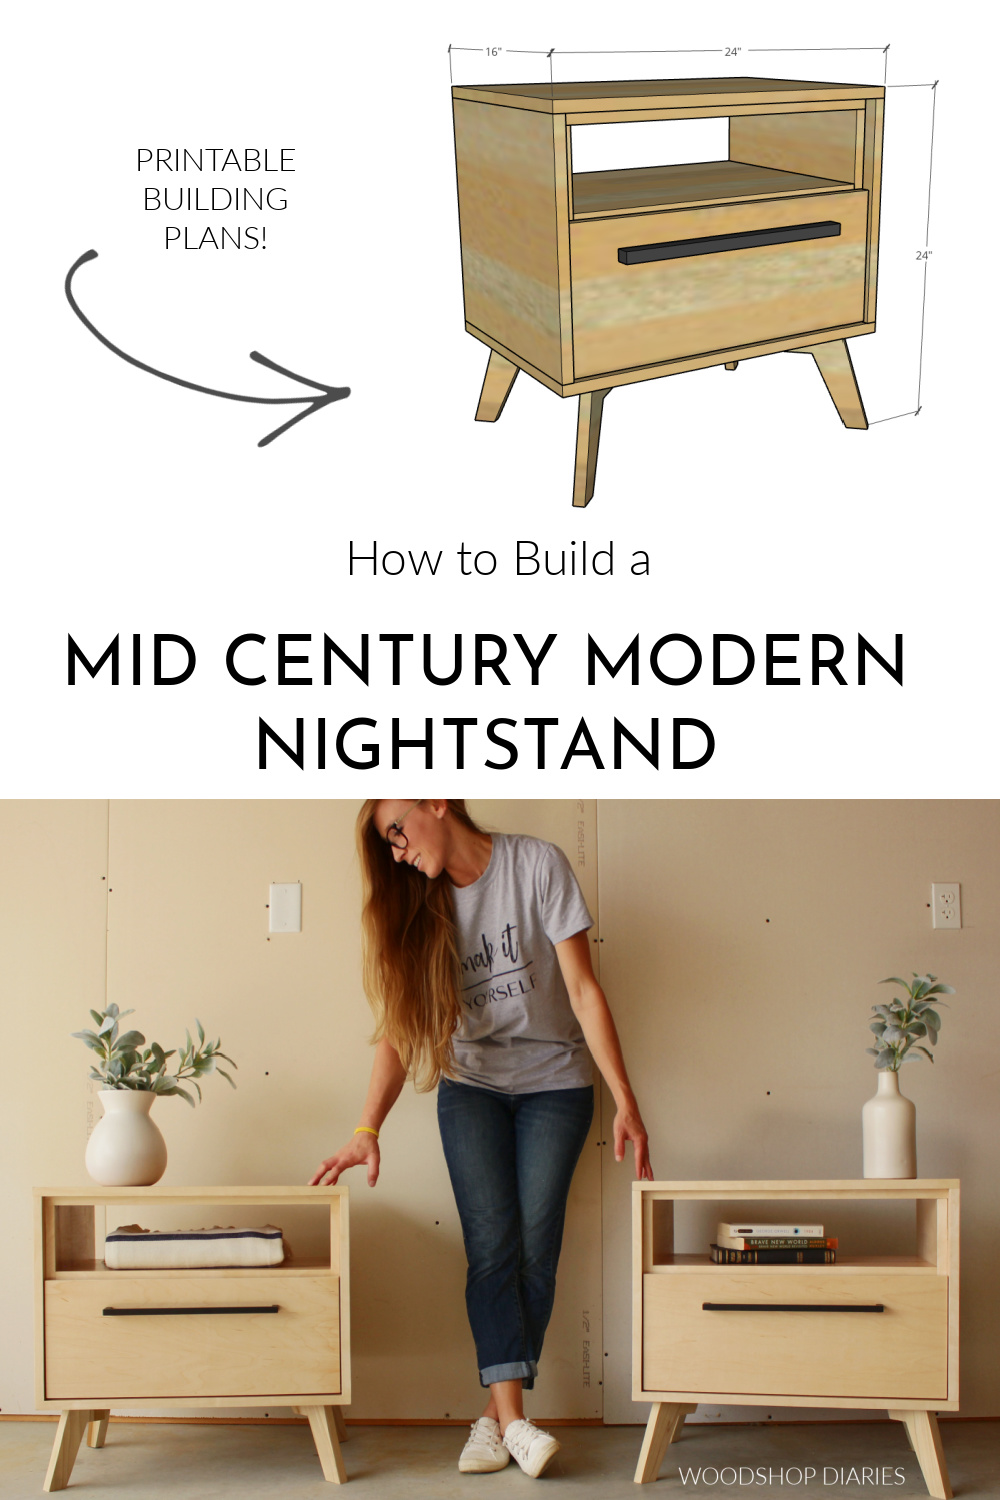
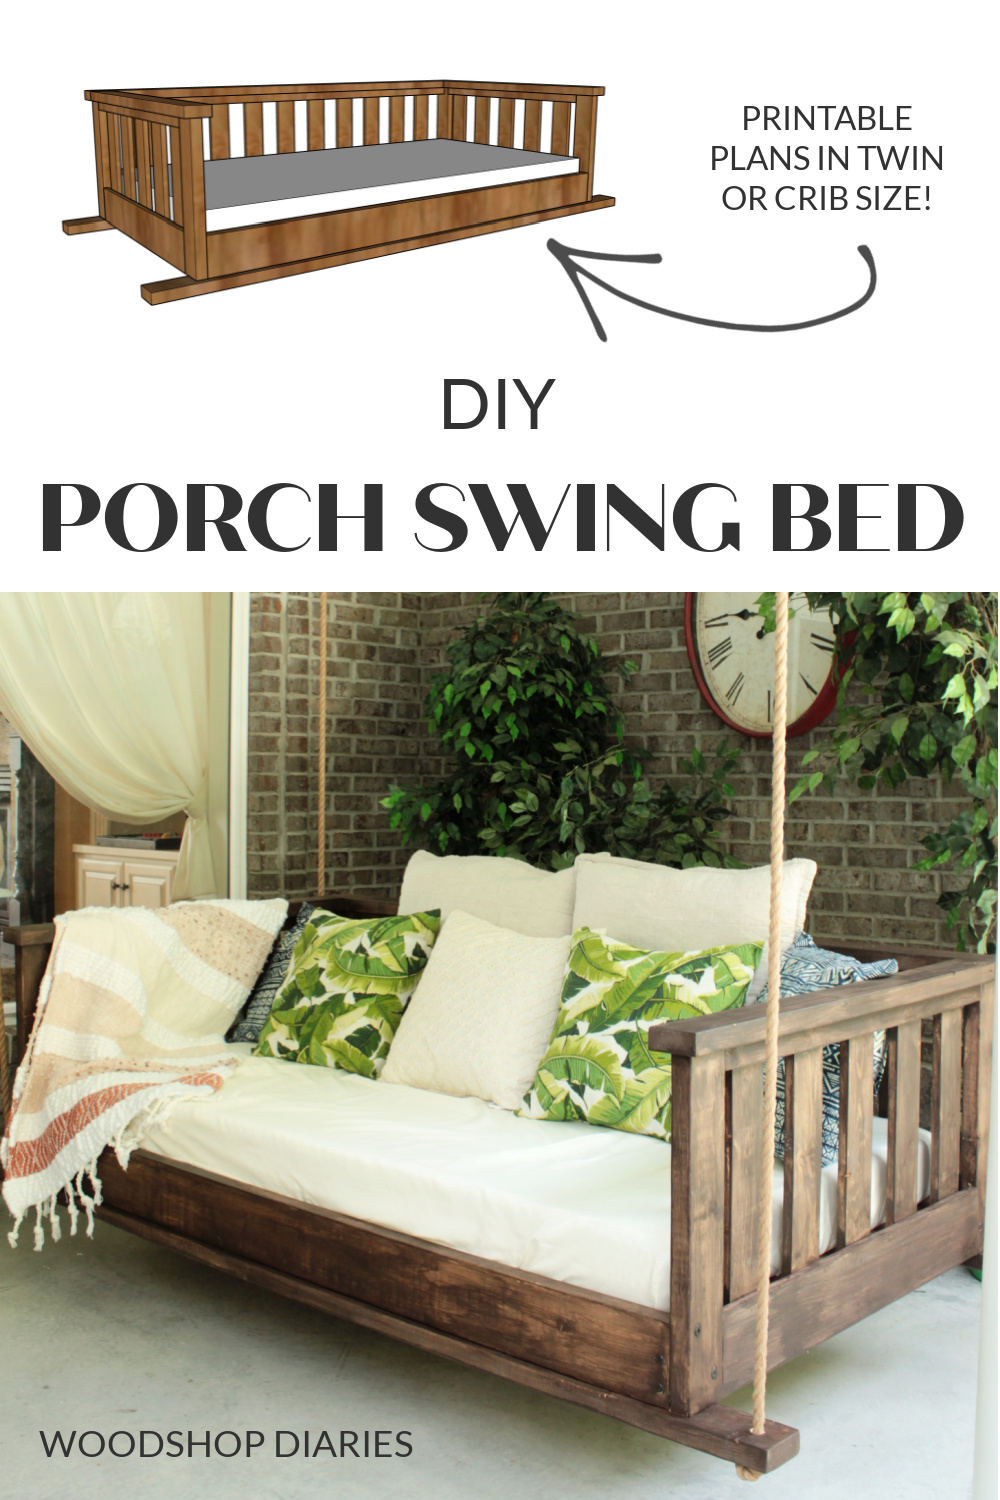
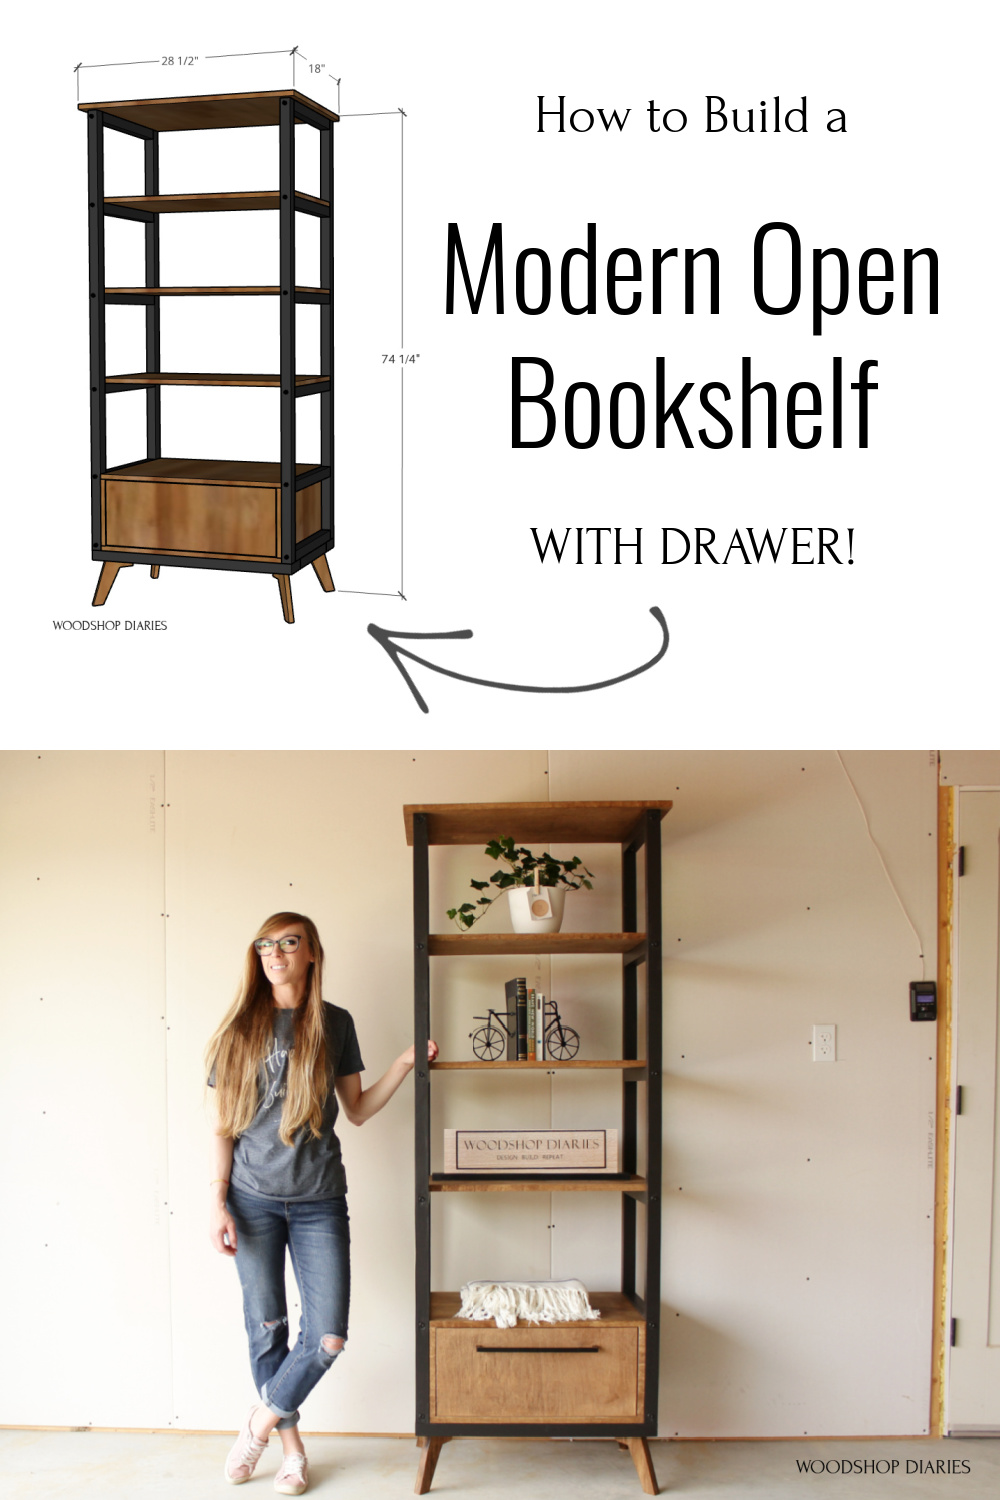
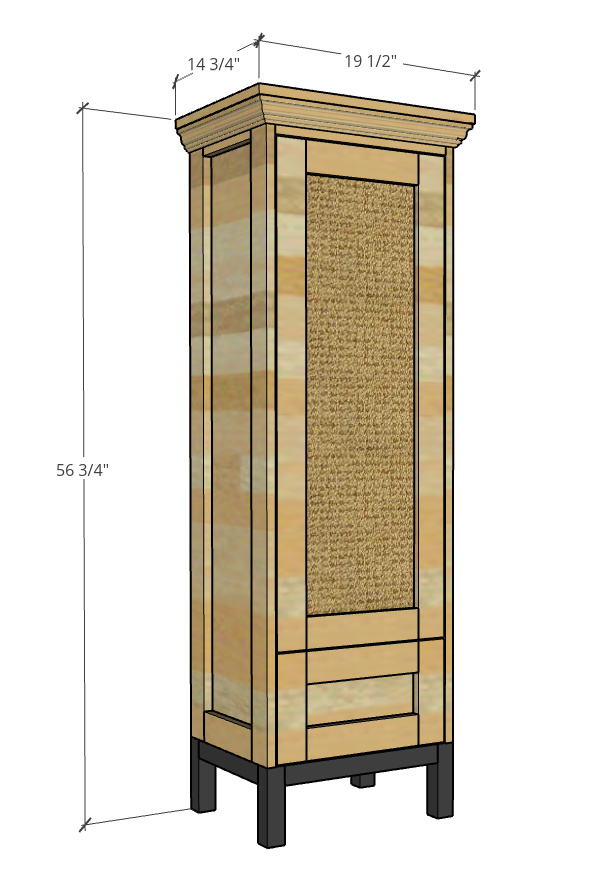
In this post, I’m sharing how to seal and paint an exterior door, and why it’s important to prime before painting.

**This post is sponsored by KILZ® Brand but the content and opinions expressed here are my own. This post also contains affiliate links.  See policies page for details.

Bare metal door unpainted with can pf KILZ primer and Behr paint in front

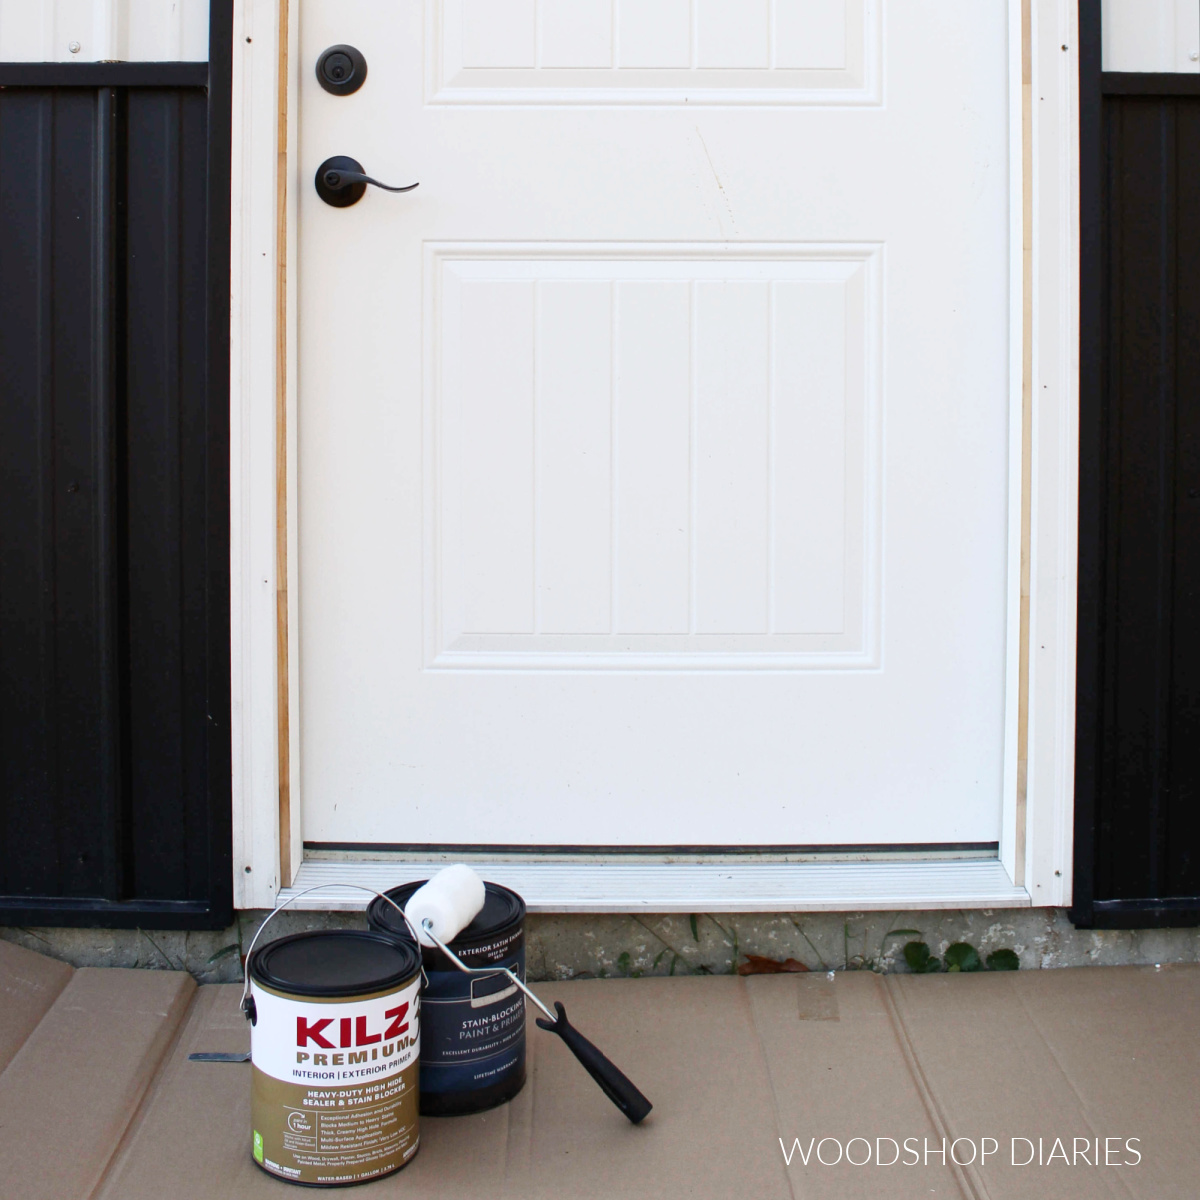
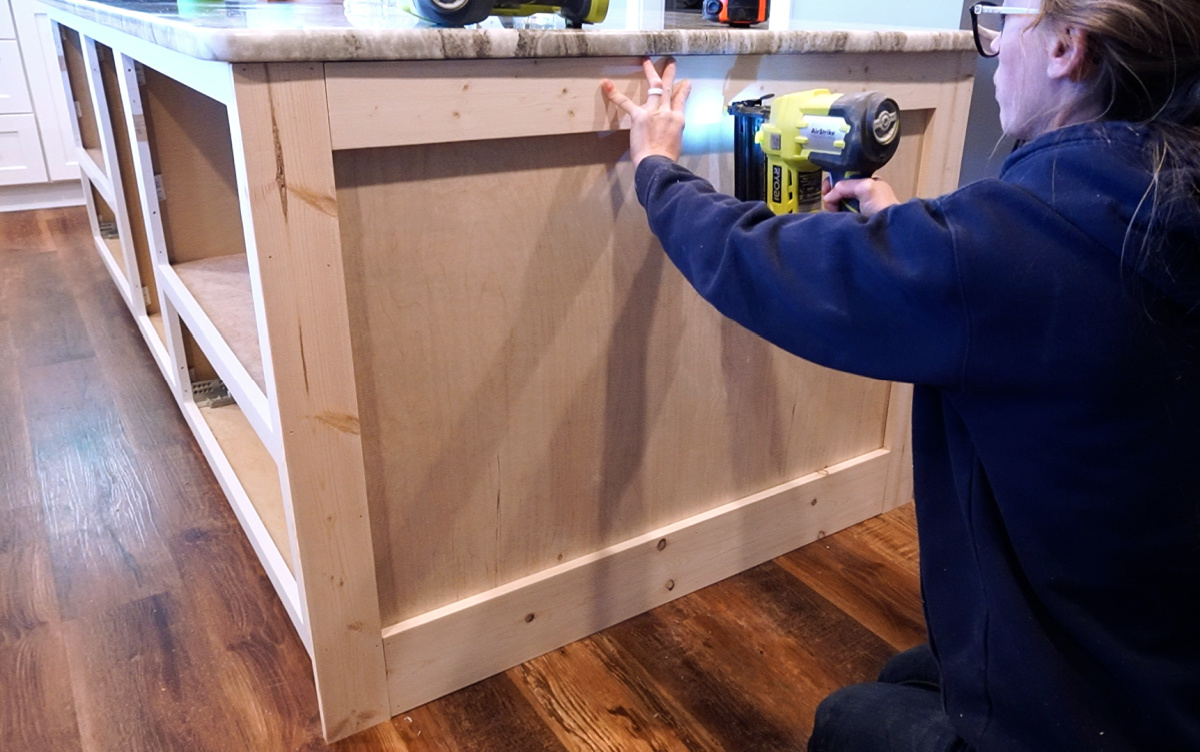
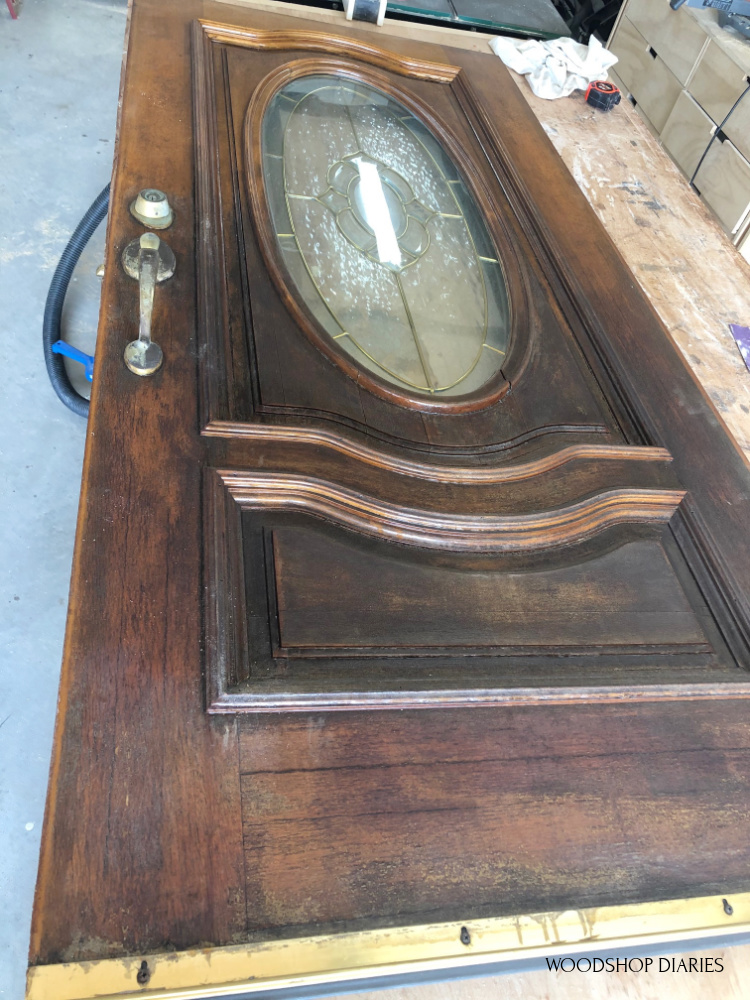
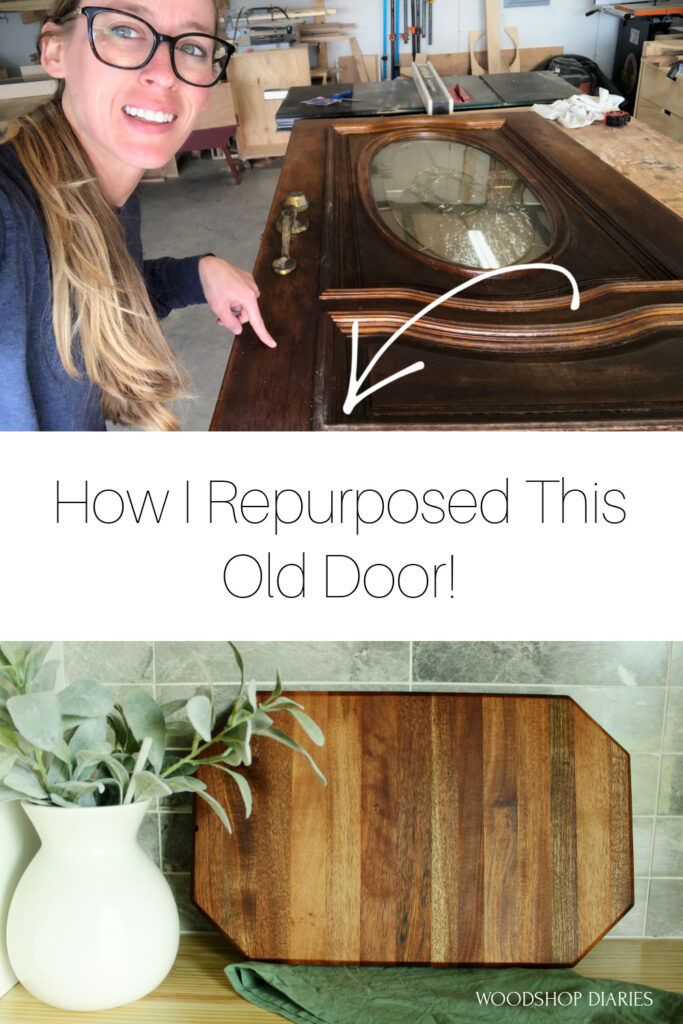
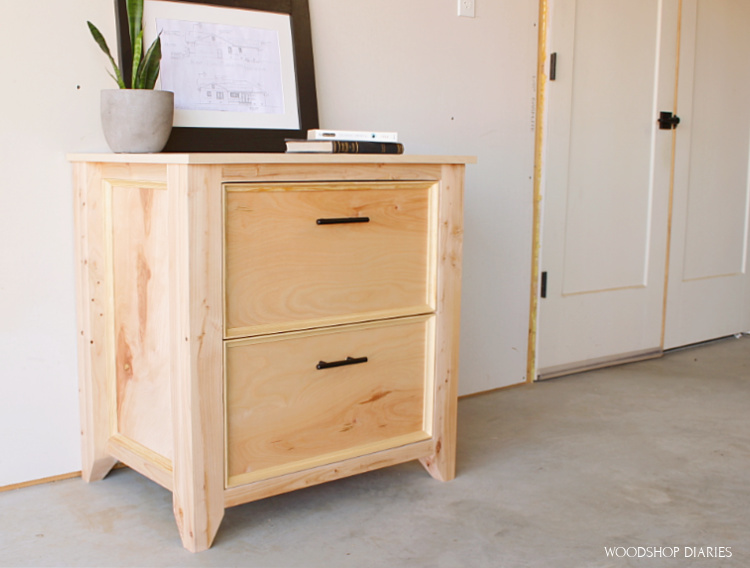
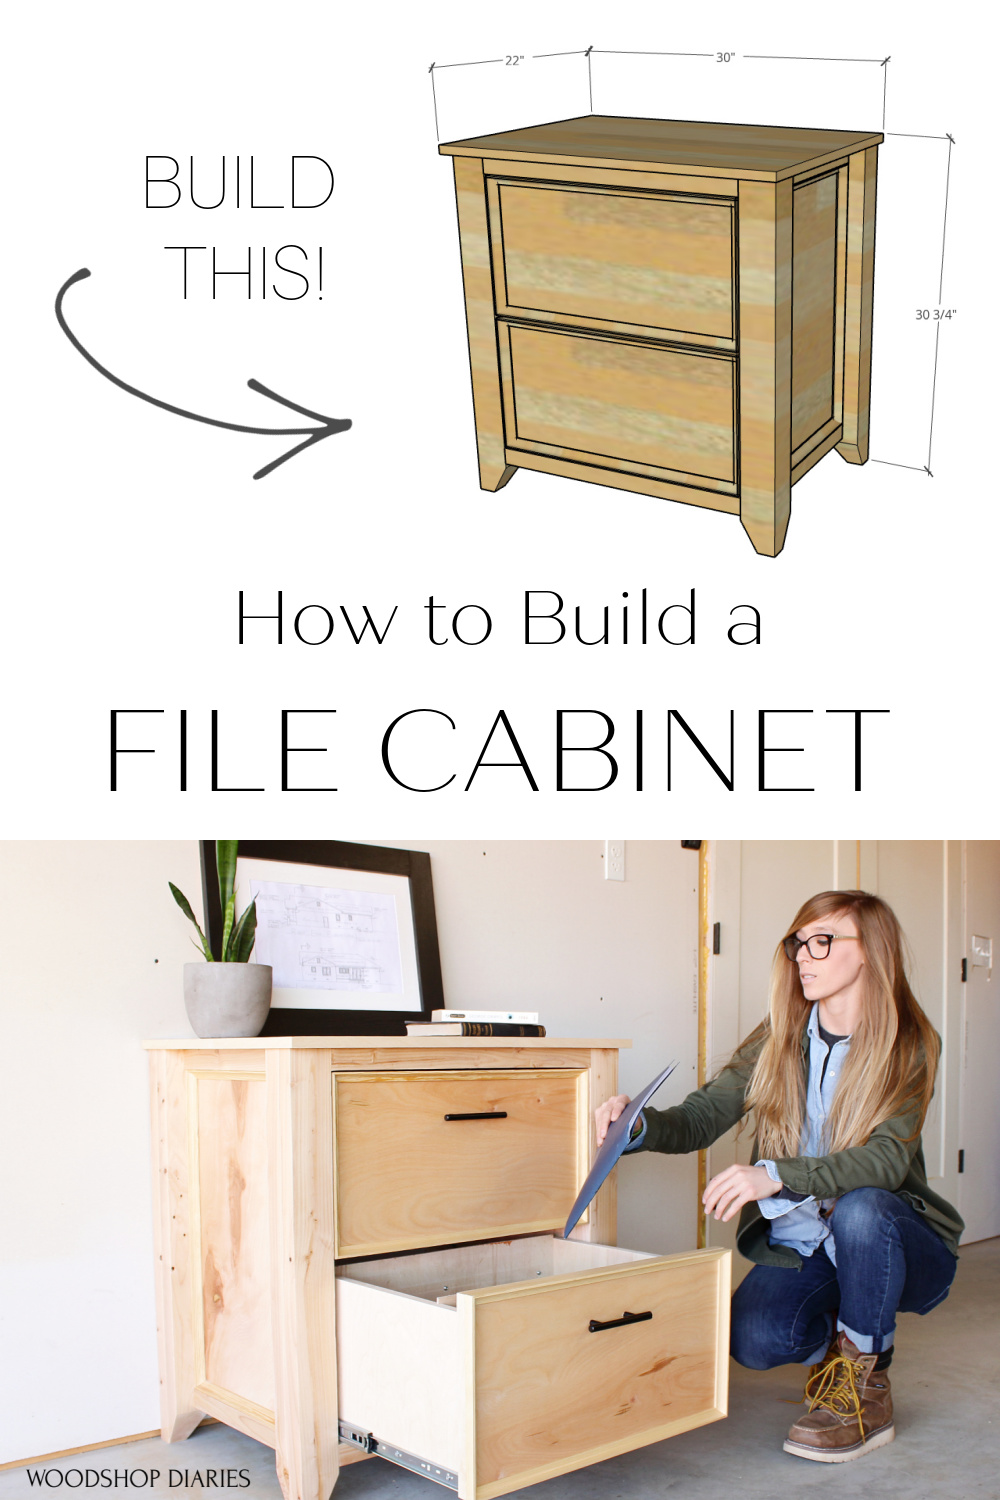
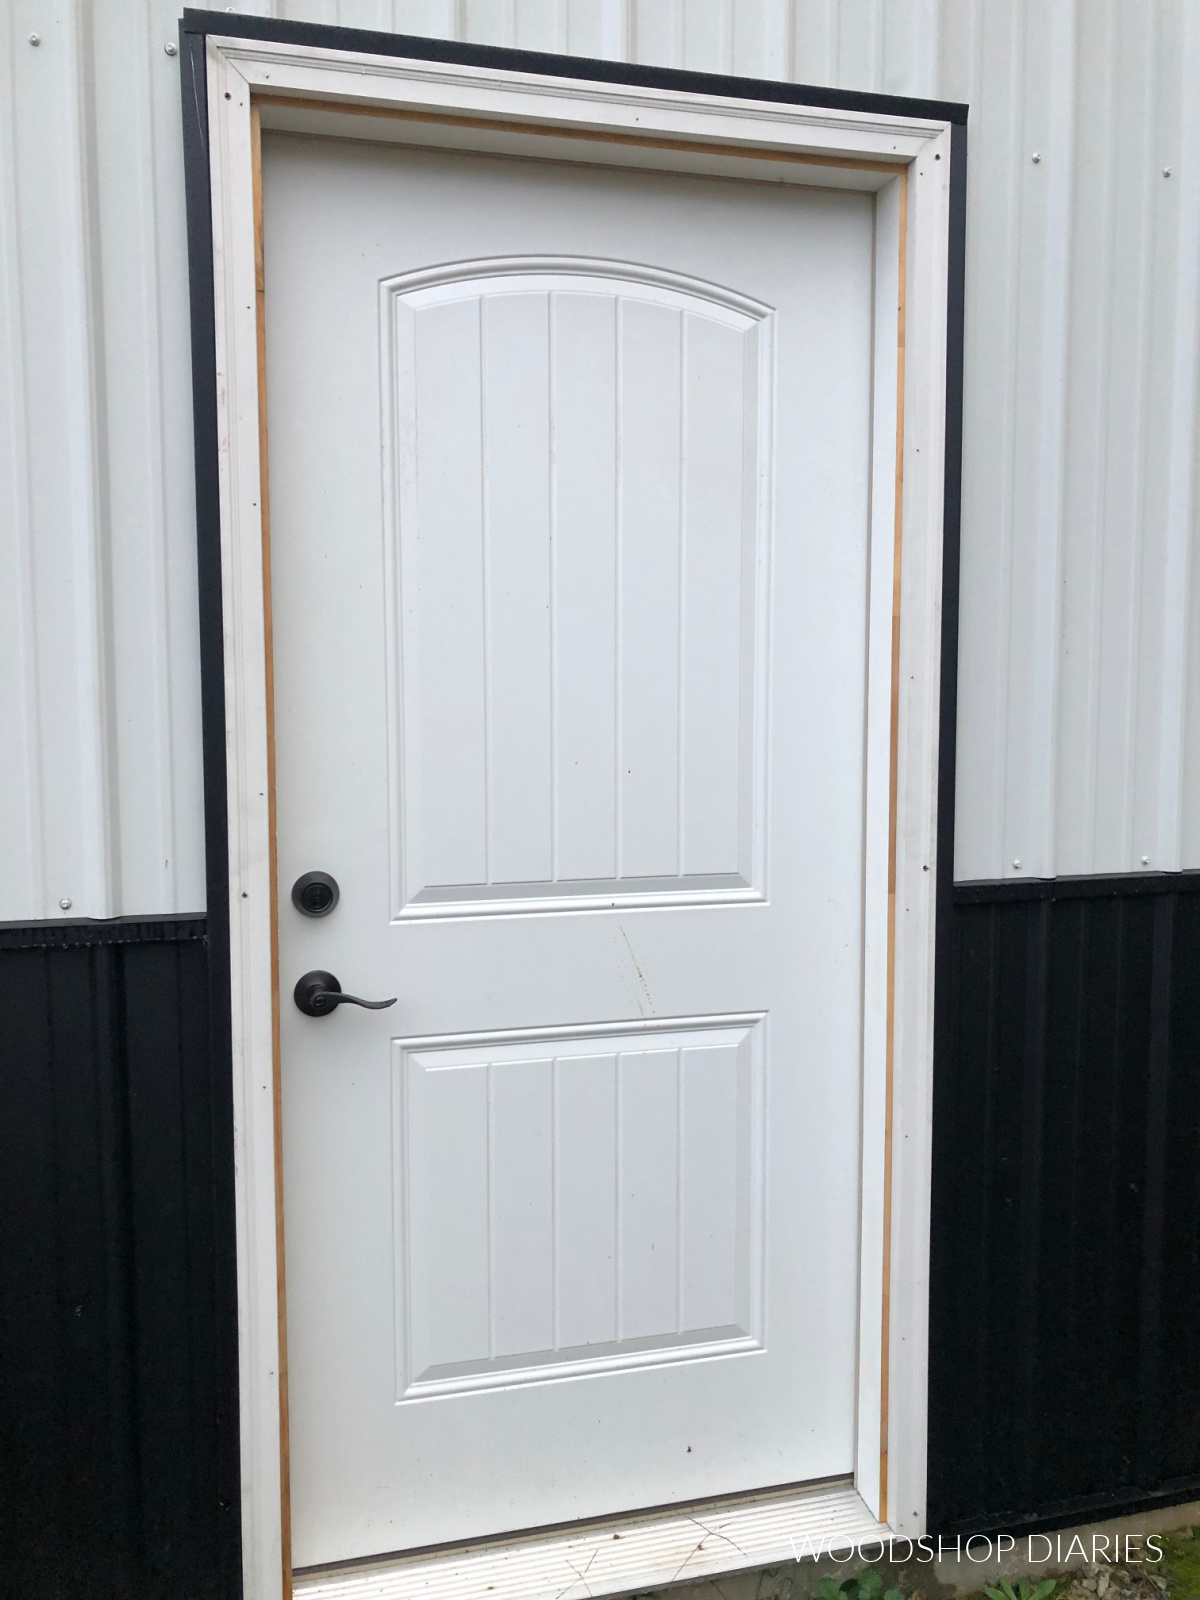
When we recently moved into a new home (and a new workshop!! Check out the video here.), I discovered that several of the exterior doors around the house and shop were installed leaving some exposed wood frame.

.

These doors really needed some color, but more than that, this bare wood needed to be properly sealed to protect it from the weather and eventual rot. 

.

Bare, untreated wood doesn’t last long outdoors, so the sooner these were protected, the less likely I was to be replacing a door sometime soon ha!

Bare metal and wood frame door unpainted--the before photo

So I took a few hours to prime and paint all the doors around the house and the new workshop and I’m sharing with you how I did it in this post.

What You’ll Need:

  • KILZ 3® Premium Primer 
  • High quality exterior paint (I used BEHR Ultra® Exterior in Graphic Charcoal)
  • (2) High quality paint brush
  • (2) 4” paint rollers and roller frame
  • Paint Trays
  • Painter’s Tape
  • Screwdriver
  • Cleaning supplies (I used 50/50 vinegar/water mixture and a rag to clean the door, but you can use whatever cleaner you prefer)

Step 1: Clean The Door

Before you do anything, you need to clean off the cobwebs, grime, mildew and all the other things exterior doors tend to collect over time.

.

It’s important to start with a clean, dirt and dust free surface.  This will allow the primer and paint to stick to the actual DOOR vs the dirt on the door…and it’ll prevent getting cobwebs and spiders in your fresh paint–YUCK!

Shara Woodshop Diaries cleaning exterior door prior to applying a finish

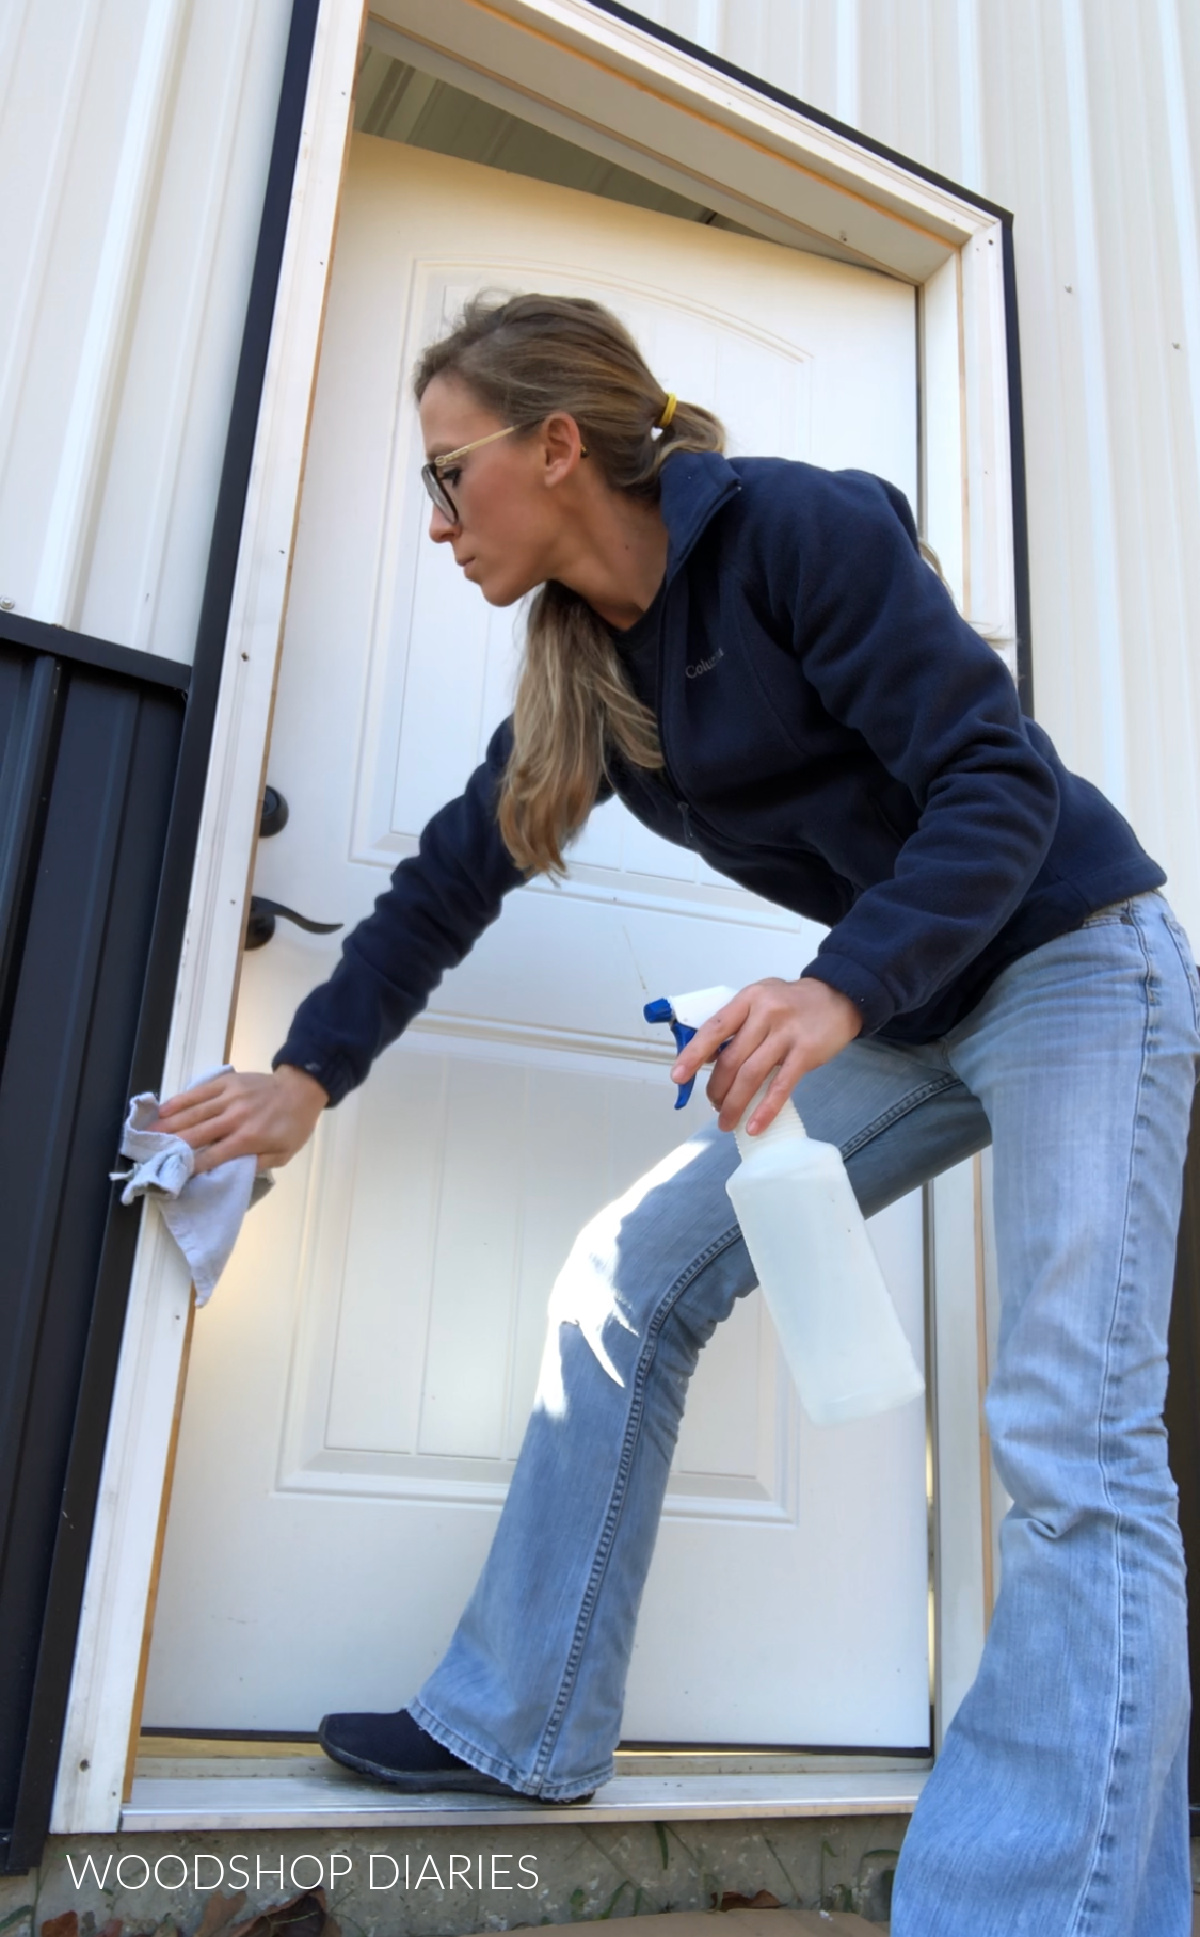
You can use whatever cleaner you prefer for this, but I like to keep it simple and just use a 50/50 vinegar/water solution and spray it all over the door and frame, then wipe it clean with an old rag.

.

Make sure all the mildew and mold is gone and that any existing rotten pieces are removed and replaced before starting.

.

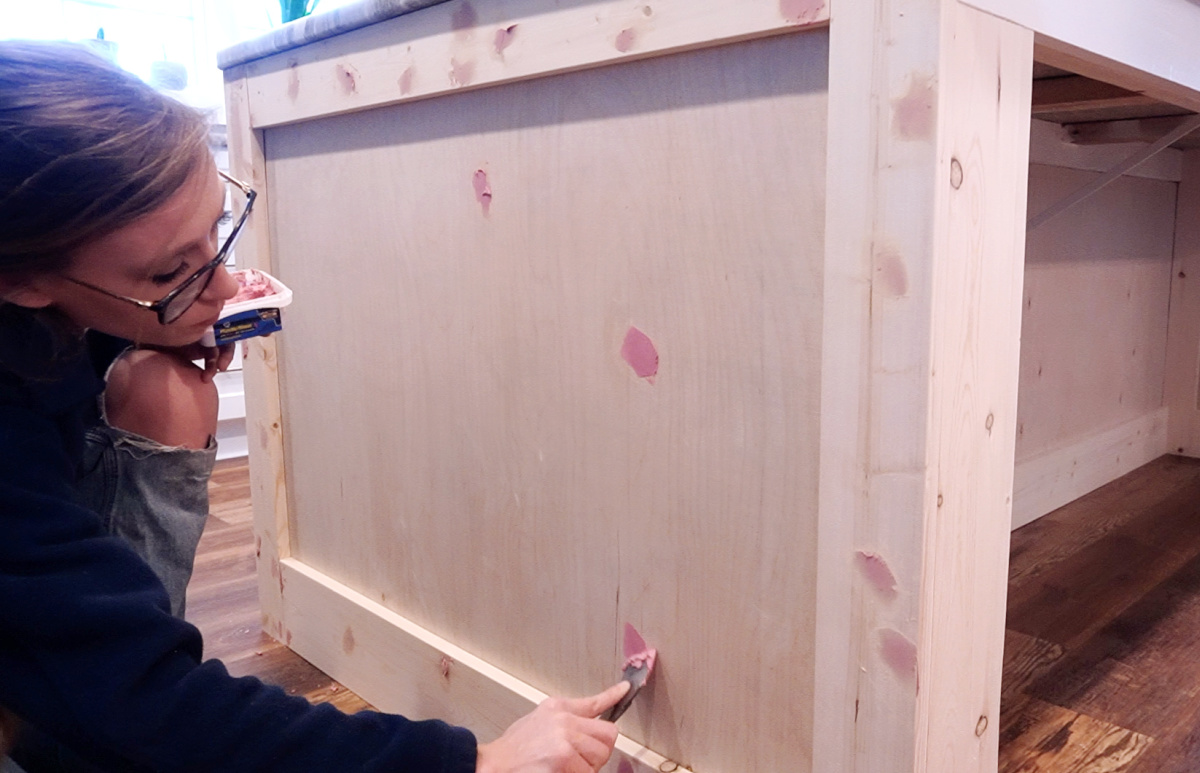
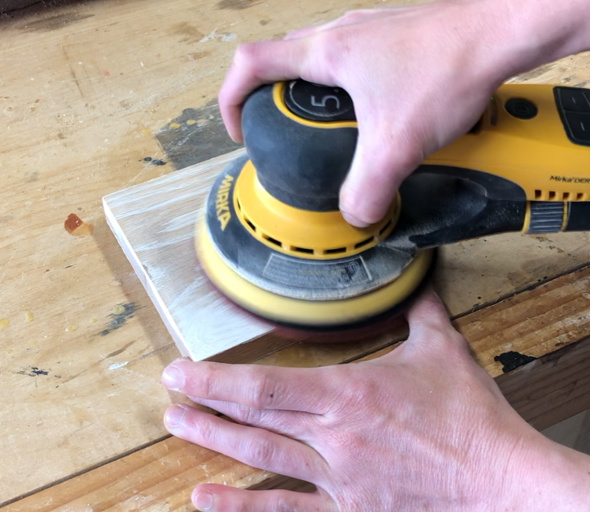
If your door already has some chipped or peeling paint, sand or scrub off any loose paint. You can hand sand with 120-220 grit paper to remove/smooth things out.

.

Painting over loose paint will just make your loose paint thicker. You need to remove any loose pieces and smooth out any chips so that your primer and paint have something solid underneath to adhere to.

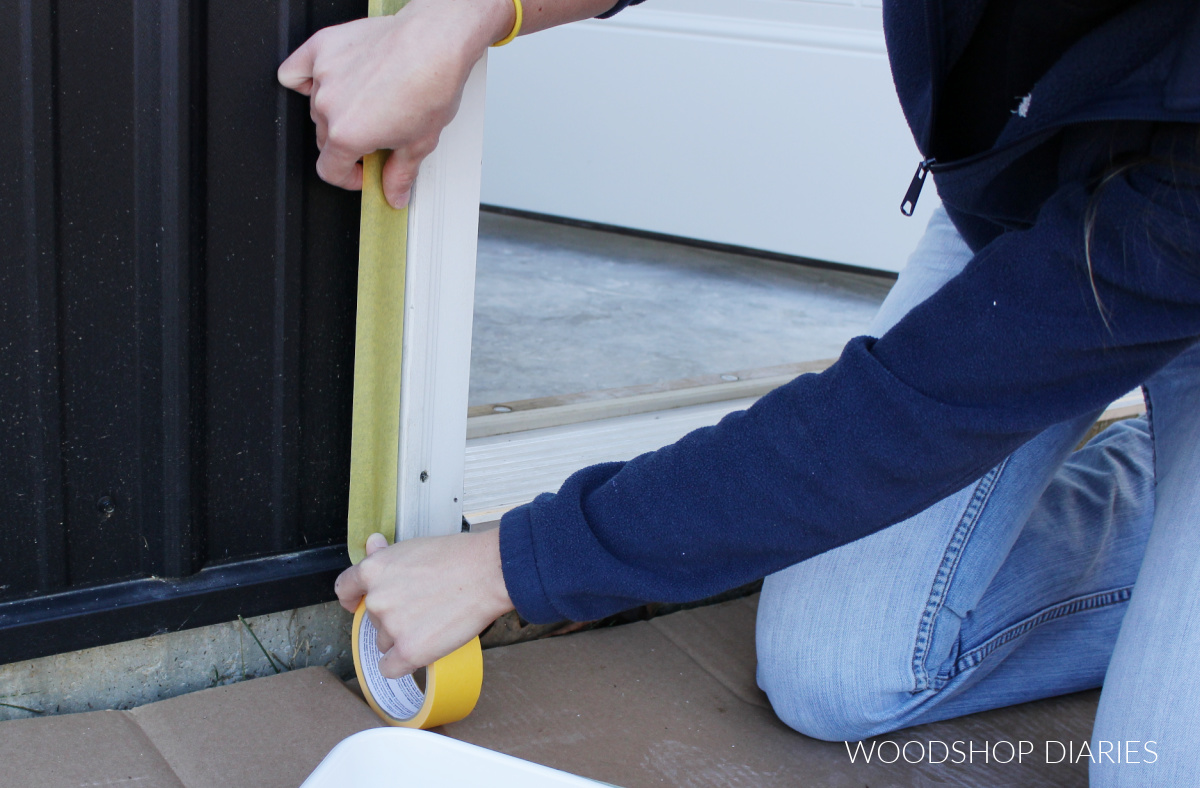
Step 2: Tape Off Door and Hardware

Use painters tape to tape off around the outside of the door frame, around any windows, trim, or thresholds you do not wish to paint.

Shara Woodshop Diaries taping off around door before painting

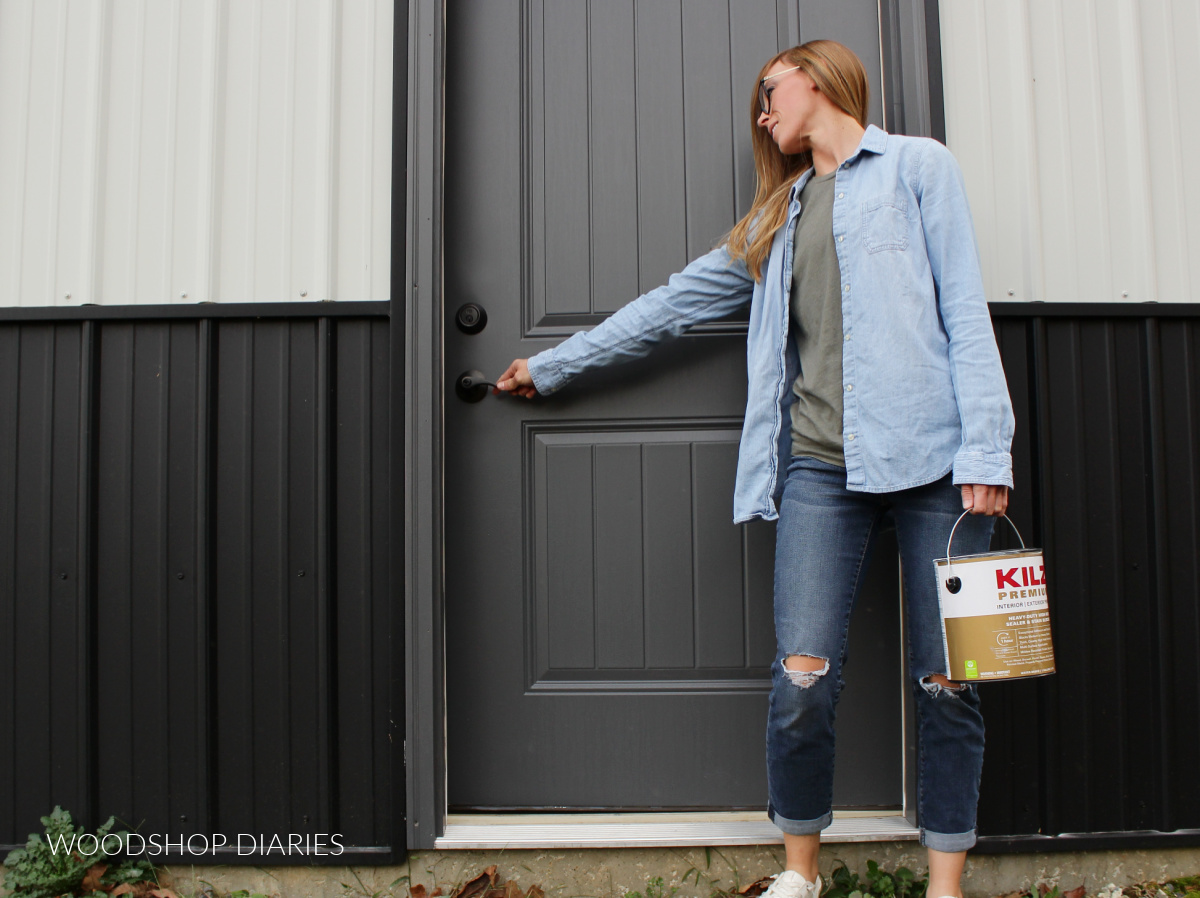
You can either tape around the door handle and deadbolt OR simply remove it by removing the two screws on the inside of the door on each one.  

Close up of exterior door hardware deadbolt

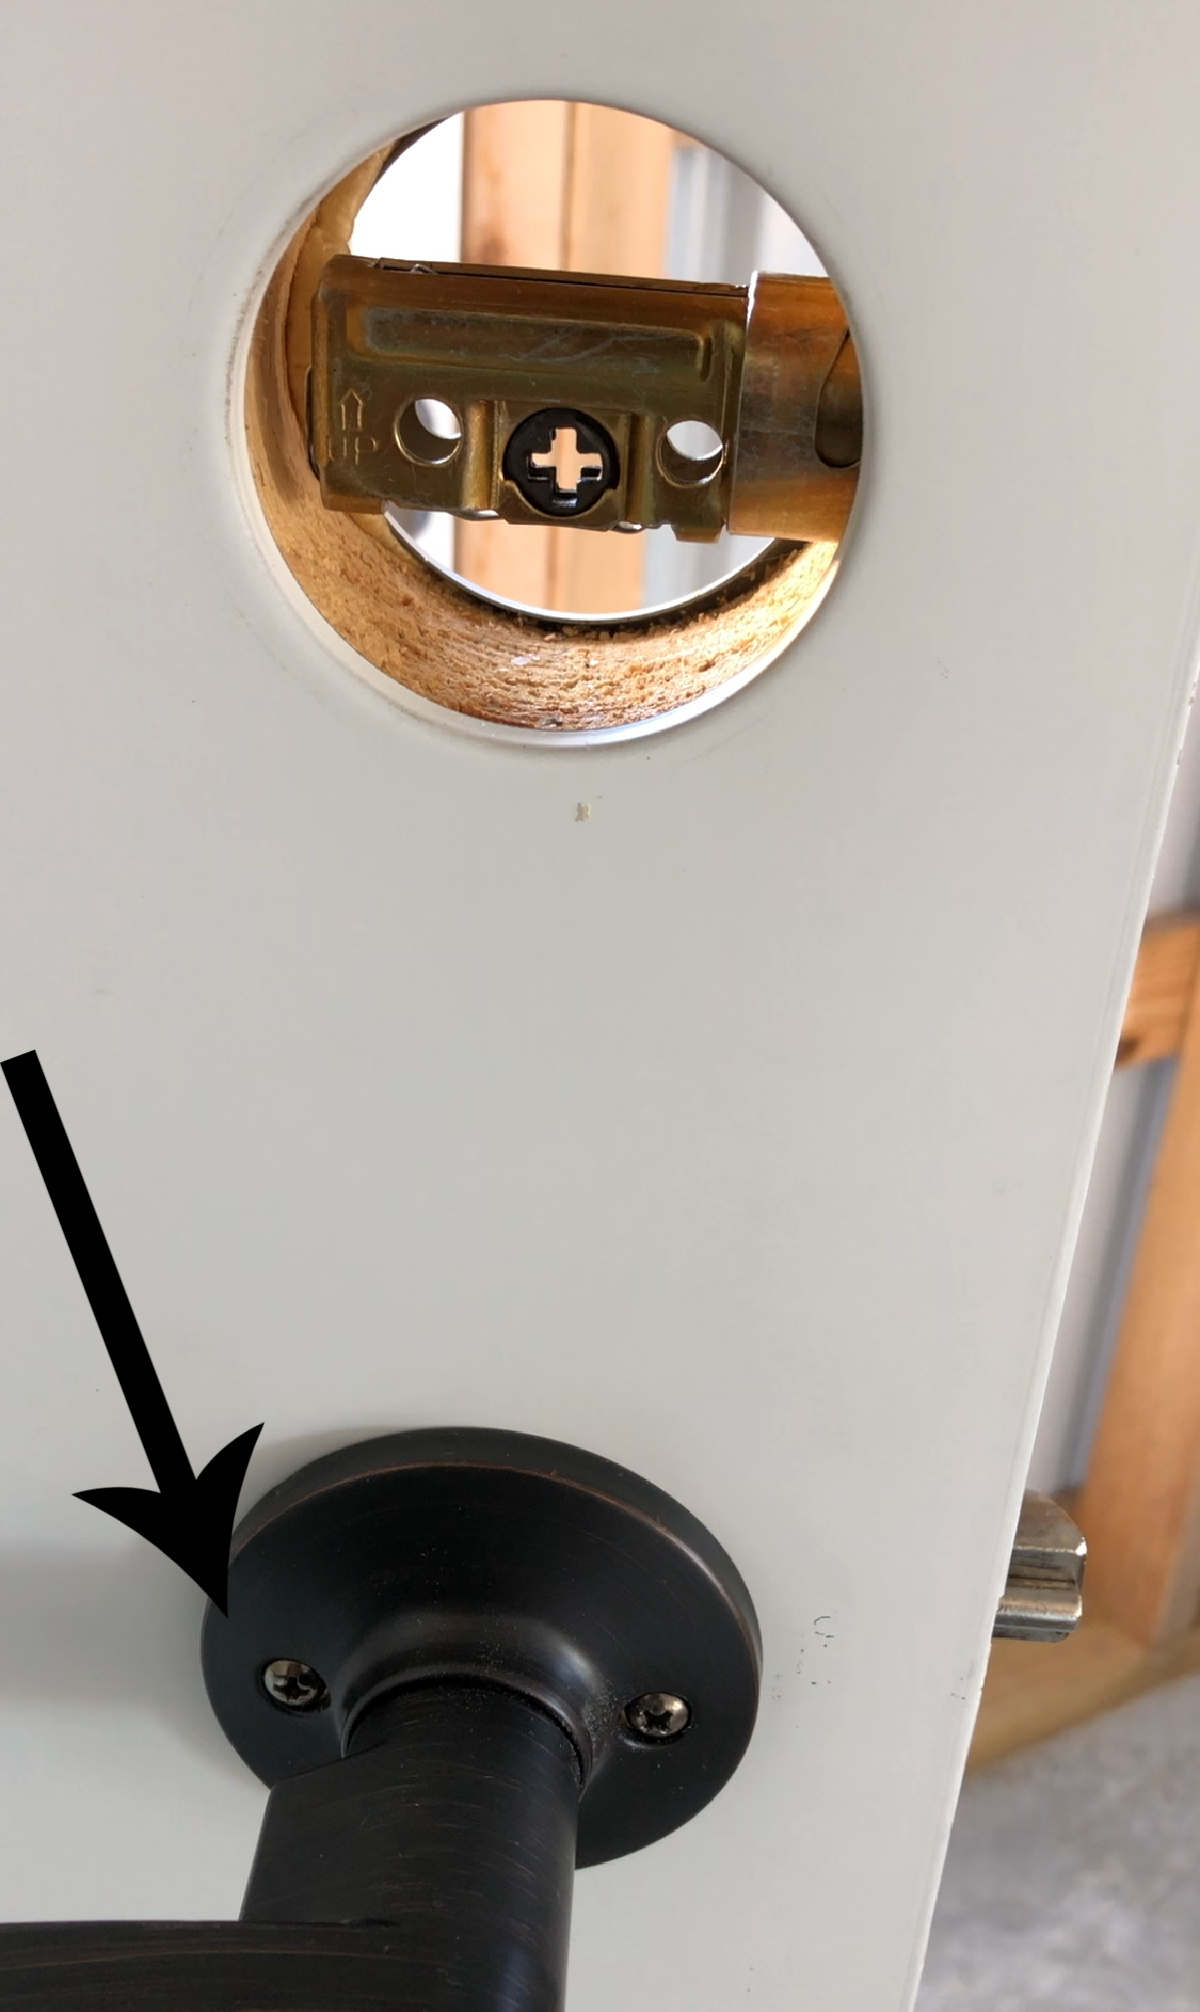
I have found it much easier and cleaner to simply remove the handle and lock.  It only takes about 2 minutes and a basic phillips head screwdriver to remove and replace it once you’re finished painting.

.

Tape over the weather stripping on the door frame–OR you can just be careful not to paint it in the next steps. It’s probably easiest to tape over it, though.

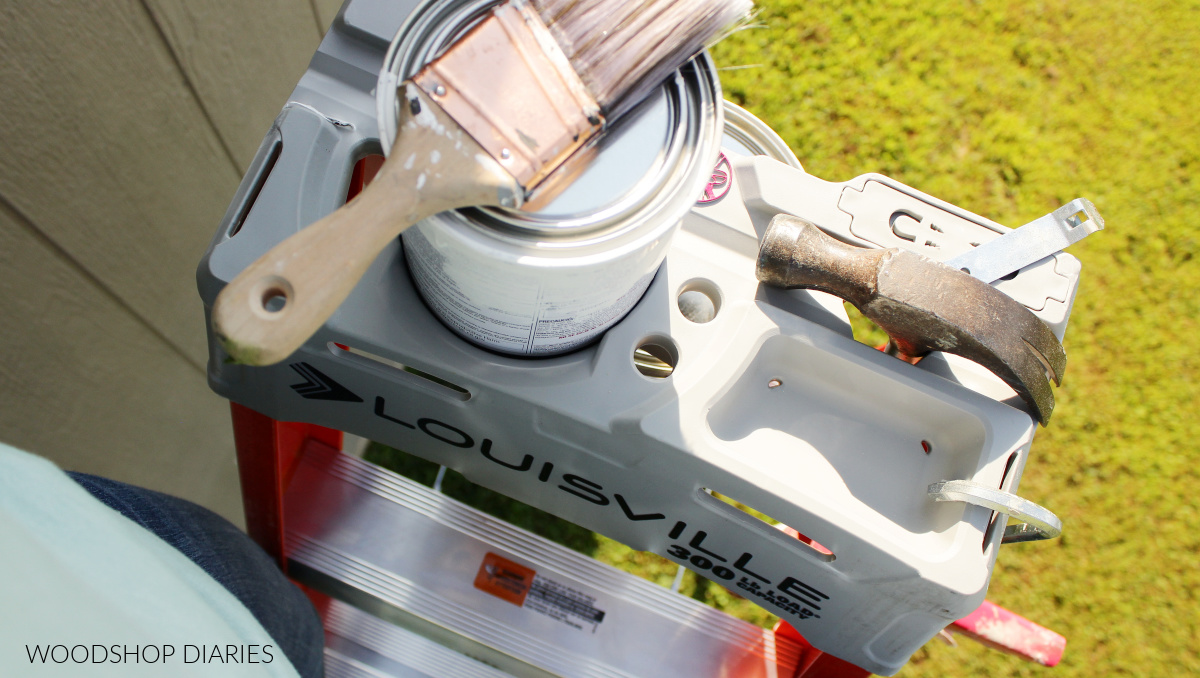
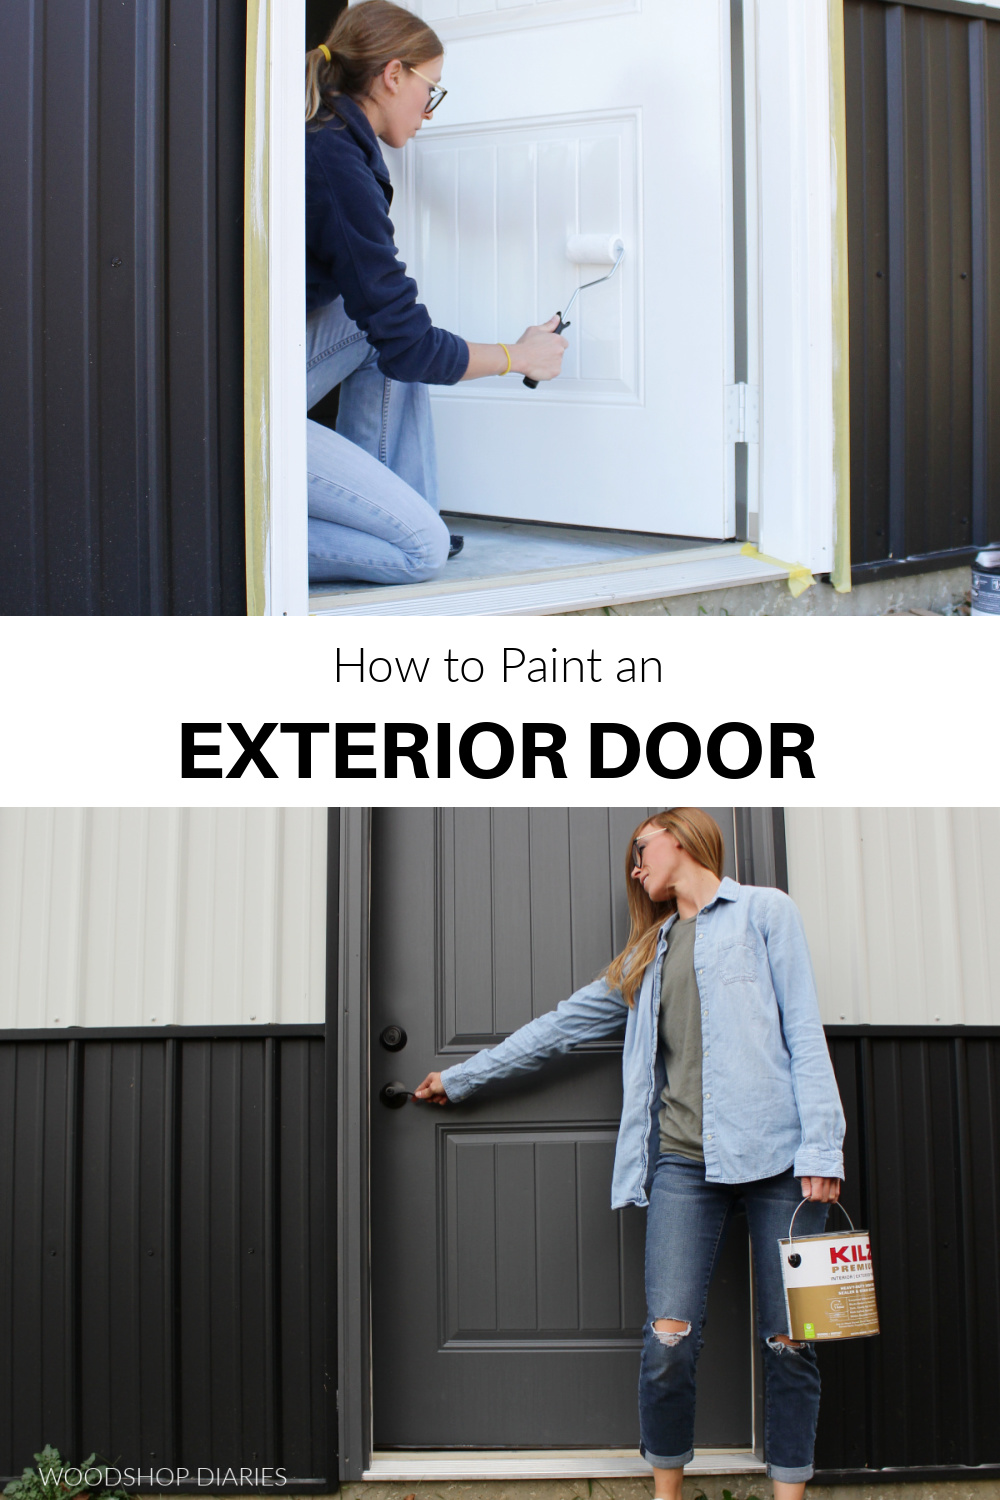
Step 3: Prime the Door

Let me be clear here, DON’T SKIP PRIMER…especially on outdoor paint projects.

.

Most exterior doors are made from smooth surfaces (like metal or fiberglass) so it’s difficult to get paint to stick very well.

.

And most exterior doors also have wood frames. Wood is porous and when left outdoors unprotected, can tend to grow mold and mildew quickly.

.

Primer can help solve both of these problems if you use the right kind. When painting an exterior door and frame, you want a heavier duty primer.

Shara Woodshop Diaries pouring KILZ 3 into paint tray to paint exterior door

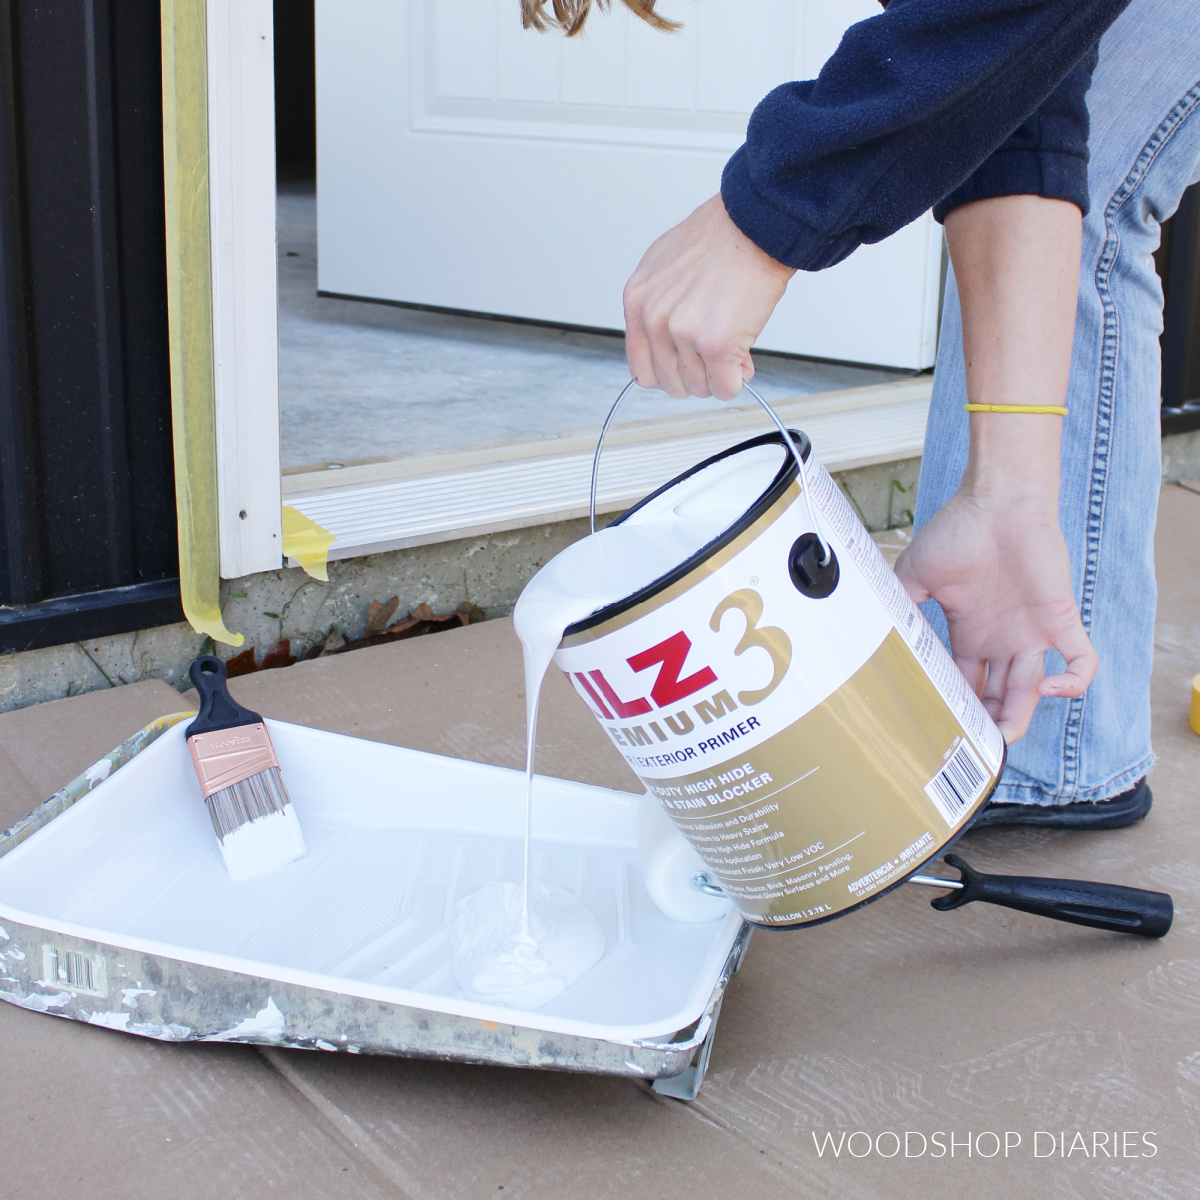
In this case, I opted for using KILZ 3® Premium Primer because it has excellent adhesion when working with smooth surfaces, and it’s mildew resistant to protect my wood door frame in moist conditions.

.

This formula is thick, goes on smooth and is easy to apply with both a roller and/or high quality brush.

.

I like to paint the frame first with a brush, then go around the details on the door.

.

NOTE: DO NOT PRIME/PAINT THE WEATHERSTRIPPING. The inside of the door frame where the door shuts and seals will have some rubbery, flexible stuff called weather stripping. You can tape over it before painting or just be careful not to paint while brushing.

.

But don’t paint over it. Painting over it can cause it to not flex and seal properly which can cause air/water leaks where the door meets the stripping.

.

I use a brush first in the detailed sections, then I use a roller on the flat surfaces to make things go a little quicker. (You can see this a little better with the paint picture in the next step–this white primer blends in with the white door.)

.

I roll the vertical sections first, then the horizontal sections.  Lastly, I roll over the middle, more detailed sections.

Shara Woodshop Diaries using paint roller to roll primer on door

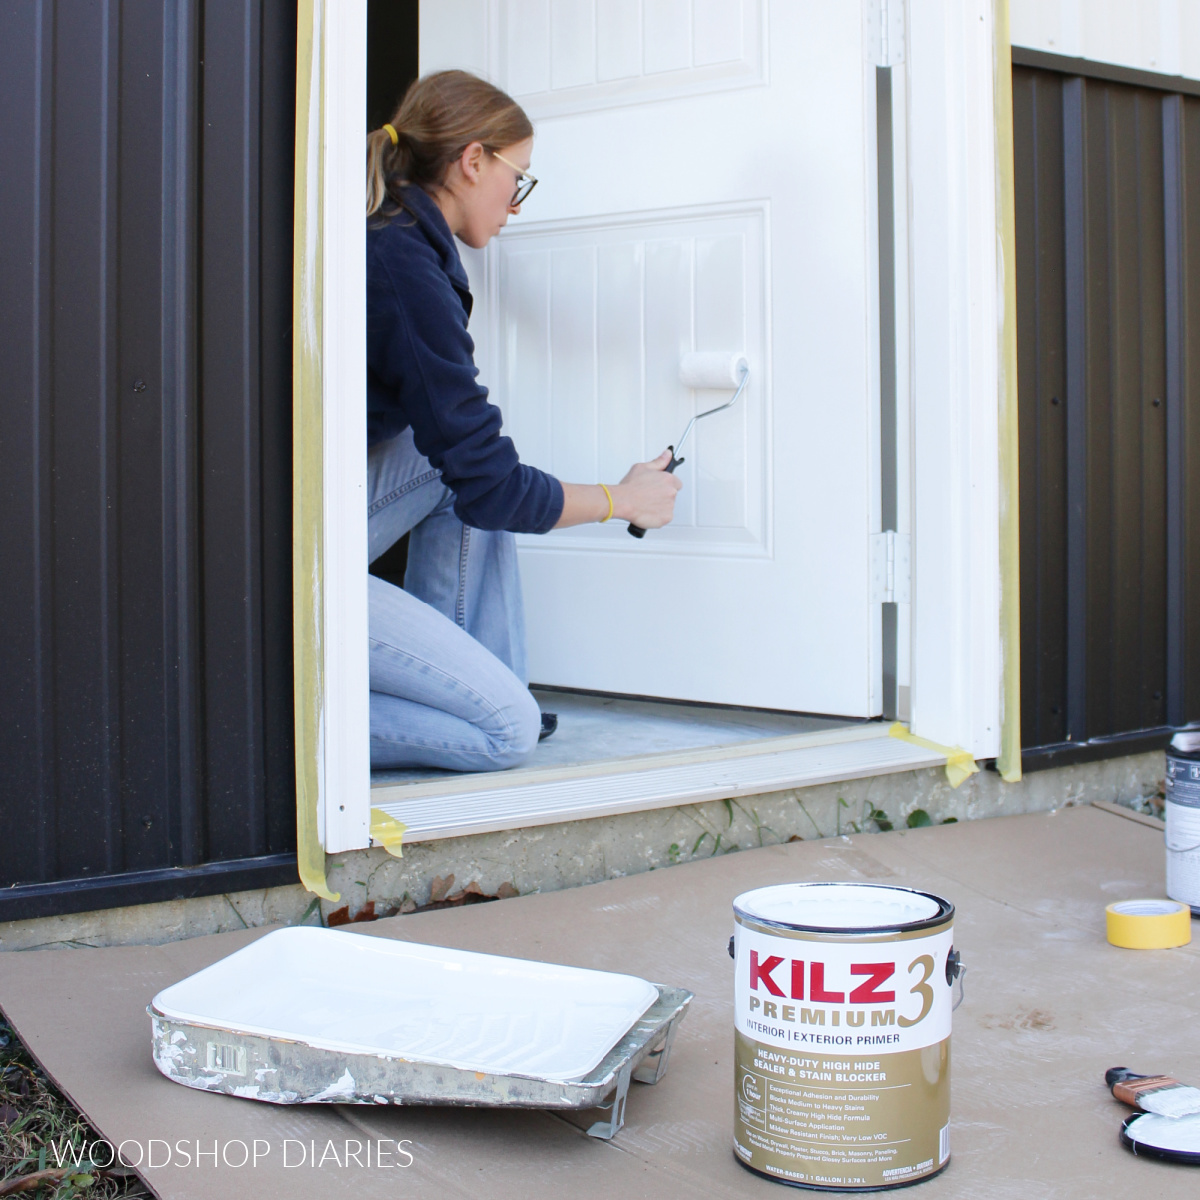
Apply a good coat of KILZ 3® primer over the entire surface you wish to paint.  Allow to dry according to the instructions on the can.

.

Once it’s dry, if you see any stains or spots that look like they’re peeking through, you can apply a second coat on top.

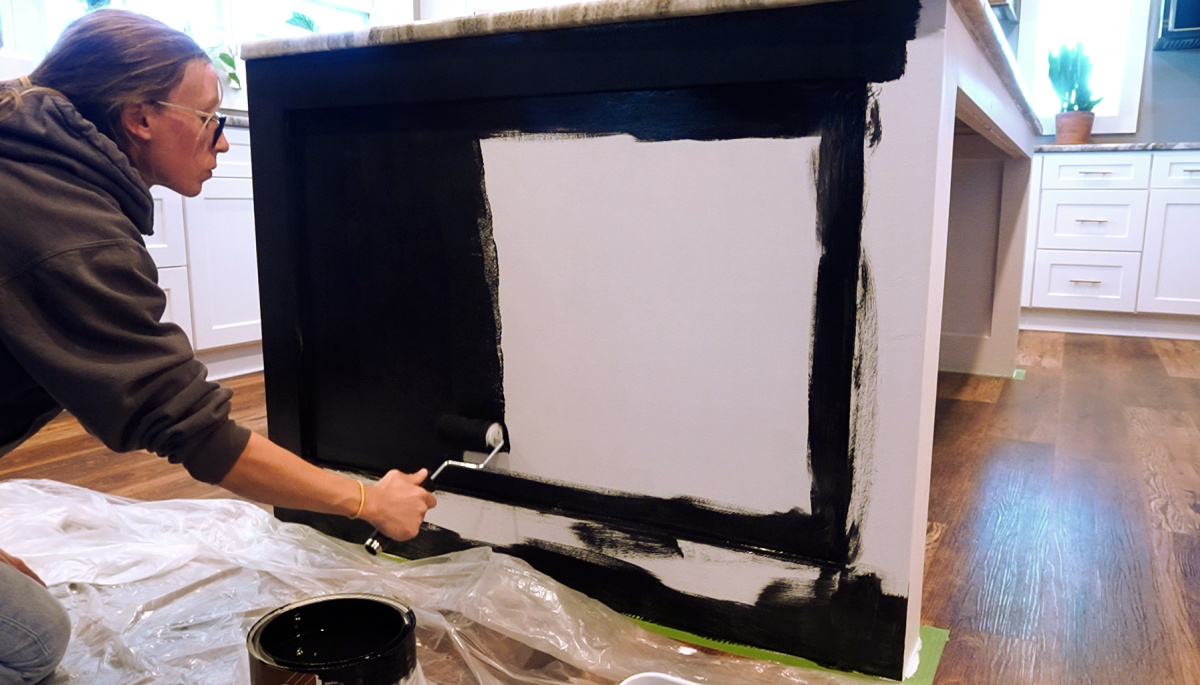
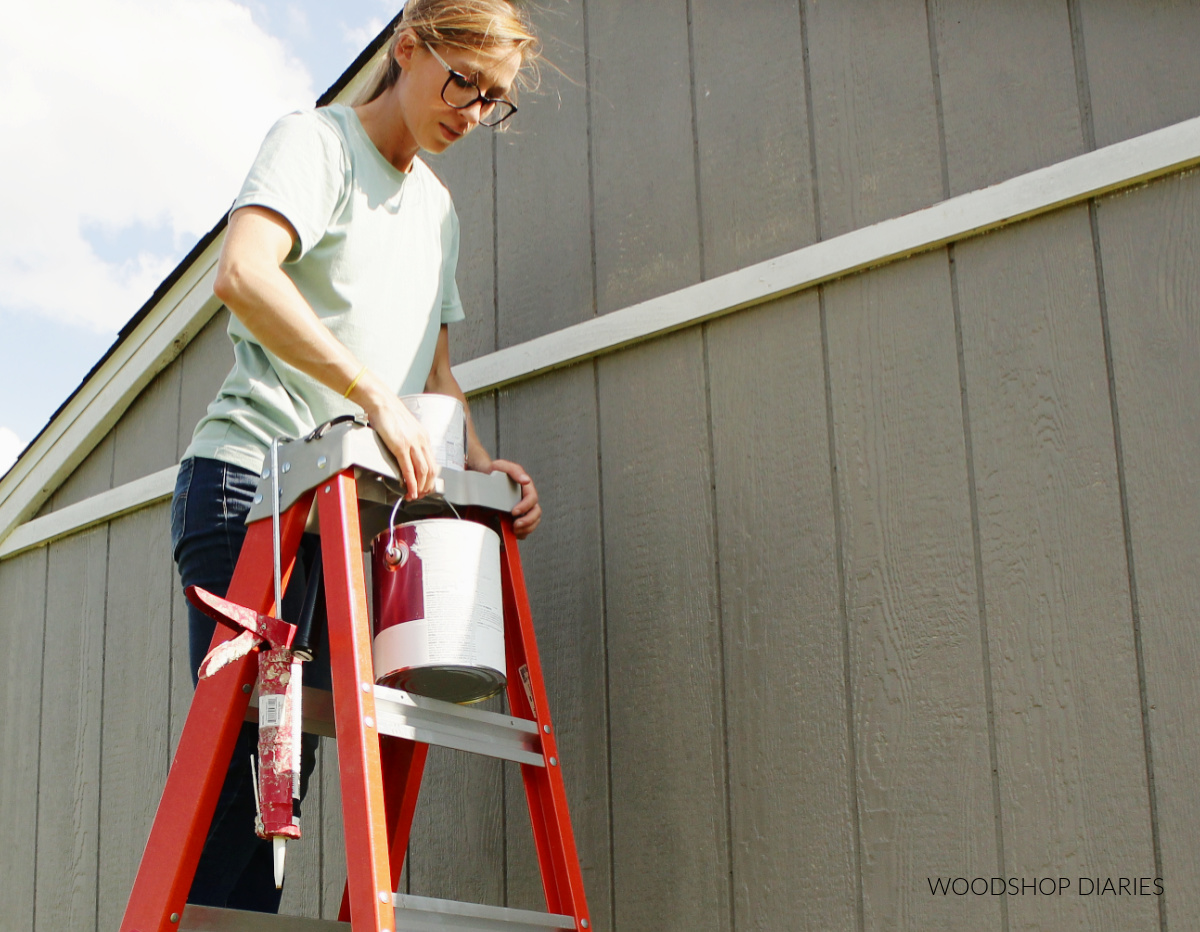
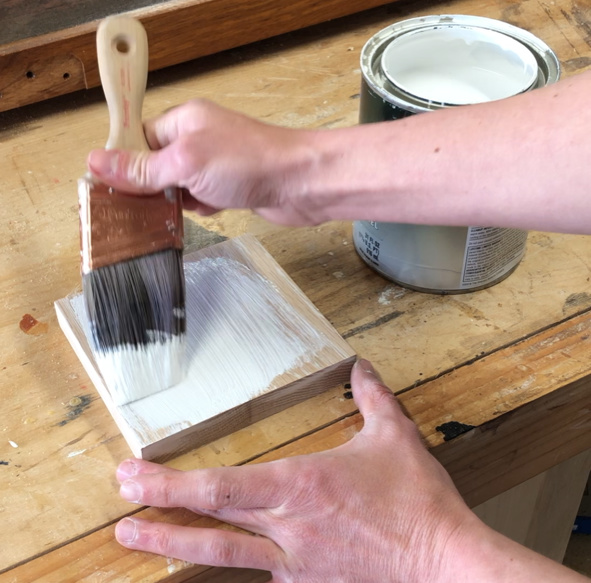
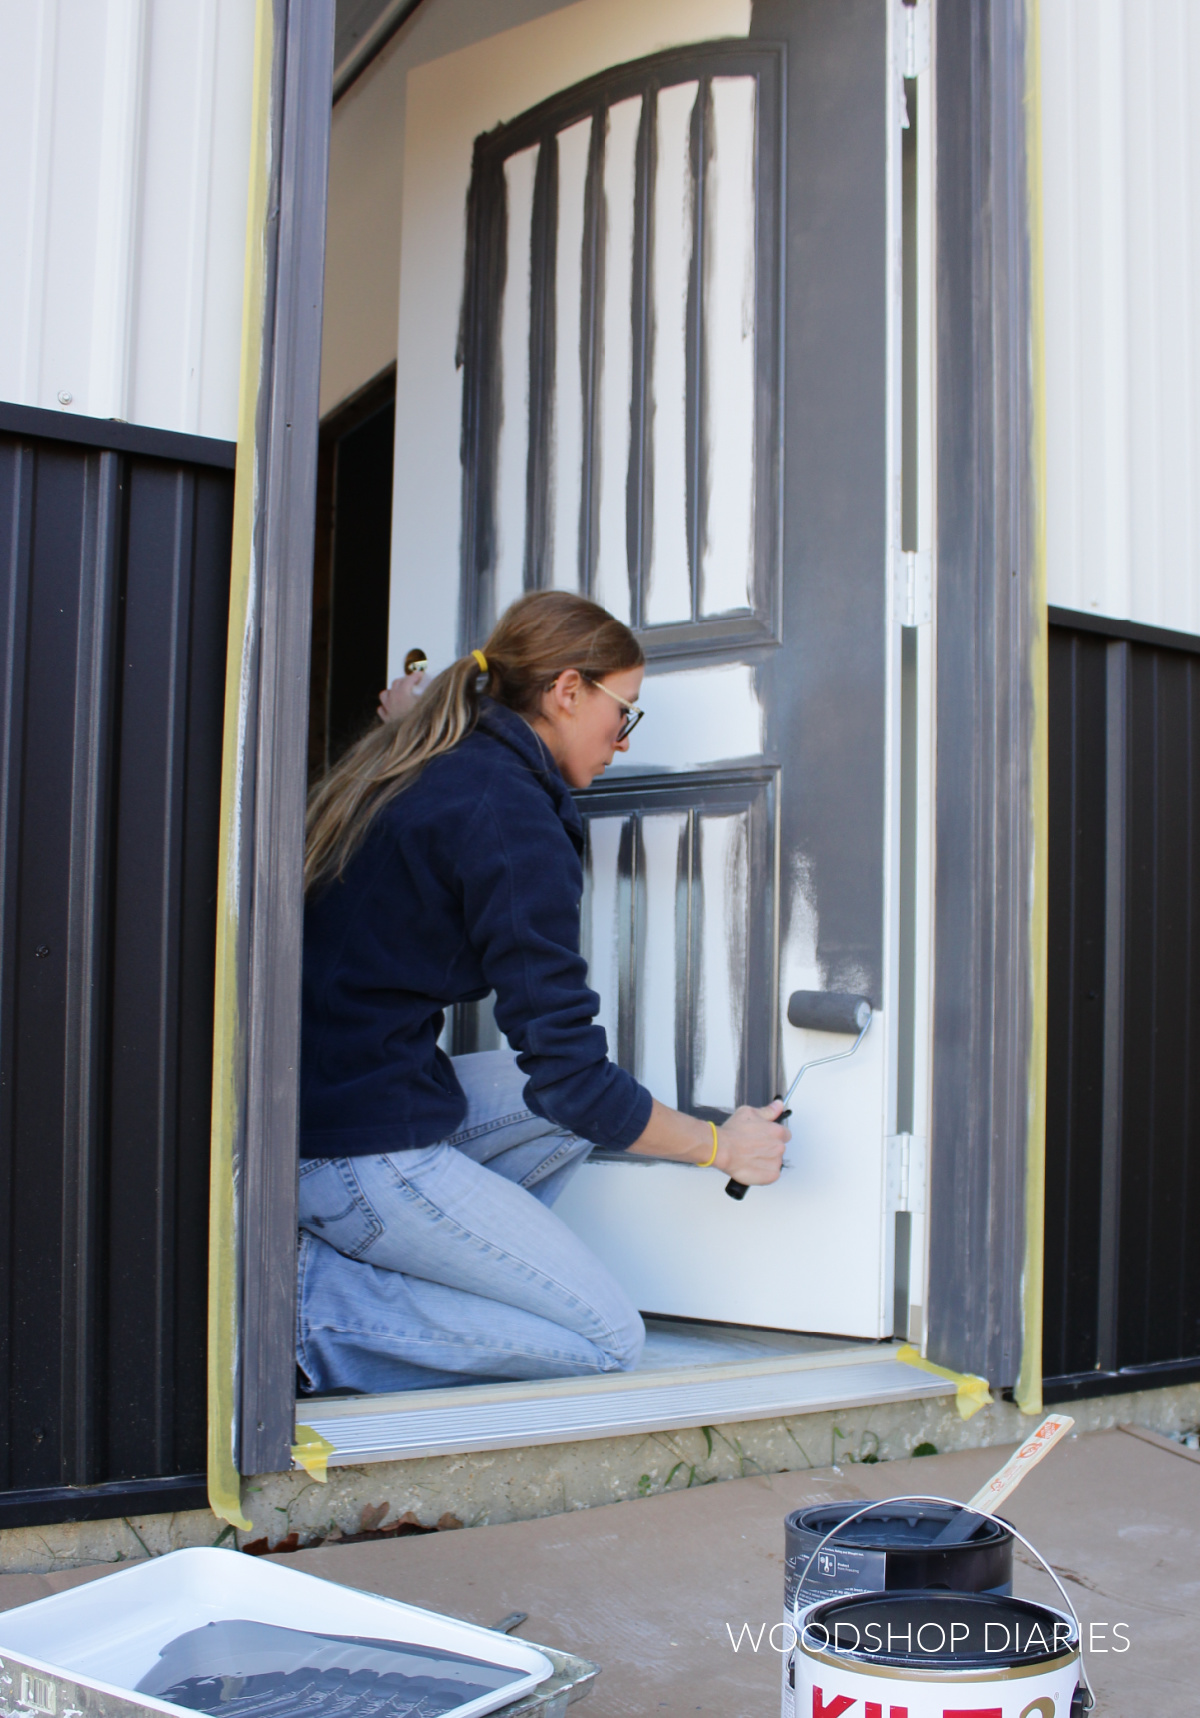
Step 4: Paint the Door

Once the primer is good and dry, you’ve laid the foundation for a proper paint coat. 

Shara Woodshop Diaries pouring paint into paint tray

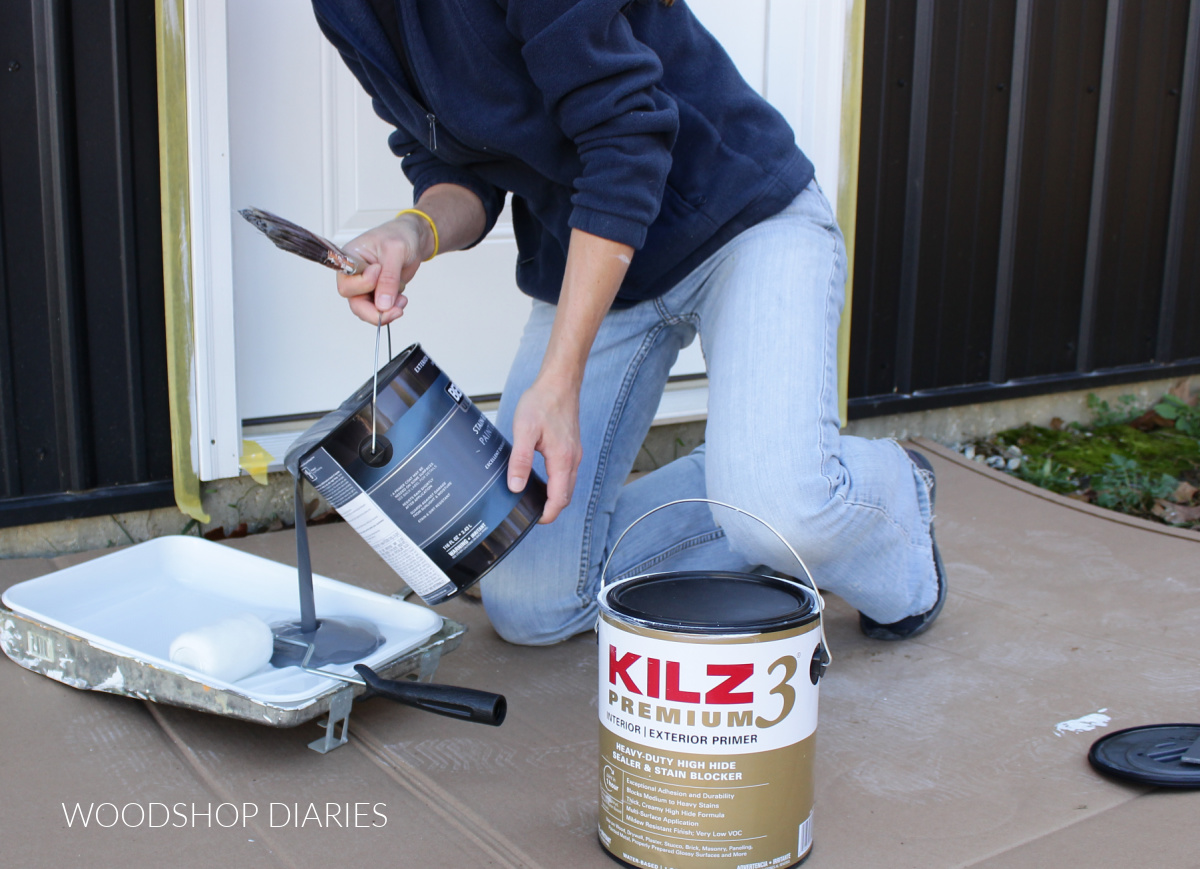
Apply at least two coats (I don’t care if the can says it only takes one coat–it takes at least two, trust me) of a high quality exterior paint to the door the same way as the primer.

.

In this case, I used BEHR Ultra Exterior in Graphic Charcoal to compliment my black and white exterior.

Shara Woodshop Diaries using paint roller to roll paint onto exterior door

Make sure to cover over anywhere you primed, let dry completely, then replace the handle and lock hardware and you’ve just sealed, protected, and “dressed up” your exterior door!

.

Painting exterior doors is not only something that adds some beauty to your curb appeal and home, but it’s an important maintenance task that will give your door a long life and prevent larger issues of rot or mold from settling in.

Shara Woodshop Diaries holding a can of primer and reaching to open freshly painted grey door against black and white metal building

But before you paint anything, don’t skip the primer.  Every project is worth using KILZ® Primer for long lasting, and smooth results.

.

If you’re getting ready to paint, check out this link for information and options for both paint and primer for your next project! 

Pinterest collage showing Shara rolling primer onto door at top and standing against finished door at bottom with text "how to paint an exterior door"

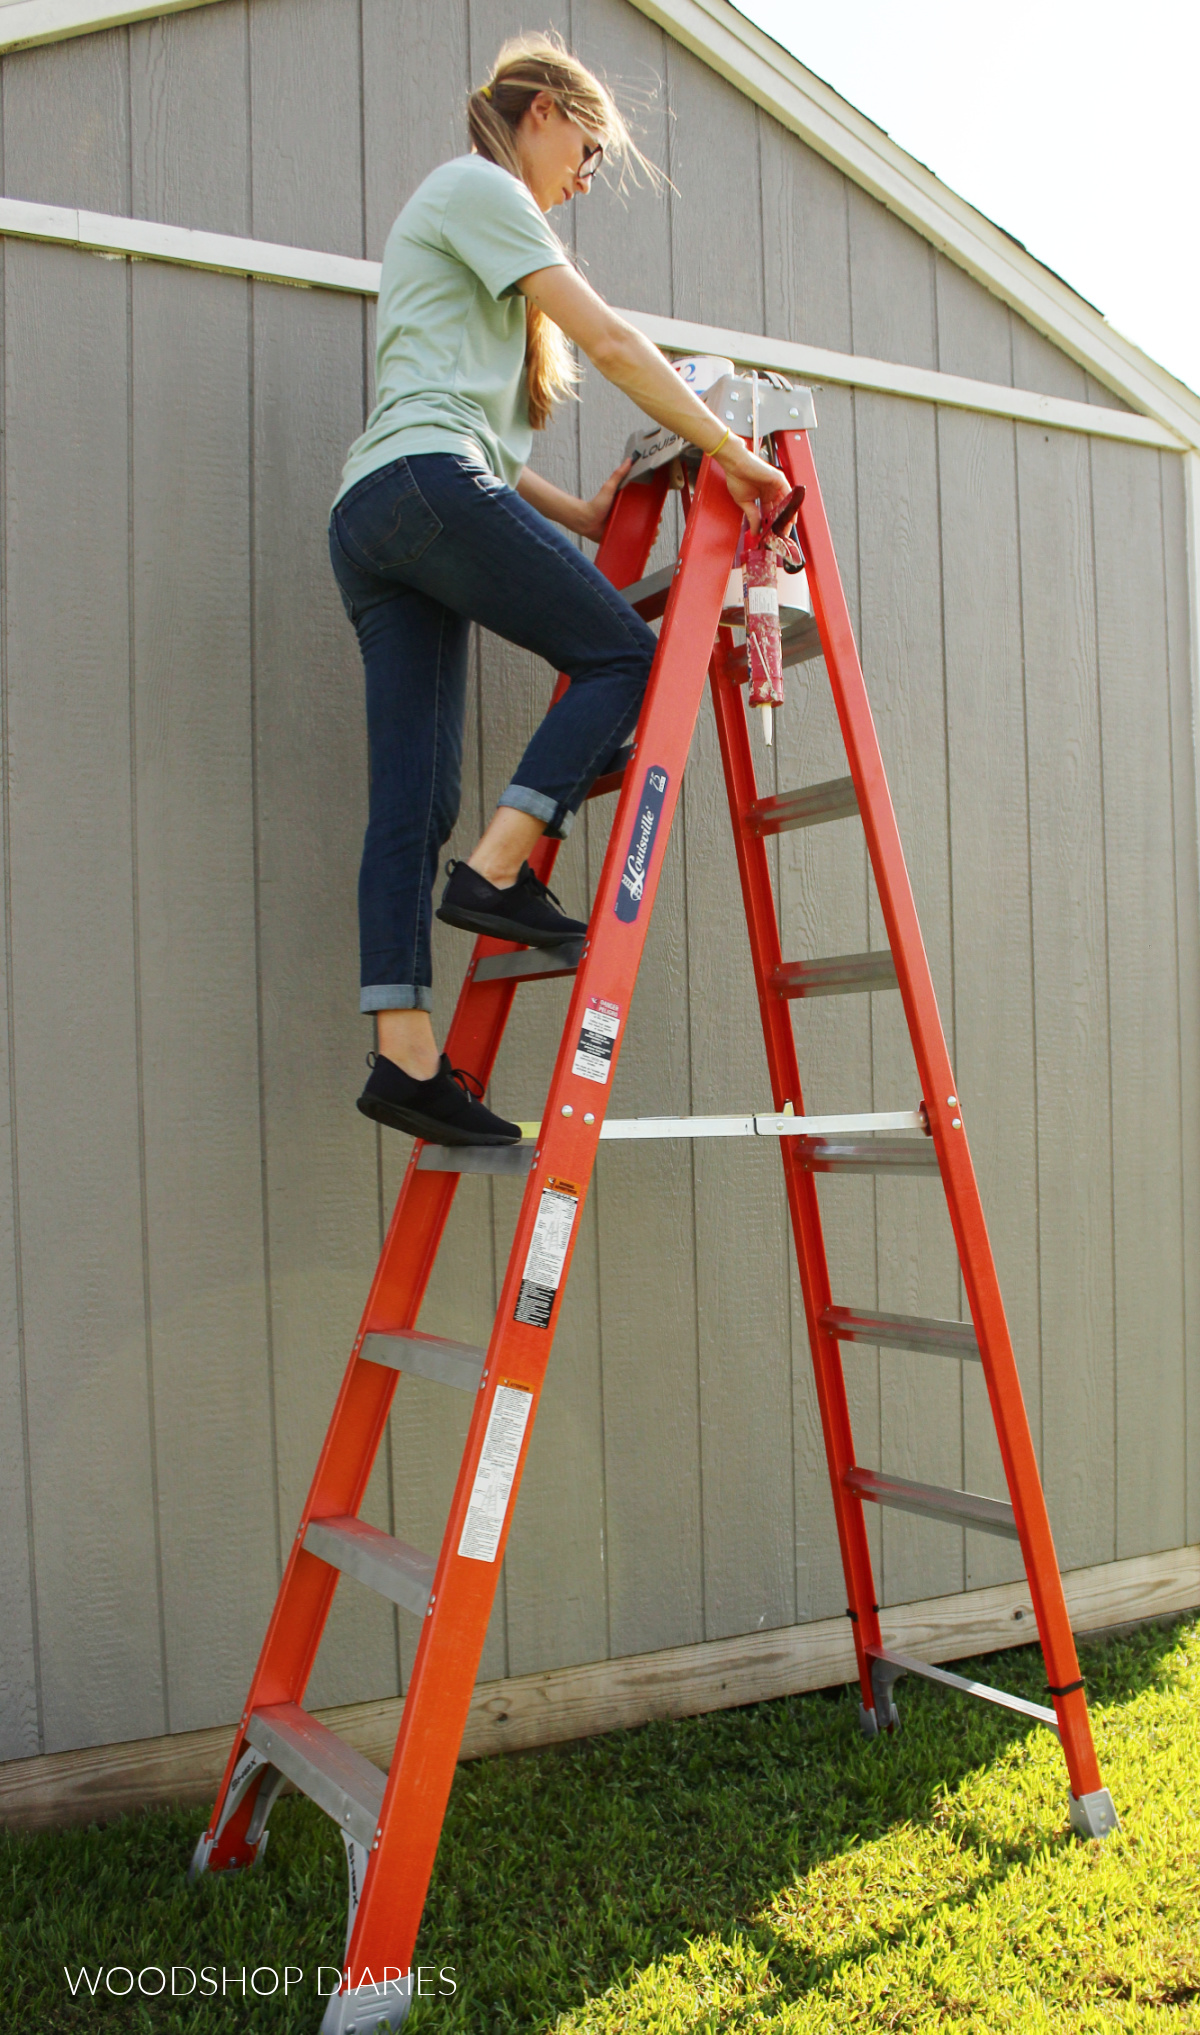
I can’t wait to show you more projects in and around my new workshop and home, but at least for now, the entry doors are ready to weather the…uh, weather, and I’m excited to hop inside and get to work!

Until next time, friends, happy building! 🙂

DIY Kitchen Island Makeover

November 13, 2021 by Shara, Woodshop Diaries

In this post, I’m sharing how I transformed our existing kitchen island into a functional and modern focal point with this DIY kitchen island makeover.

**This post is sponsored by DAP Products. This post also contains affiliate links.  See website policies for details.

Shara pushing wicker barstool up underneath black kitchen island in white cabinet kitchen

If you know me very well, you know I don’t do a lot of makeovers, repurposing or refinishing projects.  I prefer to start my projects from scratch.

.

However, there are times when that doesn’t make a lot of sense—like in this case when I already had a massive kitchen island with a granite countertop that I didn’t want to take a chance on breaking in order to remove it.

.

So this post will be a little different since I’m going to show you how I tackled this DIY kitchen island makeover and demoed, rebuilt, and refinished our existing kitchen island from this…to that.

Before and after comparison of kitchen island makeover

Check out the full video to watch the entire transformation, and check out the written step by step below:

Tools and Materials Used to Makeover this Kitchen Island:

Tools:

  • Circular saw and cutting guides
  • Nail gun (and/or stapler)
  • Hand Saw (totally optional)
  • Jig Saw
  • Sander/sandpaper
  • Pocket Hole Jig (optional)

Materials:

  • ¼” plywood for sides
  • ¾” plywood for the shelves
  • Hickory plywood for the door and drawer fronts
  • 1×4 and 1×6 boards for trim
  • DAP Weldwood Original Wood Glue
  • DAP Plastic Wood-X Wood Filler
  • DAP Premium Wood Filler
  • DAP Alex Flex Caulk
  • Primer
  • Paint
  • Modern Handles

**Also, this isn’t a tool or material, but so many have asked where I got the bar stools, so here is a link to the bar stools. They go in and out of stock regularly, so click to be notified when they come back in if they’re out.

Some notes about the project:

One of the first things I wanted to do to our new home after moving in was update this kitchen island.

.

It was a good size, and it was great to have, but it needed some contrast against the already white cabinets and honestly, I just really hate bead board.  If you like bead board, no hard feelings…we can still be friends.  It’s just…not my favorite.

White kitchen island with beadboard sides, 6 drawers, and a door cabinet

So my original DIY kitchen island makeover plan was to remove the beadboard, replace it with something a little more modern, add some trim details, and paint the whole thing a contrasting color.

.

But one thing led to another and I ended up actually opening up the drawer cabinets here to make open shelving, replacing the drawer fronts and door with hickory plywood, and swapping them from overlay to inset drawers and doors.

.

Things got a little more…involved, ha.

.

But one thing I wasn’t planning on doing–mostly because…BUDGET–was replacing the countertop. Since the top here was granite, I tried to keep the existing cabinet boxes and basic framing intact to preserve the top. 

.

There are a lot of options to try while still keeping the main body, so if you’re looking to redo your island, or vanity, or other large project you don’t want to completely replace, get creative with your options ????

Step 1: Demo Existing Kitchen Island Sides

The first thing I needed to was remove this bead board. 

Shara Woodshop Diaries removing beadboard from cabinet sides

I used a prybar and a hammer and carefully worked my way around the island removing the bead board paneled sides, the quarter round along the bottom, and all the trim pieces I was planning to replace.

.

Now, on the back of the inside section where the bar stools go, there wasn’t really any reason to REMOVE those panels, so I left them for now and just covered them up later.

Kitchen island demoed--cabinets and stud framing with granite top still intact

Step 2: Add Open Shelving in the Cabinets

Once the beadboard was gone, I started thinking about how we actually use the island and how I could modify it to better suit us.

.

The island was full of storage with 6 drawers and a cabinet in the middle.  And while that was great, we only had stuff in two of the drawers and half of the rest of the kitchen cabinets are empty, too. 

.

So, we really didn’t need that storage space, and personally, I’d prefer to have it open to display some of my cutting boards or keep my cookbooks easy to grab.

.

So I removed the drawers and the slides from the cabinets and decided to leave the top sections open, but just keep the bottom two drawers. I’ll come back to the bottom drawer later.

Removing drawers from large kitchen island

Since there was a face frame separating those two top drawers, I needed to cut that piece out.

.

I used some painters tape to protect the surface, help prevent chipping, and help me see to cut straight with a hand saw, and I carefully cut out this piece of the face frame on both sides.

Using a hand saw to cut face frame on kitchen cabinet

I removed the doors in the middle cabinet as well as I’ll replace them later with a single solid door.

.

Now that the cabinet was open, I headed to the shop to cut a couple pieces of plywood to go into these drawer cabinets for the shelving.

RELATED: How to cut plywood sheets

.

I measured and cut two pieces of ¾” plywood to fit into these cabinets. 

.

Once the pieces were cut to fit, I drilled pocket holes along the sides and the front to install them.

Drilling pocket holes into open shelf plywood

RELATED: Interested in pocket hole jigs? Check out this guide to see which one is best for your shop!

.

Installing these pieces proved a little tricky because the space was pretty tight to reach into to drive the pocket hole screws, but where there’s a will, there’s a way haha.

Plywood shelves installed into kitchen island for open shelving

The cabinet box sides were only ½” thick, so I ended up having to use 1” pocket hole screws on the sides vs the usual 1 ¼” so they didn’t stick through the other side.

RELATED: How to use a pocket hole jig

Step 3: Cover Kitchen Island Sides

After the shelves were in, the island was still kind of naked so next up was covering the exposed sides back up.

.

Instead of bead board, I wanted a just some simple, flat panels to cover the sides, so I measured and cut ¼” plywood panels to wrap around the outsides, and the insides of the island frame. 

Shara Woodshop Diaries stapling plywood panels onto sides of kitchen island

I used a crown stapler to install each piece to their corresponding sides, but you could also use brad nails and glue. 

RELATED: Brad vs Finish vs Stapler–What’s the Difference and Which One Do You Need?

.

Full disclosure, I change my mind OFTEN, so just in case I decide to redo this again later, I didn’t glue the panels to the island. That way, later, if I change my mind, I can just pop them off and swap them out with something else.

.

I used a jig saw to help me cut my panels to fit around any toe kicks, framing pieces, outlets or obstacles to “wrap” each side in plywood.

Shara Woodshop Diaries stapling plywood panels on inside of kitchen island

One side of the island had an outlet I had to cut around and clearly the plywood had some tear out issues when I cut this hole.

.

FYI, when cutting with a jig saw, it’s best to cut right side down to prevent this.  But what’s done is done and I used some DAP Premium Wood Filler to fix this later.

Shara using putty knife to spread DAP Premium Wood Filler on plywood tear out

Step 4: Trim Out Kitchen Island Side Panels

After the plywood sides were on and the naked island was at least covered up, it was time to add some details.

.

I cut to fit pieces to trim out around each panel to dress this up.

DAP Weldwood Wood Glue applied onto 1x4 trim pieces

I used 1x4s vertically on each side and used DAP Weldwood wood glue and finish nails to secure these pieces in place. 

.

While I didn’t glue the panels, I did glue the trim TO the panels so they will stay put and allow me to putty and caulk without them moving later. 

Nailing 1x4s as trim around side panels

On these front sections, I installed the vertical 1x4s so they overhung the front edge ¾”. 

.

That way, I could come back and cut to fit a 1x piece between them and they’d be flush across the front surface.

Using a finish nailer to nail front pieces onto kitchen island legs

After the vertical pieces were on, I trimmed the tops with 1x4s and the bottoms with a 1x6s. 

.

I did this on all sides, cutting each piece to fit, gluing and nailing in place.

Shara Woodshop Diaries nailing trim pieces onto kitchen island sides

Step 5: Reinstall Drawer Boxes

I decided to make the drawers and middle door inset instead of overlay like they had been. 

.

Instead of replacing the existing slides, I just screwed some scrap blocks in the cabinet here and moved the slides back about ¾” making them inset to the frame. 

Re-installing drawer slides so they are inset into cabinet

They had been screwed to the face frame, but now I attached them to these scrap blocks, so I could remove the existing drawer front on the drawer boxes, and reinstall them, leaving room to attach new inset drawer fronts later.

.

The existing cabinets already had undermount slides, so I just used what was already here.  However, I typically use (and prefer) side mount slides instead.

RELATED: Learn more about drawers, drawer fronts, and drawer slides here.

Step 6: Putty, Caulk, Prep for Paint

Once the island was trimmed out, I could start prepping for paint.  And you guys know how I feel about paint haha.

.

Painting is my least favorite thing to do, so when I make the effort to paint, I don’t want it to be in vain, and I try to get the smoothest paint finish I can. 

.

That said, putty is a crucial part to getting a smooth paint job especially when piecing trim together like this.  And especially when painting a dark color in a shiny sheen like I had planned.

RELATED: How to finish raw wood furniture

.

It’s important to fill not only the nail holes, but also to cover and smooth out each joint.

RELATED: Check out my other tips here for more professional looking DIY projects

.

I used DAP Plastic Wood X Wood Filler on the nail holes and larger gaps, knots, and voids, but I like the consistency of DAP Premium Wood Filler for the joints and small seams that just need a little smoothing out. 

Shara Woodshop Diaries filling nail/staple holes with putty knife

It’s a little easier to spread out and helps even out high and low spots that paint can emphasize if you aren’t careful.

.

After the filler was dry, I gave the entire piece a final sanding.  Sanding is just as important as any other step.  Make sure to sand the putty flat and smooth and make sure to sand all your boards smooth, too.

.

After the final sanding, I grabbed some DAP Alex Flex caulk  to go over all the inside seams. 

Shara Woodshop Diaries using DAP Alex Flex Caulk to caulk inside corners of kitchen island trim

Just like filler, caulk is a crucial part to a smooth paint finish, so I covered all the inside corners around the trim, on the sides, and along the inside of the island. 

Step 7: Prime and Paint Island

Once the caulk was dry, I gave the entire piece a coat of primer.  DON’T SKIP PRIMER!

Shara Woodshop Diaries painting DIY kitchen island black

Then, I came back with a couple coats of paint.  I choose a very dark color to contrast the white cabinets.  I think it gives it a really classy look.  I used Tricorn Black by Sherwin Williams here.

Step 8: Add Door and Drawer Fronts

While the paint dried and cured, I moved on to finishing things up by making the drawer fronts and door.  I had some hickory plywood in the shop for a future project—stay tuned for that, *wink wink*

.

But I had a little extra, and decided that I’d make the drawer fronts from that. 

.

I cut two inset drawer fronts and an inset door for the island and applied edge banding. 

RELATED: Learn how to measure for drawer front sizes here

RELATED: Learn how to measure for door sizes here

RELATED: Learn how to apply edge banding here

.

I installed the drawer fronts with a few screws on the inside of the drawer boxes.

Shara Woodshop Diaries installing drawer front onto drawer box in island makeover

And for the door, I just used concealed inset hinges for frameless cabinets, and installed some scrap wood spacer blocks here to mount them on. 

.

I’m sure they make these hinges for face frames, but I usually keep frameless hinges handy in my shop, so that’s what I had to work with. 

Shara Woodshop Diaries installing inset cabinet door onto spacer blocks

I gave the doors and drawer fronts a few coats of poly, added these handles, then stepped back and took it all in.

.

I feel like the black, with the wood, with the solid, simple framed out sides really makes this kitchen look more modern and classic.

Black kitchen island in white kitchen with hickory door and drawer fronts

Although I’d prefer to build from scratch, this was definitely worth the work involved to redo what was here and make the best of what we already had.

.

This was an excellent, budget friendly way to upgrade our existing kitchen in a weekend and without a lot of demo work and replacement.

.

I know this project was a little out of the ordinary, but I hope you enjoyed it nonetheless and picked up a few things along the way 🙂

.

If you’re loving these stools, you can snag your own here.

White kitchen cabinets with black island and wicker bar stools

Check out the video here for more details on the project and to watch it come together.

Vertical image of black and wood kitchen island with granite countertop with graphic and text that reads "DIY kitchen island makeover)

I have plenty more build from scratch, and home update projects coming soon, so if you want to follow along, be sure to subscribe to our newsletter so you don’t miss out on what’s coming next.

Until next time, friends, happy building! ????

Finish vs. Brad vs. Pin Nailer vs. Stapler-Which is Best?

November 8, 2021 by Shara, Woodshop Diaries

In this post, I’m breaking down the differences between finish vs brad vs pin nailers (and crown staplers, too!) and helping you decide which one is best for your project and workshop!

*This post contains affiliate links. See website policies for details.

Ryobi AirStrike 16 and 18 gauge nailers on workbench showing size difference

I recently posted a tutorial on how to install DIY high end window trim on a budget.

.

After posting, I received a ton of questions asking about nail gun sizes and the differences between them all, so I thought I’d break it down as it can be a confusing topic when first starting out.

.

What Types of Nail Guns are Available?

There are MANY types of nail guns. Like, A LOT.

.

Roofing nailers, framing nailers, flooring nailers, etc. are large nail guns, most common in construction and specialty projects. These are less commonly found in woodshops and home workshops, so I’m not going to talk about those here.

.

In this post, I’m discussing the three common types used most in woodworking, furniture building, and DIY projects–since that is what I (and likely, you) do most of 🙂 These are smaller, more versatile options.

RELATED: Check out my top five tools for getting started in woodworking here!

.

These nail guns are commonly referred to as FINISH nailers, BRAD nailers, and/or PIN nailers. They shoot basic straight nails and the main difference between them is the size of the nail they fire.

.

I’ll break each one down below.

.

And, although it’s not a NAILER, I’ll discuss crown STAPLERS as well since they’re kind of in the same tool family as nailers.

FINISH vs. BRAD vs. PIN nails

Before I explain when is best to use which type of nail gun, let’s break down this terminology and the size references.

.

A confusing fact to note is that when referring to nail sizes, as the numbers go up, the sizes go down. So a lower number is a larger nail and a higher number is a smaller nail.

.

Nails and staples come in a variety of LENGTHS, but the sizing here is referring to the THICKNESS, or diameter, of the nail:

  • FINISH NAILS: 15 and 16 gauge
  • BRAD NAILS: 18 gauge
  • PIN NAILS: 23 gauge

.

I don’t actually have a pin nailer in my shop–not that it isn’t useful, but I just haven’t picked one up yet.

.

But I do have a 16 and 18 gauge (finish and brad) nailer in my shop, so here’s a visual comparison of finish vs brad nails below. The brad (18 gauge) is on the left (smaller) and the finish (16 gauge) is on the right (larger).

18 gauge nails vs 16 gauge nails close up showing size difference

Obviously, the larger the nail, the better the holding power. So FINISH NAILS (15 or 16 gauge) will hold stronger than BRAD NAILS (18 gauge).

.

If you can imagine, pin nails are 23 gauge, so compared to even the 18 gauge above, they are quite small.

Battery vs. Air Nailers

You can find all three of these types of nail guns and staplers that run on either compressed air or that run on batteries.

.

Now, even the ones that run on battery, run on a version of compressed air, BUT they’re not tied to a heavy compressor and an annoying hose, and the “air compressor” is built in.

.

Typically, air nailers will be cheaper than batteries, but the compressor will require electricity, and you’ll be dragging it around with you wherever you need to use your nail gun.

.

Battery nailers on the other hand are a typically little more expensive, but you don’t need power to operate it (once the battery is charged), and there are no hoses to tie you down.

.

Personally, I have used both and hands down prefer the battery route. I’m currently using the 16 gauge, 18 gauge and crown stapler from the Ryobi AirStrike lineup and have zero complaints.

.

Once you go cordless, you’ll have a hard time going back to a compressor ha!

What Do You Use Finish Nailers For?

A 15 or 16 gauge nailer is called a finish nailer. These shoot a thicker nail and are typically used with thicker, heavier, and denser materials, like hardwoods and 1x boards.

.

I’m currently using this Ryobi 16 gauge AirStrike battery nailer and I love it.

.

For example, I used a 16 gauge nailer to install the window and door trim in my shop recently.

Shara Woodshop Diaries using 16 gauge Ryobi AirStrike to install door trim in workshop

The larger nail holds the thicker 1×4 and 1×6 material in place well without having to use any glue.

.

The downside is that the larger nail leaves a bigger hole. In some cases, this is an issue, but when painting the project, a little putty and paint will cover that right up.

.

Finish nailers are great for installing baseboards, window trim, and nailing through 1x material–whether that’s assembling a small wooden box, attaching a face frame to a cabinet, or adding trim boards on an accent wall.

What Do You Use a Brad Nailer For?

An 18 gauge nail gun is called a brad nailer. These shoot a smaller nail and are typically used for thinner, lighter weight, and more delicate pieces, like cove molding, and crown molding.

.

I’m currently using this Ryobi 18 gauge AirStrike battery nailer and have been for the last 4-5 years now.

.

When I installed the window trim recently, I used it to attach the small half round and crown molding details to the main frame of the trim.

Shara Woodshop Diaries using 18 gauge nail gun to install half round trim on door trim in workshop

These smaller brad nails leave a smaller hole to fill, but also are much less likely to damage or split these small wood pieces like a larger 16 gauge nail might.

.

Brad nails don’t have as strong of a holding power as finish nails, BUT, when used on these small pieces, it really doesn’t need it.

.

You can, however, use brad nails along with some wood glue to give you very good holding power on heavier pieces depending on the application you’re using it with.

.

Brad nailers are great for adding small molding details, attaching thin, delicate pieces of wood together, and for assembling small wood projects (as long as you also use some glue).

What Do You Use a Pin Nailer For?

I’ll be honest, I don’t have a pin nailer. There have been times I was in the middle of a project and thought, “it would be nice to have a pin nailer, right now.”

.

But, I just haven’t ever remembered to actually pick one up. I plan to grab this Ryobi AirStrike Pin Nailer during Black Friday or as a Christmas gift to myself this year.

.

They are extremely handy to have around in the shop, but are also a little more specialized. Pin nails are VERY SMALL. On their own, pin nails won’t hold much.

.

However, they are great for “pinning” a piece in place to check the fit before gluing, or for use in something you plan to stain and don’t want large nail holes to fill.

.

Pin nails leave such a small hole that most people don’t even bother puttying over them. If you’re working with veneers, or really thin materials, these work great to hold things in place while glue dries without leaving much of a mark.

.

If you are working alone and trying to install a long piece of molding or a board, a pin nailer can be an extra set of hands and allow you to “pin it” in place while you check the fit or mark where to cut.

.

You can simply pop it off, and remove the nails when you don’t need them anymore.

What About Staplers?

The Ryobi AirStrike lineup also has an 18 gauge crown stapler that I just added to the shop.

Close up of Ryobi AirStrike crown stapler with staples

This isn’t necessarily a NAIL gun as it shoot staples, not nails. But, it functions just like a nail gun and has some similar uses.

.

Contrary to popular belief, the term “crown stapler” doesn’t refer to crown molding–it’s actually referring to the type of staple–these rounded top, narrow staples.

.

These small staples are PERFECT for upholstery, attaching mesh, paper or thin materials to wood, or installing thin wood panels (like ¼″ plywood or beadboard) onto projects.

Ryobi AirStrike crown stapler showing staples used to secure ¼" plywood to wood boards

They CAN be used to attach thin moldings and since it’s a staple, it would hold a little better than a nail.

.

But the struggle with staples is that you need to make sure the top of the staple seats down below the wood surface so it can be puttied over. Depending on the material and the angle you shoot at, this can be challenging.

.

I’ve been using a hand stapler for many projects around the shop recently, but having a battery stapler will give my hands a nice rest.

So, Which One is Best?

There is no “best” in this case. It all depends on what you’re using it for. If I had to narrow it down to just one to start with, I’d say the 18 gauge nailer as it’s probably the most versatile.

.

That’s just, personally, the one I use most often. But that may not be the case for everyone.

.

You can use it on larger projects if you use some glue with it, but it’s small enough for small trim pieces as well.

.

However, when it comes to nail guns, there’s no one size fits all. They each have their purpose and their pros and cons.

Shara Woodshop Diaries using 18 gauge nail gun to secure crown molding along window trim in workshop

But the great news is that you don’t have to buy them all at once. If you’d like to add one to your shop, you can grab one now and grab another one later down the road.

.

If you go with a battery nailer, though, I recommend sticking with the same brand as you add to the collection so the batteries are all interchangeable.

.

I hope this beginners guide to nail guns (and staplers) was helpful in breaking down the pros and cons and differences of the various nail gun types.

Pinterest collage image showing "beginners guide to nail guns" with image of nails and Shara Woodshop Diaries using nail gun to secure door trim

Head over to my DIY basics page to check out other tips, and tool guides to help get you started.

.

If you’d like to stay up to date on all the latest happenings and projects at Woodshop Diaries, be sure to subscribe to the newsletter below:

Until next time, friends, happy building! 🙂

How to Install DIY Window Trim–On a BUDGET!

November 6, 2021 by Shara, Woodshop Diaries

In this post, I’m sharing how to install your own custom DIY window trim using basic lumber on a budget.

*This post is sponsored by The Home Depot as part of the #THDProSpective program.  This post contains affiliate links.  See website policies page for details.

Completely finished window trim painted white with crown molding and half round molding

Installing new window and door trim is one of my favorite ways to upgrade the interior of a home—or in this case, the interior of my workshop.

.

I’m installing this DIY window trim on new construction windows and doors in my new workshop—so there wasn’t any existing trim here yet.  However, I’ve done this many times on doors and windows with existing trim. 

.

If your window already has trim on it, you simply remove it first.  You can use a prybar and a hammer to carefully remove the trim around your window to get it down to the rough 2×4 window frame like you see here.

Rough framing with window and drywall installed--no trim

I’ve provided a YouTube video here showing how to install this custom DIY window trim to your own windows, and also have the written step by step tutorial below:

BEFORE TRIMMING OUT YOUR WINDOW:

If there are any gaps between your window and rough framing, you should seal these before adding trim.  You can use some straw foam to fill these in, allow to dry, then cut it flush to the window.

.

Also, be sure to clean your window and remove any residue from the frame—mine was…pretty filthy haha.

A NOTE ABOUT WALL THICKNESS:

Normal wood framed homes and buildings have either 2×4 or 2×6 exterior walls.  In my case, I have 2×4 walls and I used a 1×6 for my window sill/ledge and used 1x4s for the inside trim on my window.

.

However, if you have 2×6 walls, you will need wider boards since your wall is thicker.  I’d recommend using 1×8 for the ledge board and 1x6s for the inside frames. (*This is noted in the materials list below)

MATERIAL QUANITITIES:

I’ve listed basic board sizes I used in this project below, but the number/length of boards you will need will vary depending on your window size and how many you are trimming out.

.

I recommend reading through the tutorial, then measuring your window and figuring rough sizes for each piece in the tutorial, adding them up, and figuring how much wood/material you will need.

For this DIY window trim project, you will need:

Materials:

  • 1×6 board for window ledge/sill (or 1×8 if you have 2×6 walls)
  • 1×4 boards for inside window trim (sides and top)–(or 1×6 if you have 2×6 walls)
  • 1×4 boards for outside window trim (sides, top, bottom)
  • Crown molding
  • Half round molding
  • 16 gauge 2″ nails
  • 18 gauge 1 ¼″ nails
  • Wood Glue
  • Painters tape
  • Wood Putty
  • Caulk (NOT SILICONE–make sure it’s paintable)

Tools:

  • Ryobi AirStrike 18 gauge nailer
  • Ryobi AirStrike 16 gauge nailer
  • Miter Saw
  • Table Saw
  • Jig Saw
  • Tape Measure
  • Speed Square

Step 1: Cut and Install Window Sill

I add the window sill first, so I grabbed my 1×6 for this.  I measured the inside opening of the rough window frame—so between the 2x4s the window sits inside. Find this WIDTH (left to right measurement).

. 

Because I’m adding 1x4s (which are 3 ½” wide) on each side of the window on the outside, I need to add 7” to this opening measurement.  But, I also usually have about a 2” overhang on each side, too.

Close up image showing what the overhang on the window sill is using arrow

So the overall length of this 1×6 window sill board needs to be = Inside opening + 7” + about 4” for overhang on each side.

.

I trimmed my 1×6 to this length, then marked the center of the board. (Ex. If you cut your board 60″ long, mark it at 30″.) I took the inside opening measurement, divided by 2 and marked this distance on the board on each side from that centerline. 

.

I went back to the window and measured from the front of the window to the front of the drywall in multiple places and took the average. 

Shara measuring width between front of window frame and front of drywall

Theoretically this should be the same across the entire length, but in reality, it rarely is.  Using the average seems to work pretty well.

.

I marked this measurement from the edge on each end of my 1×6 and used a square to draw out these marks so I can see where to cut for the window sill to sit into the window opening.

.

You are basically measuring and marking your 1×6 so that it will sit INTO the rough frame opening, but will wrap around and stick out each end across the drywall.

Using jig saw to cut notches in 1c6 window sill board

I used a jig saw to cut along these lines, then tested the fit in the window.

.

You may need to trim and adjust slightly, but once it fits well, It’s time to nail in place.

Notches cut out of window sill board to fit over drywall

A NOTE ABOUT NAIL GUNS:

Throughout this project, I relied on my Ryobi AirStrike battery nailers.  I ditched my air nailers several years ago because I got tired of dragging the cords and heavy compressor around.  I picked up an AirStrike and never put it down.

.

I’ve been using my 18 gauge Ryobi AirStrike nailer for over 4 years now, and recently added the 16 gauge Ryobi AirStrike to my shop. The 16 gauge (larger) is on the left and the 18 gauge (smaller) is on the right below.

16 and 18 gauge Ryobi AirStrike nailers sitting on workbench

I really like using 16 gauge for door, window, and larger, thicker trim as it’s a larger nail, so it holds a little stronger. 

.

But I like to keep the 18 gauge handy for smaller, more delicate pieces like the crown and half round molding I’m adding later.

Close up of 18 gauge vs 16 gauge nails

A nail gun is actually one of my top five recommended tools for beginner woodworkers! Check out my full list here.

.

I’m grabbing this 16 gauge AirStrike to secure this window sill in place along with the rest of the main pieces of window trim.

.

I used several nails along this sill board to secure it in place.

Shara using 16 gauge Ryobi AirStrike to secure window sill in place on window trim

Step 2: Trim Out Inside of Window Frame

Once the window sill was installed, next, I moved on to adding the trim around the rest of the inside of this window. 

.

I cut a 1×4 to the length of the opening at the top.  Now, as I mentioned earlier, my walls here are 2×4 studs.  If you are working with 2×6 walls, you will likely need a wider board for this, like a 1×6.

.

Once it was trimmed to length, I measured the distance across the top between the front of the window and the front of the drywall in several places again and took the average.

Using table saw to rip 1x4 boards for lining window frame

I ripped this board to this width on the table saw, then nailed it in place. You want all your inside boards to butt up to the window frame, and come as flush as possible to the front of the drywall.

.

That will allow the boards added in the next step to fit nice and flush.

Shara Woodshop Diaries using nail gun to line inside of window frame with 1x4 boards

I repeated this same process to install the two pieces on the sides as well.

Shara Woodshop Diaries nailing wood to line inside of window frame

Step 3: Install Window Trim Frame Sides

Once the INSIDE of the window was trimmed, I moved to installing the outside—which is the pretty part haha.

.

First, what is “TRIM REVEAL?”

I typically install the OUTSIDE of the trim so that it “reveals” about ⅛” of the edge of the boards on the INSIDE trim pieces.

Close up of DIY window trim showing what a reveal is with an arrow pointing

This ⅛” reveal just helps hide minor imperfections if a board is slightly warped or bowed, and allows you to come back later and caulk that joint easily for a cleaner paint job.

.

I use ⅛” typically, but you are welcome to use ¼” or ⅜”, etc.

.

So for these side pieces, I measured from the window sill board up to the inside of the top board, then added ⅛” for the reveal.

.

I measured and cut a 1×4 this length for each side—theoretically, they should be the same length, but in reality, it’s likely they’re slightly different, so it’s best to cut each side to fit.

Shara Woodshop Diaries nailing side boards on left and right of window to frame it out

I installed these using my Ryobi 16 gauge AirStrike nailer so that they were about ⅛” out from the inside edge to leave my reveal.

Step 4: Install Window Trim Frame Top/Bottom

Then, I measured across the side pieces from step 3 to find the length for my top and bottom pieces.  I cut two 1x4s this length and installed one across the bottom and one across the top.

1x4s nailed around window to frame it out--unfinished

As a note here, it’s important when nailing these outside pieces in place to use nails long enough to reach through the board, through the drywall, and into the studs or framing behind it. 

.

Securing these boards to just the drywall will not hold. 

.

Since these boards are ¾” thick and the drywall here is ½” thick, I’m using 2” long nails so that about ¾” is going into the wood behind the drywall to hold it in place.

.

And on that note, you also want to make sure you are hitting studs and/or headers with your nails. 

.

Typically (in most cases), there will be a solid header running across the top of a window, but underneath the window, you can use a stud finder to locate where to drive your nails.

Step 5: Add Crown Molding

Once the outside frame is installed, you can call it quits and leave as is, but I like to add some detail with crown molding and half round.

Close up of crown molding and half round molding on window trim to add detail

I’ll start with the crown molding and first, I want to cut the piece that will run along the front.

.

I recommend checking out the video for details on how to cut crown molding if you aren’t sure.

Crown molding upside down on miter saw ready to cut end

But, I cut a piece of crown molding to run along the length of the top board and nailed it in place using my Ryobi 18 gauge AirStrike nailer.

.

The 18 gauge nailer shoots a smaller nail, so it’s great for thinner, more delicate pieces like the crown and the half round in the next step.

Shara Woodshop Diaries using 18 gauge brad nailer to install crown molding on top of DIY window trim

For the end caps, you simply cut a couple small pieces of crown to “wrap around” the edge of the top board—one end mitered and one square. 

Close up of end caps of crown molding to be added to window trim

The flat piece on the bottom back side should be ¾” wide to match the thickness of the 1×4 at the top.

.

I like to rip off a couple pieces of painters tape and have them handy, then apply some wood glue along the corner edge and the bottom, and tape these pieces in place on the ends until the glue dries.

Close up of crown molding taped and wrapped around ends of top window trim board

Step 6: Add Half Round

I mitered the ends of the half round to 45 degrees, and nailed it along the bottom edge of the top 1×4 here, again, using the 18 gauge nailer as the smaller nails are a little better on these delicate pieces.

.

I’ve only ever found these in 8 foot pieces, and since my window was so long, I ended up having to splice them together in the middle, which isn’t a big deal. 

.

Check out the video for how to do that. 

Unfinished DIY window trim installed on workshop window ready for paint

The end caps of the half round molding are attached the same way as the crown—one square end and one 45 degree, ¾” long.  Simply glued and taped in place.

Step 7: Putty, Caulk, Prime, Paint

After the glue dried on the trim, I went back and puttied over the nail holes and around the outside corners of the molding, then caulked between the drywall and trim and between the trim and windows.

.

You don’t want to skip caulking window trim as this can result in moisture issues and air leaks.  Be sure to caulk where the wood meets vinyl for a good seal, and between where the wood meets drywall for a cleaner paint job.

Close up of window trim boards puttied and caulked and ready for paint

Once the caulk was dry, and putty was sanded smooth, I primed the wood—since it’s raw wood, priming will make for a smoother paint coat and help better seal it.

.

Then, I applied two coats of high quality white paint (although, feel free to get creative and use a different color than white!), and it was done. 

RELATED: Check out this post for how to finish/paint raw wood

Shara Woodshop Diaries against finished window trimmed out with basic wood and crown molding

I love the difference a little trim makes on not only this, but basically any project. 

.

As we work our way through projects in the new house, I’ll be replacing all our window and door trim to match this, but for now, my shop is getting the fancy treatment haha.

.

I’m planning something fun for this window wall in the back of my workshop, so while the trim looks nice, I know the wall is still a work in progress, so bear with me. Check out other workshop projects here.

.

If you want to see all the upcoming projects and videos, be sure to subscribe to the newsletter if you aren’t already. 

And if you’d like to save this for later, don’t forget to pin it or save it to your favorite social channel!

Pinterest collage showing Shara Woodshop Diaries at top nailing window trim pieces in place and finished window trim with crown molding at bottom with text "how to install custom high end window trim"

Until next time, friends, happy building!

EASIEST DIY Lumber Rack

November 2, 2021 by Shara, Woodshop Diaries

In this post, I’m sharing with you how to make the easiest DIY lumber rack storage shelves using just basic 2x4s and wood screws!

Shara Woodshop Diaries loading up basic wood DIY lumber rack in new workshop

We recently moved into a new home and a new workshop! It’s been really exciting trying to situate and set up my new shop, but it’s also been a somewhat exhausting and stressful experience as well.

.

Isn’t moving always a mixed bag of emotions, though?? HA!

.

I left my old lumber rack in my old shop since it was already attached to the wall, so when I moved my wood pile to the new place, I had no where to put it but on the ground…right in front of the door…right in the way.

Shara Woodshop Diaries sorting through wood pile on floor of workshop

So I needed a quick and easy way to get my wood pile out of the walkway here and this easy DIY lumber rack was the perfect solution.

.

This is actually the third time I built this exact rack design–so you know it’s good because if it didn’t work, I wouldn’t keep using it.

.

I had this in my last two shops (and left them when I moved) so hopefully the third time is the charm and I’ll not be moving again any time soon haha!

.

If you want to see all the details on moving and workshop updates, along with a video tutorial for this lumber rack, check out my video here. But if you just want to see how to build the DIY lumber rack, I’ve got the steps below.

*This post contains affiliate links. See policies page.

What You’ll Need to Build This DIY Lumber Rack:

Tools:

  • Saw (you can use miter, circular, jig, any saw that can cut straight lines on a 2×4)
  • Drill/Driver (you can use just a drill, but it’s quicker to have both a drill and a driver handy so you can predrill with one and drive with the other)
  • Level
  • Stud Finder
  • Measuring tape

Materials:

  • (8) 2x4x8 boards
  • 4″ Wood Screws (a 1 lb box was JUST ENOUGH to build this one)

Step 1: Determine Lumber Rack Height

My new shop has ten foot high ceilings, so I used full 8 foot boards for the FOUR backer (vertical) pieces of my lumber rack.

Shara Woodshop Diaries leaning 8 ft 2x4s against the wall to use for lumber rack

I didn’t want to have to pull out a ladder every time I wanted to reach the wood at the top, so I didn’t bother making it any taller than 8 foot. But if you have tall ceilings and you wanted to, you could use longer 2x4s and make it taller.

.

If your ceilings are only 8 foot, measure the height from floor to ceiling and cut FOUR 2x4s an inch or so shorter than this measurement. That will give you a little wiggle room to install these onto the wall.

.

Set these backer board pieces to the side for now.

Step 2: Cut Lumber Rack Rungs

From the remaining 2×4 boards, cut twenty 14″ long pieces (five per back board from step 1) to use as the rungs.

.

Then, cut one extra to use as a “spacer block” to help install these rungs evenly.

.

If you’re wondering where 14″ came from, I just picked a number. You can make these longer or shorter, but I’ve always used 14″ and it’s worked well for me.

.

But, I don’t recommend going much longer as the longer they are, the weaker they will be.

Step 3: Install Rungs onto Backer Boards

Use the 14″ long spacer block to install the first rung on the backer board (the long boards from step 1) 14″ from the bottom. Use a scrap piece of 2×4 underneath the rung so it’s closer to the center of the back board.

.

Predrill two holes and drive two 4″ long wood screws through the back side of the backer board to secure the rungs.

Shara Woodshop Diaries securing rungs to backer board of lumber rack with 4" wood screws

Once the first one is installed, move the spacer block to install the next and work your way up until you have 5 rungs installed on the backer board.

Close up shot of driving 4" wood screws to secure rungs

Repeat this until you have five rungs installed on all four backer boards.

.

Side note: If you wanted a longer, stronger, heavier duty lumber rack, you can do more than 4.

Step 4: Secure Lumber Rack to Wall Studs

NOTE: MAKE SURE YOU SECURE RACK TO STUDS–DO NOT USE ANCHORS.

.

Use a stud finder to find and mark your wall studs where you want your rack to go. I spanned mine across several studs and made it about 12 ft wide overall. If you wanted longer, I’d recommend making more than just 4 rung assemblies.

Using a level to ensure backer boards of lumber rack are vertical

Use a level to make sure the backer board is straight up and down, then secure the backer board into the wall studs using at least three 4″ wood screws per back board.

.

I put one in the top, toward the middle and at the bottom.

Using screws to secure backer boards to wall studs

Step 5: Load It Up!

Now, I can’t tell you how much weight overall these will hold–there are a lot of potential factors to consider.

.

However, I have used this exact design three times now and haven’t had any issues with failure and I’ve loaded them down pretty good in the past. (Although, based on this picture, it’s pretty empty at this point–I need to restock!)

Easy DIY lumber rack loaded up with walnut, cedar, and trim pieces

I climbed all over mine to test it out (you can see in the video) and it didn’t budge. However, if you miss a stud or your 2×4 is cracked and weak, failure can occur.

.

I recommend thoroughly testing yours before loading it down too much–just in case.

.

But, once it’s loaded up, that’s it–an easy and inexpensive way to store your lumber up off the floor and use your wall space instead!

.

I hope you enjoyed this quick and easy project and I hope it helps you get your workshop more organized and efficient.

.

If you want to check out other workshop ideas, be sure to head over to this page!

.

Be sure to subscribe to the newsletter to stay up to date on the latest happenings and projects.

And if you want to save this for later, don’t forget to pin it or share it on your favorite social channel!

Pinterest collage image showing Shara securing rungs to backer board at top and completed lumber rack on wall at bottom with text "EASY DIY LUMBER RACK"

Until next time, friends, happy building! 🙂

MODERN DIY Round Coffee Table

October 9, 2021 by Shara, Woodshop Diaries

In this post, I’m sharing how to build a modern DIY round coffee table–in any size!

Big and small black and wood modern DIY round coffee tables together with floating top

If you happened to see my last post on building a modern dining table, you may have seen that I recently purchased some maple to build that project with. 

.

When I originally ordered the maple, I had intended on building that table differently–in a way that would have required more wood.

.

So when I changed my mind and built the table the way that I did, I had quite a bit of lumber left over that I had already paid for and I didn’t want it to go to waste.

.

So I decided to build myself a new round coffee table. Actually, TWO–I had just enough wood left to build two of these modern table designs in different sizes to make a “set.”

.

I’ve got step by step tutorial and plans below for this DIY round coffee table project plus a video (including how to make your own circle cutting jig!) here:

This post contains affiliate links. See website policies here.

Tools & Materials:

*Materials may vary depending on the size table you’re building.

Materials:

  • (3) 2x8x8 boards (for the tops)
  • (2) 2x2x8 boards (for the bases)
  • 2 ½″ wood screws
  • ⅝″ wood screws
  • ⅜″ dowel (optional to plug screw holes)
  • Figure 8 fasteners
  • Wood Glue
  • Ebony Stain
  • Clear Poly

Tools:

  • Miter Saw
  • Table Saw (optional)
  • Router (optional–can use a jig saw or band saw instead)
  • Drill/Driver
  • ⅜″ forstner bit (Optional–to countersink and plug screw holes)
  • ⅝″ forstner bit (to install figure 8 fasteners)
  • Large clamps to glue up top
  • Sander(s)
  • Flush cut saw (hand or oscillating)

Grab the printable plans for this build here:

Some Notes About the Round Coffee Table Build:

There are MULTIPLE ways to do almost every part of this project.

Options With This Build:

For example, you can use half laps OR simply use wood screws to attach the legs together. I’m sharing both ways in the video above (I used half laps for the larger table and screws for the smaller one), but in this post, I’m keeping it simple and showing the easiest way–using screws.

.

To cut the round table top, you can use a router and a circle jig–which will give you more accurate results. However, if you don’t have a router, you can definitely just use a jig saw or a band saw…or just cut a square or triangle and skip the circle altogether.

.

I used a ⅜″ forstner bit to drill out and plug my screw holes in this project. However, you could simply leave the screws exposed OR use putty to cover them over. That’s optional, too.

.

And lastly, I used figure 8 fasteners to attach this table top. There are LOTS of ways to attach it (simple screws, L brackets, etc), so if you prefer using another method, feel free to get creative.

Size Adjustments:

The table size is SUPER EASY to customize. To adjust the height, simply adjust the length of the legs in step 2.

.

To adjust the diameter of the top, simply adjust the length of the braces in step 1 and cut the size top you wish.

.

Take note that changing the size you build may change the amount of material you need to build. So adjust accordingly 🙂

.

I’m sharing below how I built mine 34″ diameter and about 19″ tall. That gives you a starting point and you can adjust your measurements as needed.

Some posts you may find helpful in this build:

  • How to make your own 2x2s
  • How to square board edges
  • How to make a table top
  • Basic Guide to Using a Router
  • 5 Tips to Professional Looking DIY Furniture
  • How to Finish Raw Wood Furniture

Step 1: Cut Center Coffee Table Braces

I began this project by determining the size table I wanted to make. In my case, my larger table was 34″ diameter. Once I knew the size I wanted the top, I could figure out what size to make the base.

.

The base of this table was made from 2x2s. You can purchase these precut or make your own 2x2s with this tutorial.

.

Based on my 34″ diameter top, I determined that the 2×2 braces that go between the table legs needed to be about 15″ long.

Diagram of center braces for modern round coffee table

NOTE: Adjust this length ABOUT ½″ shorter for ever inch smaller you make your table table top and ½″ longer for every inch larger you make your table top. However, I don’t suggest making your table much larger than 36″.

.

So, I cut three pieces of 2×2 about 15″ long, then used my miter saw to cut one end of each piece with a 30 degree miter.  These ends will fit together in the center. 

30 degree mitered ends coming together in center

Then, I flipped these pieces 90 degrees and cut a 10 degree miter on the other end.

.

Note that the other end needs to be mitered so that the bottom is longer than the top (they’re laying upside down in the image below) and where the piece is rotated 90 degrees–these 30 and 10 degrees miters are not mitered on the same plane.

center coffee table braces laid out showing mitered ends orientation

Step 2: Cut Coffee Table Legs

Once these center brace pieces were cut, I cut three more 2x2s with ends mitered 10 degrees parallel to each other  for the legs. 

Diagram of coffee table leg length--showing 10 degree miters and 13 ¾" length

You can make these as long or as short as you need to make your table as short or as tall as you wish.  For a table 19″ tall, these should be about 13 ¾″ long. Adjust shorter for a shorter table and longer for a taller table.

Step 3: Assemble Center Braces to Table Legs

To assemble these pieces together on the larger coffee table, I used half laps.  I share that in detail in the video if you want to see that method.

.

NOTE: To use half laps, you’d need to make your table legs in step 2 about 1 ½″ longer since it would overlap the brace piece instead of sit underneath it.

.

Half laps are a great method to use for this, but they are a little more involved and time consuming.

.

So in this post, I’m sharing how to do this using just wood glue and screws. This is the method I used to build the smaller coffee table. (Both ways worked fine.)

.

First, I used a ⅜” forstener bit in the top of the brace piece to drill out a small hole (about ⅜″ deep) to plug later with a dowel to hide the screw. (If you don’t mind seeing the screw or using putty instead, you can skip that part.)

Diagram showing center brace and leg attached with screw

Then I predrilled through this hole and into the leg before driving the screw. Predrilling helps prevent the wood from splitting.

.

I used plenty of wood glue, and a 2 ½” long screw through this hole to attach these pieces.

Close up of plugging screw holes in coffee table legs

Then, I used some wood glue and ⅜” dowels to plug the screw holes and once these were dry, I just trimmed them off with a flush cut blade on an oscillating saw (you can use a hand saw as well).

Step 4: Attach Coffee Table Legs in Center

I attached the three leg pieces in the center using wood glue and screws. I laid the screws out here to get a visual of their locations.

Round coffee table base screw locations  at center

This process was similar to how I screwed the legs together.  I used a ⅜″ forstner bit to drill out a hole about ⅜″ deep to plug once the screw is in, predrilled the hole, and then drove 2 ½” screws to attach. 

Driving screws to attach leg braces of coffee table base at center

I used a generous amount of wood glue at each joint and once all three screws were in, I plugged these holes with glue and ⅜” dowels. Once the glue was dry, I flush cut these plugs and sanded smooth.

Step 5: Add Risers to Coffee Table Base

The last part of the base of this coffee table was the—what I’m going to call—risers.  I just cut three pieces of 2×2 about 2 ½” long and glued these on top of each leg about 2 ½” from the edge. 

Gluing risers onto table base on each leg

Once the glue was dry, I flipped this over and added a 2 ½″ screw through the bottom for extra security.

Driving screws to secure riser blocks

With the base complete, I gave it a final sanding and applied some ebony black stain to the base.  You could paint, stain, leave natural, whatever, but I wanted some contrast so I went with a black base. 

Step 6: Glue Up Table Top

I built this table top by gluing up whatever boards I had leftover from my dining table build, so they varied in size. However, you can glue up 5 pieces of 2×8 (which are 7 ¼″ wide) to make a 34″ diameter table.

.

NOTE: If you purchase 8 foot boards, you will cut 34″ long pieces and be left with a short piece. Glue the short piece on the end–the outside of the circle won’t need to be as long.

.

You can use a combination of whatever size boards you wish to make whatever size top you’re going for.

RELATED: Check out my tutorial here for how to make a table top.

.

I ran these boards through the table saw to just barely rip a little off the edges to give me a nice, smooth, square surface for gluing.  You can do this with a circular saw and straight edge, table saw, or jointer.

.

OR, you can leave edges as is if you prefer.

RELATED: Learn about why it’s important to square off table top edges here.

Using pipe clamps to glue and clamp table top panel together

I glued up these pieces in sections adding one board at a time just like when I glued up my table top in the last project.

.

You could use dowels, dominoes or biscuits if you wanted, but I just used glue.

Step 7: Cut Round Coffee Table Top

Once the glue was dry on the top, I removed it from the clamps, flipped it top side down, and found the center of the panel.

.

Now, there are a lot of ways to cut out a circle.  You could use a band saw, a jig saw, even a table saw if you’re brave, but I used a straight bit in my router with a homemade circle jig.

Router Option:

The jig is SUPER easy to make–check out the video for more details. It’s just a piece of ¼″ plywood attached to the bottom of my router base.

RELATED: Check out this Basic Guide to Using a Router

.

I measured and drilled a small hole half the diameter of the circle I wanted to cut from the router bit.  In this case, the circle was going to be about 34” diameter, so I marked 17” from the bit and drilled my hole.

.

I placed this hole on the center mark of the table top panel and drilled the bit about halfway through the wood.  Don’t drill all the way through…since this is the bottom side of the table, this hole won’t matter.

.

I left the drill bit in place, but removed the plywood to adjust my router cut depth to about ¼”.  I also put a piece of ½” plywood under the jig to try to keep the plywood on the same plane since the router base plate was about ½” thick.

Using router and homemade circle jig to cut round coffee table top

Then, I proceeded to cut out my circle going counterclockwise.  Once one pass was done, I could have dropped the router depth another ¼″ and continued making deeper passes until I was all the way through.  That would work just fine.

.

But, I used a jig saw to cut off the edges, then used a flush bit in my router to cut the rest of the sides flush with the initial router cut. 

Router and flush trim bit smoothing out coffee table top edges

Jig Saw or Band Saw Option:

If you don’t have a router, you can use a round object to trace a circle the size you want your top onto the panel or use a pencil with a string tied to the drill bit in the center to draw your circle out.

.

Then, use a jig or band saw to follow that line closely, but staying slightly to the outside of it. Once it’s cut out, you can sand the edges up to the line to get your circle.

Using jig saw to cut round table top

However you decide to cut your circle is fine as long as it gets cut.

.

Once the edges were finished, I sanded it flat and smooth making sure to remove all the glue residue.

Step 8: Attach Base to Top

I attached these figure 8 tabs to the risers on each leg by drilling out a ⅝″ diameter hole just deep enough for the tab to sit down into flush.

RELATED: Check out these tabs used in this table top application for more information.

.

Because these tabs are supposed to be able to swivel back and forth, I used a chisel to remove the material on the sides of the hole, then screwed the tab in place with ⅝″ screws just tight enough that it can still swivel.

Attaching figure 8 fasteners to risers on round coffee table base

I did this on each riser.  You could use a couple per riser if you wanted, but I felt like 3 was fine for me.

.

If you don’t want to use these fasteners, you could also use L-brackets, screws, or another method you feel comfortable with.

Securing coffee table base to round top through figure 8 fasteners

Then, I flipped the base over on the bottom of the round top, made sure it was centered, and screwed these tabs in with ⅝″ screws.

Step 9: Finish DIY Round Coffee Table

To finish up, I gave the entire table (including the legs and the underside) several coats of clear poly to seal it and sanded between each coat.

RELATED: How to finish raw wood furniture

.

I repeated all of this for the smaller table and then I sat down to enjoy them both.  I really love this big and small table together…I may add a third one someday haha.

Overhead view of round wooden coffee tables--one large and one small side by side

These are exactly what I wanted for our new living space—something simple, but modern, and they match the new dining table, and I didn’t was able to put that leftover maple to good use!

.

I really hope you guys enjoyed this DIY round coffee table project!  Be sure to check out the video for more details if you’d like to build one of your own.

.

If you can’t wait to see what’s next, I’d love if you’d subscribe so you can stay up to date on all the latest projects and DIY tips!

If you want to save this for later, be sure to pin it!

Pinterest collage image showing overhead view of round coffee tables at top with Shara Woodshop Diaries sitting by coffee tables at bottom with text "How to build a modern round coffee table"

Until next time, friends, happy building!

How to Build a Modern Dining Table

September 30, 2021 by Shara, Woodshop Diaries

In this post, I’ll show you how to build your own DIY Modern Dining Table with a “floating top!”

Shara Woodshop Diaries looking at Lucy underneath finished DIY modern dining table

A few years ago, I built this same modern dining table design when we first moved into our tiny garage home. We used it for three years and loved it.

.

BUTTTTT…We recently sold that home and the buyers requested we leave that table and chair set behind. (I mean…I don’t blame them. It’s a nice set! Ha!)

Contemporary modern dining table in kitchen with black chairs and grey backsplash

PSSST…Like this kitchen?? You can learn how to make these DIY kitchen cabinets here!

.

So, before we packed up and moved out, I went ahead and built us a new dining table to bring with us to the new place.

.

Since I’ve loved the old one so much, I built this new one in the same basic design–only, this time, I assembled it slightly different and used thicker lumber.

.

I’ll show you how I built both DIY modern dining table versions below in the plans so you can build your own, and I’m also sharing a video tutorial, right here that you can check out for more details:

**This post contains affiliate links. See website policies.

Tools and Materials:

Materials:

*Lumber amounts may vary based on the size table you are building (See notes & step 1)

  • (4) 1x10x8 OR 2x10x8 boards (or equivalent of other widths)
  • (3) 1x4x8 OR 2x4x8 boards (for apron)
  • (3) 1x6x8 OR 2x6x8 (could use x8 instead of x6 for bigger legs)
  • Wood Glue
  • Wood dowels
  • Figure 8 tabs to install table top (optional)
  • ⅝″ wood screws (optional)
  • 1 ¼″ OR 2 ½″ washer head screws (see step 6)
  • Washers

Tools:

  • Circular saw (AccuCut helpful, but not required)
  • Drill/Driver
  • Sander(s)
  • Miter Saw (optional–can use circ saw for everything if preferred)
  • Table Saw (optional, but helpful)
  • Router and straight bit (optional)
  • ⅜″ forstner bit
  • ⅝″ forstner bit (optional)
  • Clamps (various sizes)
  • Chisel

Some Notes About the Modern Dining Table Build:

Lumber Choices:

As you can see by the materials list above, you can build this table from 1x material (which is typically ¾″ thick) or 2x material (which is typically 1 ½″ thick). I’ve built it both ways and it looks/functions great.

.

NOTE: I wouldn’t recommend using 1x material if you are making a really long table as it’ll be more prone to sagging over the longer span.

.

You can use whatever species of lumber you prefer for this. It just depends on your budget, availability, and preference. I used 1x poplar for the older table and 2x maple for the newer one.

Collage image comparing 1x poplar table to 2x maple table

See more about lumber options in step 1.

Table Sizing:

You can easily modify your table size as you wish (I’ll discuss in the steps below).

.

Standard dining table heights are 30″ tall–heights don’t really vary much as they’re made to use with standard size chairs.

.

Widths usually vary from 36-42″ wide…there’s no specific “standard.” And lengths vary greatly–typical is between 6-8 ft long.

.

I built mine approx 40″ wide and 80″ long and that was plenty to seat 6 chairs–potentially 8 if you want to add chairs on the ends.

Table Top Boards:

I listed x10 boards for the table top in the materials list just to keep things easy. Nominal x10 boards are actually about 9 ¼″ wide. Four of these together would give you a top about 37″ wide.

.

But, if you want bigger, you could use x12s instead, or you can use whatever combination of lumber you wish to piece together to make a top whatever size you want. A couple of x6s, a few x10s…it doesn’t have to be specific as long as you have enough to make your top the size you wish.

.

For my table, I used boards of varying widths and ended up gluing together 6 boards total to make a top 40″ wide.

Leg Size:

You’ll notice in the materials list, I listed EITHER using x6s or x8s. Either will work fine, but x8s will make wider/thicker legs.

Some links you may find helpful in the building process:

  • How to square board edges
  • How to build table tops
  • Basic Guide to Using a Router
  • How to finish raw wood furniture
  • Tips for professional looking DIY furniture

Step 1: Determine Your Dining Table Size

First, I determined the overall size I wanted my table to be. You may want something different, depending on your space constraints, style, and how many people you plan to seat.

.

I made this particular table 40″ wide, 80″ long, and kept the standard 30″ table height.

.

Once you determine the size table you want, you need to determine the amount and size lumber you need to build it.

.

I purchased my lumber from a local saw mill, so the widths of the pieces varied.

Shara Woodshop Diaries examining maple wood on workbench for dining table build

I picked out enough pieces that I could trim down and glue together to make a top approximately 40” wide and 80” long.

.

I also purchased some shorter pieces to use for the legs and a couple more long pieces to trim down for the apron—you’ll see that later.

.

Now, if you are on a tight budget, don’t have access to a local mill, or prefer to use readily available lumber, you can definitely build this using basic construction lumber from the big box store or your local building supplier as well. See notes above.

Step 2: Glue Up Dining Table Top

I like to begin table builds by making the top first, so I’m going to focus on that for now.  I ran these boards through my table saw to get clean, square edges on every edge that will be joined.

RELATED: Check out this post to learn how to square board edges.

.

A table saw is definitely helpful for this, and if you have a jointer, that works as well. 

.

However, if you don’t have either, a good straight edge or saw guide used with a nice finish blade on a circular saw can also work.  You just need to make sure the circular saw blade is good and square so your edges aren’t beveled.

.

Once I had my edges prepped, I laid them out on the workbench to decide where I wanted each board to go so that they fit well and the colors blended nicely.

Shara Woodshop Diaries laying out maple wood to arrange boards for table top glue up

A couple of these boards had some “character” edges, that could have been trimmed off.  But I decided to leave these and use them as a design element in the finished project. 

.

So I laid these pieces so that they will be on the outside edge of the table.

Live rough edge on one maple board of table top

It’s a time consuming process, but I’ve found it easiest to only deal with one glue joint at a time.  So I started by gluing just two boards together.

.

Once this had dried, I came back and added another board.  Then another.  Then another until I had the entire top glued up as one panel.

Two maple boards being glued together on workbench to make dining table top

You can use biscuits, dominoes or dowels on these edges if you prefer.  But I just use glue. 

RELATED: Check out this post for tips and more information on how to build a table top.

.

I let the glue dry completely once I clamped on the last board, and while I was waiting, I moved on to the legs.

Step 3: Assemble Dining Table Legs

I trimmed down my leg pieces to eight 27 ½″ long pieces (or 28 ¼″ long if using a 1x thick table top).

.

Then, I ripped them on the table saw to their exact widths.

.

Since I was working with 2x (which is 1 ½″ thick material), I ripped my pieces to a 6″ wide piece and a 4 ½″ wide piece for each leg. That way, when butted together, they will be 6″ wide in each direction.

Wood laid out on workbench in L shape to dry fit dining table legs together

If you’re working with 1x material, this would be 6″ and 5 ¼″ since the material thickness is different. Of course, you can customize your sizing here however you wish.

.

Now, on my original table, I skipped this next part, but with my most recent build, I tried it out. So this is optional…I’ve done it both ways and either works fine.

Cut (Optional) Rabbet for Table Apron

I added a rabbet on the inside corners of my table legs to rest the apron onto later.

Dining table legs dry fit together to show rabbet cut at top in corner

Now, there are lots of ways to go about cutting this out, so whatever works, works. And honestly, if you don’t have the tools to make the cuts, it’s not really necessary. I just thought it would be fun, strengthen the corners, and add a small design detail.

.

For each leg, I took my two leg pieces and marked out where to cut for the apron to sit into.

I highly recommend checking out the video for more specifics.

Wood marked for making rabbet cuts for table apron to sit into

I made my apron 3″ tall, and I wanted a 1″ space between the top of the legs and the bottom of the table top. So I needed the apron to sit down into the legs 2″.

.

If your apron will be a different height, adjust this as needed to that it will stick out the top of the leg 1″.

.

I used some scrap wood and clamps to make kind of a jig to run my router along.

RELATED: Beginners Guide to Using a Router

Scrap boards clamped to table leg pieces to use as straight edge to cut rabbets

I set a ½” straight bit into my router with a cut depth of about ⅜” and cut away this material.

.

Now, I highly recommend doing a test cut on some scrap pieces first to make sure your fit is good and adjust as needed.

Using router to cut rabbets in dining table legs

Once it was cut out, I could use a chisel to square off the corner.  I did this for all four legs and tried to keep these measurements and cuts as consistent as possible. 

Rabbets cut in leg pieces laid out on workbench

Glue Table Legs Together

Just like with the table top, wood glue alone would probably have been fine, but I did add a few dowels here just for the heck of it.

.

I measured and marked out a few corresponding dowel locations down the length of the legs and drilled them out using a ⅜″ forstner bit.

Using forstner bit to drill out dowel holes to assemble modern dining table legs

Then, I used some ⅜″ dowels and glued and clamped each leg together tightly, wiped away the squeeze out and made sure the inside corners stayed nice and square.

Using a speed square to check inside corners of table legs

I set the legs aside to dry and came back to finish up the table top.

Step 4: Trim and Prep the Table Top

The worst part about making tables is having to flatten it out and sand it down once the glue dries.

.

I tried out my new hand plane to help flatten out any unevenness.  It was pretty fun and cut down quite a bit of sanding time. I definitely recommend trying one out if you haven’t before!

.

Once it was pretty flattened out, I used my circular saw and Kreg AccuCut to trim the ends of the top down to its final size. If you don’t have a saw guide, a simple straight edge clamped to the surface works fine.

Using a circular saw to trim table top edges on workbench

Then I followed up with a belt sander to smooth out the surface, then used an angle grinder on the rough spots that I left on the edges. 

.

SIDE NOTE: If you wanted to fake your own live edge over this whole table top, you could definitely give that a go. 

.

I’m not a huge live edge fan…I think this little detail was plenty for me without going overboard.  But if you wanted to do the whole edge, here’s a guide on how to fake your own live edge.

.

Then, I gave the whole thing a final sanding with an orbital sander.  Sanding is boring but is OH SO IMPORTANT! Check out my other tips on how to make DIY furniture look professional here.

Sanding table top smooth using an orbital sander

I repeated this process on the bottom side to at least get it flat–you want it to be able to sit flat on your apron later.

Step 5: Assemble DIY Modern Dining Table Apron

The apron size is based off the final size of the table top.  I wanted the outside edges of the legs flush to the outside edges of the table top. 

.

So I measured the overall size of the table top once it was trimmed down, subtracted 2x the thickness of the top of the legs, and figured up my apron size from there. 

.

I trimmed what maple wood I had left down to make this apron and ripped it to 3” wide. This will give me an apron height of 3″.

.

I laid out these pieces on the workbench and double checked my overall size before gluing anything together. ALWAYS DOUBLE CHECK 🙂

Dry fitting table apron pieces together on workbench

I assembled this apron using wood glue and dowels.  You can get as simple or as complex as you wish for assembling this frame. 

.

You could use pocket holes and screws if you wish as they won’t be seen on the inside anyway.

RELATED: How to use pocket holes in woodworking projects

Applying wood glue to dowel holes to assemble dining table apron

I measured and marked corresponding holes on the apron pieces and used a ⅜” bit to drill out holes to place the dowels into.

Clamping table apron together while glue dries

I glued and clamped this apron frame together using these dowels.

Step 6: Attach Apron to Dining Table Legs

Once the glue on the frame was dry, I sanded down the legs and the apron, then, dry fit the pieces together. If you cut the rabbets in step 3, the apron should just sit down into them on each corner.

Table apron dry fit together with modern dining table legs

But if you skipped the rabbets, clamp the apron to the inside of the legs so that it sticks up from the top 1″.

.

To assemble the apron to the legs, I used some 2 ½″ washer head screws (use 1 ¼″ if working with 1x material) through some washers.

.

I drilled a ⅜″ hole through just the apron (NOT THE LEG), then drove a screw through a washer to pull them together snug (don’t overtighten…just drive until they are tight together to allow for wood movement). 

Close up of screws used to assemble table apron to legs at corners

I did this on each side of each corner on each leg. 

.

The oversized hole drilled through the apron will allow for wood movement as the leg pieces expand and contract so they shouldn’t pull apart at the seams.

Step 7: Finish Table As Desired

I applied 4 coats of clear coat and sanded between each one.  You are welcome to paint/stain/finish the top and base however you wish.

RELATED: How to finish raw wood furniture

Close up of Minwax Helmsman water based poly

I also went ahead and applied a couple coats of clear coat to the bottom side of the table top as well to help prevent warping.

Step 8: Attach Table Top to Table Base 

I installed several of these figure 8 tabs onto the base of the table.  Now there are a few different ways and styles of brackets you can use for attaching table tops. 

.

On my last table just like this one, I simply glued and clamped the top onto the base—but, later I learned that apparently that’s a huge no-no as it doesn’t allow the wood to move and can potentially crack it.

.

However, it’s been three years and it’s yet to have any issues. So sometimes I question the legitimacy of these rules haha. 

.

Nonetheless on this table, these figure 8 tabs are supposed to allow the top to move while keeping it secure to the base and prevent it from cracking over time.

Close up of figure 8 table top fasteners

But, you’re welcome to try whatever method you feel comfortable using to attach the top.

.

To install these tabs, I used a ⅝″ forstner bit to drill just deep enough so that the tab sits flush into the hole. 

Using forstner bit to drill out holes for table top fasteners to go in

The tab is supposed to be able to swivel, so I used a chisel to square off these sides to allow it some room to move. 

.

Then I screwed it in place with some ⅝″ wood screws just loose enough that it can rotate.

Securing table top fasteners to table apron

I did this in several places along the table apron, then I put it all together.

RELATED: If you want to learn more about using figure 8 tabs, this post is really helpful.

.

The top should set on the apron and the edges should be flush to the outside edges of the table legs.

.

Once the tabs are secure to the base and the top is positioned on the apron, you can install the table top, by driving ⅝″ screws through the other side of the tabs on the underside of the table.

Underside of table showing figure 8 fasteners

I didn’t screw my top in place yet because this table was SUPER heavy and it’ll be easier to move in two pieces. But I’ll attach it once we get it moved into the new place!

.

I am so happy with how this turned out and cannot wait to get it in my new home and set up with my new chairs and get to actually use it.

Close up of live edge corner of modern DIY dining table

While I am sad to let my old dining table go, I’m really grateful for the opportunity to have been able to rebuild this design—this time, making some improvements and adding some details I hadn’t thought about before.

.

I really hope you guys enjoyed this DIY modern dining table build and I can’t wait to show you all the upcoming project ideas I have for the new home and the new shop. 

Modern DIY dining table with black chairs

Be sure to subscribe if you aren’t already to stay up to date on all the latest videos and projects.

And don’t forget to pin or save this project for later!

Pinterest collage image showing Shara Woodshop Diaries sitting at Modern DIY dining table at top and complete table with black chairs at bottom with text "How to build a modern dining table"

Until next time, friends, happy building!

DIY Wooden Dog Crate Cabinet

September 25, 2021 by Shara, Woodshop Diaries

In this post, I’ll share with you how to build a DIY wooden dog crate cabinet!

Black and White DIY wooden dog crates sitting side by side with one door open

A friend of mine recently asked me to build a custom black and white wooden dog crate to fit underneath her laundry room countertop.

.

Since this was custom built to fit into a specific space, my measurements are a little random. 

Laundry room space where dog crates will be built into

I’ve provided step by step instructions for this project below, but you will probably want to determine your own size and dimensions to fit your specific dog and your own space constraints.

.

For more pet projects, check out a few of these favorites!

  • DIY Pet House
  • Modern Dog Crate
  • Dog Crate Console Dresser
  • DIY Dog Bed

To determine a good size to make this wooden dog crate for your own pet, I’d recommend finding a plastic tray liner or a dog bed that’s a good size for your dog and build your crate to fit those measurements.

.

Nonetheless, this is a pretty straightforward build and is very easy to customize, so let’s jump right in. You can check out the plans below and the build video here:

**This post contains affiliate links. See website policies.

Tools and Materials:

Tools:

  • Circular Saw
  • Cutting Guides (optional)
  • Miter Saw
  • Drill/Driver
  • Pocket Hole Jig
  • ⅜″ Dowel Jig (optional)
  • ⅜″ forstner bit
  • Nail Gun (optional)

Materials:

  • (1) sheet ¾″ plywood (I used cabinet grade maple)
  • (1) sheet ¼″ plywood
  • (3) 1x3x8 boards
  • (8) ⅜″ dowel rods
  • ⅜″ dowels for joinery
  • 1 ¼″ pocket hole screws
  • Pair butt hinges
  • Surface Bolt Latch
  • Wood Glue
  • Wood Putty
  • Edge Banding (optional)
  • Spray Paint (whatever color you want to paint the rails)
  • Paint (whatever color you want to paint the cabinet)
  • Clear Poly (optional–to finish the inside of the crate)

Notes About the DIY Wooden Dog Crate Cabinet Project:

I used cabinet grade plywood for this project–birch, oak, and maple are usually readily available and are great options. This made them easy to finish and kept the insides nice and smooth (no rough surfaces for splinters).

.

You can mix and match your paint colors as you want for your own project, but I used a custom color match of white paint for this to match my friend’s existing cabinets (the closest color to what I used is SW Extra White) and I used SW Tricorn Black for the top panel. I just used satin black spray paint for the rails.

.

Feel free to get creative by using different colors as you wish.

.

When spacing out your rails in the front panels of this wooden dog crate, make sure to space them close enough together that your dog can’t get their head through and get stuck. Err on the side of too close vs. too far apart.

.

Some posts you might find helpful in this build:

  • How to Cut Plywood Sheets
  • How to Assemble Basic Cabinets
  • How to Apply Edge Banding
  • How to Use a Pocket Hole Jig
  • How to Paint Furniture Without a Sprayer

Step 1: Assemble Dog Crate Cabinet Carcass

If you’ve ever built basic cabinets before, this wooden dog crate is literally just building a cabinet box–two sides, a bottom, two strips at the top, one at the back, and a toe kick at the bottom.

RELATED: You can check out more information on how to build basic cabinets in this post.

ALSO RELATED: You can also check out how to build them a SLIGHTLY different way in this post as well.

Basic unfinished DIY cabinet box

So, I began this project by cutting down the plywood needed to build the main cabinet carcass of the crate. You’ll need to determine your sizing and the best way to cut your pieces from that.

.

As usual, I used a circular saw and my Kreg cutting guides to cut down this sheet. I started by cutting a piece off the sheet to use as the top later.  I set this to the side, then ripped down the remaining sheet into strips to make the cabinet body.

RELATED: How to Cut Down Plywood Sheets

.

From these strips, I cut two sides and a bottom panel. Then I cut three thin pieces for the top and back supports and a strip for the toe kick.

All plywood parts laid out on workbench ready to assemble basic wooden dog crate cabinet

The widths of these thin support strips isn’t critical, but I did cut the toe kick to be about 3” wide to use at the bottom of the box.  You can obviously adjust this width to raise or lower your bottom panel as desired.

.

To keep things super simple, I just used pocket holes to assemble this box—so I drilled ¾″ pocket holes into the ends of the thin strips, and across the ends of the bottom panel.

RELATED: How to Use a Pocket Hole Jig

.

I used the toe kick strip to help me install my bottom panel into my side panel exactly 3” up from the bottom edge.

Shara Woodshop Diaries using pocket holes to assemble bottom panel of crate cabinet

Then, I continued assembling, by attaching these top strips using pocket hole screws.

.

I did apply iron on edge banding to the front edges of all these pieces that will be exposed.  This just makes things look a little cleaner, but is definitely optional.

RELATED: How to Apply Iron On Edge Banding

Shara Woodshop Diaries using pocket hole screws to attach top support strips

NOTE: The top two support strips in this cabinet will be used to install the top panel later and the piece at the back will be used to secure this to the wall studs once it’s set in place—just like a typical kitchen, bathroom, or built in cabinet.

.

Once the sides, bottom and top were assembled, I added the toe kick piece a couple inches from the front edge and set this cabinet aside to start work on the front face frames and door.

Installing toe kick board into cabinet box

Step 2: Measure and Cut Face Frame and Door Pieces

Since I was painting, I used some primed 1×3 pine for the face frame and door frame of this project.

.

I cut down the pieces to make a door and a stationary rail panel to fit my cabinet. 

Finished Wooden dog crate cabinets showing stationary face frame panel vs mobile door panel on front

I made the HEIGHT about ⅛″ shorter than the distance from the top of the cabinet to the bottom of the bottom panel.

.

Now, you can customize the widths you want here to fit your own needs, but I made my stationary face frame panel a little smaller than my door panel.

RELATED: How to Size and Build Cabinet Doors

.

Again, this is completely customizable, but once I cut my pieces to fit on the front of my cabinet, I laid them out on the workbench to get a visual and make sure it would fit correctly.

Laying out door and face frames on workbench to figure proper sizing

Make sure that the two panels together are a little narrower (⅛″ to ¼″) than the overall cabinet width to give you some wiggle room.

Step 3: Drill and Prep Face and Door Frame Pieces

Now, since the rails and frames were two different colors (black and white), I needed to paint the frames and rails separately before assembling them together.

.

So before painting, I went ahead and drilled the holes for assembly and for the rails.

.

I used pocket holes in the stationary panel because they’ll be hidden on the back side. But I used dowel joinery on the door so the joinery wouldn’t be seen when the door is open. However, either method works fine for both.

.

Make sure to label these pieces well so after painting, you know which piece goes where 🙂

.

Once the pocket and dowel holes for assembly were drilled out, I marked and drilled the dowel holes to insert the rails. 

Door frame pieces marked for drilling dowel holes for rail

I decided to add two dowels in the small stationary panel and six in the door.  So I just measured and tried to evenly space these so that they looked okay. 

.

The goal here is to space them close enough so that the dog can’t get their head stuck between them haha.

.

I was using ⅜” diameter dowels, so I used a ⅜” forstner bit to drill out these holes.  I just drilled until the cutter head was about flush with the surface of the wood—the exact depth isn’t critical here—consistency is most important.

Drilling dowel holes for rails in door panels

Once all these holes were drilled, I gave everything a good sanding, then painted all these pieces and the cabinet boxes separately.

RELATED: How to Finish Raw Wood Furniture

Step 4: Cut and Paint Dowel Rails

While the paint dried on the frame pieces, I cut dowels long enough to span the frames and go into the dowel holes so they’ll stay put.

Spray painting dowel rails for dog crate panels

Once these were cut, I used some black spray paint to paint them all and let them dry well before moving on.

Step 5: Assemble Door and Face Frames

I used pocket hole screws to assemble the small stationary frame and used a rubber mallet to make sure the dowels went securely into the drilled out holes.

Assemble rail panel using pocket hole screws

Then, I assembled the door frame using dowel joinery.  I found it easiest to attach the rails between the top and bottom pieces, then add the sides using wood glue and dowels. 

.

The rubber mallet is super helpful in this process to tap everything in place.

Assembling door frame panel of dog crate using dowels and glue

I clamped the door together until the glue dried, then went back and puttied, sanded, and smoothed over the joints on both frames and touched up the paint.

Step 6: Install Face Frame and Door onto Wooden Dog Crate

I installed the stationary panel onto the front of the cabinet using wood glue and brad nails.  Now, if you’re concerned this isn’t enough, you could use screws instead of nails, but honestly, the glue should hold this fine on it’s own.

Shara Woodshop Diaries brad nailing face frame onto wooden dog crate cabinet

You’ll notice that I built this frame so that there is about an ⅛” space between the top of the frame and the top of the cabinet. 

.

This is because I made the door that way so it had clearance to open smoothly and I wanted the two frames to be even.  So that’s why you see a little space here at the top…it was intentional.

.

I puttied over these nail holes, then came back later and sanded, and touched up the paint again…it felt like a never ending process of paint touch ups haha.

Attaching door frame with butt hinges onto dog crate cabinet

Then, I installed the door frame using some simple black butt hinges.

Step 7: Install Back Panel on Dog Crate

Once the door was in place, I cut a piece of ¼” plywood to staple onto the back. If you don’t have a staple gun, wood glue and brad nails or screws would work just as well.

Shara Woodshop Diaries stapling back panel onto cabinet

Step 8: Install Top Panel and Latch

I brought out the piece from the very beginning that I cut from the plywood sheet to use for the top.  I trimmed it to fit, then applied edge banding, and painted it black to match the rails. 

.

I hate painting so I hardly ever show that process.  But I have a helpful furniture finishing guide here.

.

So once the top was painted, I simply screwed it in place using 1 ¼″ screws through the supports at the top, then added a latch to keep the door closed.

Shara Woodshop Diaries attaching top panel using wood screws through top supports

I used a simple surface bolt because I thought it looked good with this project.  But whatever kind of latch you prefer is fine.

.

To install this surface bolt, I placed it where I wanted it and traced out the hole in the bracket that the bolt should slide up in to. Check out the video above to see the full process.

.

I drilled out a hole about ¼” deep in this spot, then screwed the bracket in place.  Then I attached the surface bolt to the door so that it lined up with the bracket.

Close up of installing surface bolt latch onto dog crate door

I also added a small magnetic catch to the door to just help pull it into place when the door is shut. This is completely optional, but you can see it in the images below.

.

I also applied a few coats of clear sealer (I used Minwax Helmsman Water Based) to the inside of the cabinet to seal it and make it easier to clean up any messes and spills.

Shara Woodshop Diaries with dog, Lucy, showing finished black and white dog crate with door open

You’ll notice that I installed the door panels opposite on these two crates.  Either way works fine, but this way, since they’re going side by side, once they’re installed, it’ll be more balanced looking with the doors centered.

.

I bribed Lucy into demonstrating this wooden dog crate cabinet for me…she has to earn her keep around here haha!

Black and white dog in front of black and white wooden dog crate with door open

I hope you enjoyed this DIY wooden dog crate cabinet build and I hope it inspired some ideas of your own!

.

If you can’t wait to see what’s next, I’d love if you’d subscribe so you don’t miss out on all the upcoming tips, tricks, and projects!

Don’t forget to check out the video as well, and if you’d like to save this for later, don’t forget to pin it or share it to your favorite social channel!

Pinterest collage image showing pair of black and white dog crate cabinets at top and dog in front of crate at bottom with text "how to build a dog crate cabinet"

Until next time, friends, happy building!

How to Make a Simple Chair

September 10, 2021 by Shara, Woodshop Diaries

In this post, I’ll show you how to build this easy modern chair with dowel rails on the sides!

Simple modern DIY outdoor chair made from cedar and wood dowels sitting on front porch with cushion and pillow

A while back I built some modern outdoor chairs that we’ve been using pretty much daily for the last several years.  And when I say “we,” I mean mostly my dog, Lucy, as this is her favorite hangout spot while I’m working in the shop during the day.

.

Every spring I think “I really need to refinish these chairs” and every year I keep putting it off haha. 

.

So, due my to neglect, they’ve started looking a little rough and I thought it might be time to spruce things up with a new chair for the porch.  After all, Lucy deserves it 😉

.

I’m sharing FREE free plans for this simple outdoor chair build with diagrams, dimensions and details below, and I have a video tutorial here as well:

This post contains affiliate links. See website policies.

Tools & Materials:

Tools:

  • Miter or Circular Saw (to cut pieces to length)
  • Drill/Driver
  • Pocket Hole Jig
  • Table Saw (optional, but helpful)
  • Kreg MultiMark (optional, but helpful)
  • ¾″ forstner bit

Materials:

  • (3) 2x4x8 boards
  • (1) 1x6x8 board (tongue and groove 1x6s are usually cheaper and will work fine for this)
  • (5) ¾″ diameter x 48″ long dowels
  • Wood Glue
  • 1 ¼″ & 2 ½″ wood screws (exterior grade)
  • 2 ½″ exterior pocket hole screws
  • 2 ⅞″ Timber Screws (optional)
  • Black Spray Paint
  • Outdoor Wood Finish

Some Notes About the Build:

Lumber:

Since I’ll be using this chair outside, I opted for cedar 2x4s and 1x6s since cedar is naturally rot resistant and holds up well for exterior projects.

.

I couldn’t find cedar dowels, so I used poplar dowels (pine dowels would also work fine) and will paint them to seal and protect them. This should help this chair last for years to come.

.

Hardware:

Also, since this is an outdoor chair, it’s important to use screws rated for exterior use so they don’t rust or corrode over time.

.

Cushions:

This seat sat comfortably, but was somewhat low to the ground. If you want to raise the seat, you can shorten the length of your dowels. Or, simply add a cushion.

.

You can check out this post to learn how to make an easy outdoor cushion and cover.

.

Size:

Overall project dimensions are 24 ½″ deep, 25 ½″ tall, and 31″ wide.

Overall DIY outdoor chair dimensional diagram--31" wide, 24 ½" deep, 25 ½" tall

Step 1: Assemble Top Chair Frame

I assembled the top of the chair first. From my first 2×4, I cut three pieces like shown below to make the top chair frame.

.

I set the remaining piece of 2×4 from this board to the side to use in a later step.

Diagram showing the U shape top frame assembly of outdoor chair

I assembled this “U” shaped frame using 1 ½″ pocket holes and 2 ½″ pocket hole screws.

RELATED: How to use a pocket hole jig

.

Since this is an outdoor chair, I used these Kreg Blue Kote screws since these are designed for use in pocket holes in exterior projects.

Step 2: Attach Legs to Top Chair Frame

Once this top frame was together, I used some 2 ½” exterior screws to attach the legs. 

.

I cut these legs from my second 2×4 board.

Diagram showing legs installed onto top chair frame

Helpful hint: Note that this diagram shows the legs at 24″ long. Due to the blade kerf from the cuts, in order to keep them all the same length, it might be best to cut them more like 23 ⅞″ so the last leg isn’t shorter than the rest.

.

I attached two legs at the back corners and I made sure to predrill the holes before driving the screws to prevent splitting the wood.

.

Then, I placed the front two legs 21″ from the back legs. I honestly don’t know why, but I thought it would be neat to let the arm rests overhang the front legs about ½” here as you can see.  Feel free to make these flush instead if you prefer.

Step 3: Mark and Drill Dowel Holes for Chair Rails

After these legs were attached, it was time to move on to the fun stuff—adding the dowels.

.

I’ve actually added dowels to a few of my recent projects, so you may already know the drill here—no pun intended haha.

.

See more projects using dowels here:

DIY Blanket Ladder
DIY Toddler Bed

But flipped this chair upside down on my work surface and used my Kreg multimark tool to mark a line ¾” in from the inside edge of the arm rests and along the back edge of the back rest. 

Using Kreg Multimark to draw dowel marks

Then, I measured out 5 equally spaced marks along this line to add the dowels. You can space these however you wish and add as many as you wish. I just did five on each side and 5 on the back.

Measuring out dowel locations on DIY outdoor chair top frame

From my last 2×4 board, I cut two 24″ long pieces for the front and back of the seat and two 21″ long pieces for the sides of the seat.

.

I transferred these marks from the top chair frame to the sides and back seat pieces so the dowel holes will be drilled at the same locations.

Transfer dowel locations from arm rest to seat frame

The front seat frame piece won’t need any holes drilled, so I left it alone.

.

Since I was using ¾” dowels, I used a ¾” forstner bit to drill out holes at all these marks on both the arm and back rests and on the side and back seat supports.

Using a forstner bit to drill out dowel holes in outdoor chair seat frame wood pieces

I just used a regular drill for this since I don’t have a drill press and just drilled until the head of the bit was about flush to the surface of the wood.  This doesn’t have to be perfectly precise, just keep it as consistent as possible.

Step 4: Cut and Paint Chair Rails

Then, I cut 15 dowels about 14” long.  For a higher seat, you can cut them shorter and for a lower seat, you can cut them longer. 

Spray painting dowels to use as outdoor chair rails

Once they were cut, I hand sanded them, then took them outside to spray paint them.  I gave them all a few coats of satin black paint and made sure all the surfaces were covered and let them dry well.

Step 5: Install Outdoor Chair Railings and Seat Frame

Once the paint was dry on these railings, I used some wood glue and insert them into the holes drilled on the arm rests of the chair.   

Installing dowels as chair rails into the arm rests

After they were inserted into the holes on the bottom of the arm rests, I added some glue at the tops of the railings and set the side seat frame piece on top.  I used a rubber mallet to kind of tap the dowels into the holes in the seat support.

.

Then I used some timber screws to secure this seat support flush along the inside of the front chair leg. 

Securing DIY outdoor chair seat side frame pieces using timber screws

I checked that the distance at the front and the back between the arm rest and seat support was the same before securing. I tried for the seat frame top to be about 10″ from the bottom of the legs, but it doesn’t have to be 10″ exactly as long as you keep it consistent.

.

Now, I was running low on these timber screws, so I actually only used these at the front because they add a nice decorative touch and I just used regular exterior 2 ½” screws at the back since they won’t be seen.

.

But timber screws OR 2 ½″ screws would work fine here.

.

Then, I repeated this same process on the opposite side of the chair.

Diagram showing seat side frame pieces attached between chair legs

The front and back seat frame pieces will be attached with 1 ½″ pocket holes and 2 ½″ exterior pocket hole screws, so I drilled pocket holes into the ends of these two pieces.

.

I glued the dowels in place on the back side of the chair just like the sides and installed the seat piece just like the sides, only I secured them through the pocket holes.

Securing back seat frame piece using pocket holes from the inside of chair

Then, I simply attached the front piece using pocket hole screws so that it was at the same height as the other seat supports.

Diagram showing installation of front seat frame piece into DIY outdoor chair

Step 6: Add Seat Supports and Slats

Now all that was left was adding the seat.

.

I ripped the leftover 2×4 from step 1 in half on the table saw to give me roughly two 2×2 pieces and cut them to 20″ long.

RELATED: How to cut your own 2x2s from 2x4s

.

I screwed these onto the inside of the seat frame sides ¾″ down from the top edge using 2 ½″ wood screws.

DIY outdoor chair diagram showing installation of seat slat supports screwed into seat side frames

The seat slats were cut from a 1×6, but they are a little too wide to fit 4 full slats, so I ripped these down to about 4 ¼″ wide on the table saw.

.

Now, tongue and groove 1x6s are typically cheaper (especially with cedar) than standard 1×6 boards, and since these need to be ripped anyway, it makes sense to buy T&G and just rip off the tongue and grooves and use these for the slats to save a few bucks.

.

I cut my board into 4 pieces about 23 ⅞″ long, ripped off the tongue and groove edges, and placed them in the seat with equal gaps between them.

Diagram showing dimensions of chair seat slats

The gaps don’t have to be perfect. Just eye ball them so they all look even.

.

Then, I screwed them into the 2x2s below using 1 ¼″ exterior wood screws. At this point, you can add some outdoor finish/sealant and it’s ready to use!

.

Now, the chair sat good and felt strong and sturdy but, personally, it felt a little short and like it was missing something.

.

So I added a seat cushion to give it a little more comfort, height, and visual interest. You can make your own cushion with this tutorial, but I designed this outdoor chair to fit a standard 24″ x 24″ seat cushion, so you can also purchase one instead of making it if you prefer.

.

After me and Lucy tested out our new DIY chair in the shop, I moved it to the front porch so we (mostly her haha) can enjoy it all year long. 

Shara Woodshop Diaries and Lucy sitting in modern outdoor chair on front porch

I hope you enjoyed this project, and if you’d like to build your own, be sure to check out the video tutorial here to get extra details on the process! 

.

And if you can’t wait to see what’s next, I’d love if you’d subscribe to my newsletter so you don’t miss out on all the upcoming projects…and guest appearances from Lucy 😉

If you’d like to save this DIY chair project for later, don’t forget to pin it or share it to your favorite social channel!

Pinterest collage showing overall dimensional diagram at top and finished chair on front porch at bottom with text "how to build a modern outdoor chair"

Until next time, friends, happy building!

DIY Mid Century Modern Bed

September 4, 2021 by Shara, Woodshop Diaries

In this post, I’ll share how to build this DIY mid century modern bed frame!

I’ve got printable plans below for full, queen, and king bed sizes so you can build your own in whatever size you need!

DIY Mid Century Modern Bed Frame with matching nightstands

I love a matching set of furniture…in case you hadn’t picked that up between the various matching sets I’ve built already haha.

.

This bed finishes off my latest matching series–this time, a mid century modern bedroom suite!

.

This bed is the fourth part of the series. If you haven’t already, be sure to check out the other matching pieces in this set here:

  • Mid Century Modern Nightstand
  • Mid Century Modern 6-Drawer Dresser
  • Mid Century Modern Dresser Console

.

I built this particular mid century modern bed as a queen size for my parent’s guest bedroom, but I’ve got the plans, details and dimensions for a full, queen, and king size below, plus a video and step by step tutorial to walk you through the process as well.

This post contains affiliate links. See website policies here.

Tools & Materials:

Materials:

  • (3) sheets ¾″ plywood sheet (I used maple)
  • 2x scraps to cut legs out of
  • (2) 2x2x8 boards
  • Edge banding
  • Bed rail brackets
  • 1 ¼″ pocket hole screws
  • 1 ¼″, 2″, 2 ½″ wood screws
  • Finish nails
  • Wood Glue
  • Wood Finish of your choice (I used Minwax Helmsman Clear Coat)

Tools:

  • Circular Saw
  • Miter Saw (optional)
  • Jig Saw
  • Drill/Driver
  • Pocket Hole Jig
  • Nail gun (or hammer and finish nails work, too)

PRINTABLE BUILDING PLANS:

Notes About the Mid Century Modern Bed Build:

Just like with all the other pieces in this series, I used ¾″ maple plywood for the vast majority of this build.

.

You can use whatever species of plywood you prefer, but a good quality hardwood (cabinet grade) plywood is always recommended for best results.

.

This build calls for cutting some thin pieces from a plywood sheet for some of the trim pieces. If you prefer to use solid wood instead of plywood for this, feel free to do so.

.

I typically use a Kreg Rip Cut for ripping strips from a full sheet, however, the Rip Cut is not designed to cut very thin pieces, so for the thinner trim stuff, I recommend using a straight edge as a guide or a table saw if you have one.

.

This design is made so that a box spring is not needed under the mattress. The slats that run between the side rails will support the weight of the mattress. Typically, I prefer to support these slats in the middle using 2×2 posts.

Computer diagram showing bed slats spaced across the side rails

However, if you don’t want to see these posts under the bed, I’ve seen people run a 2×4 or 2×6 support between the head and footboard to support the slats in the middle. However, I don’t prefer that method, so I’m showing center posts for support here.

.

Overall dimensions will vary based on the size you’re building, so refer to the plans for specifics.

Diagram of mid century modern bed

This bed (like most of my other bed builds) is broken down into 4 basic parts–the headboard, the footboard, the side rails, and the slats. I’ve found it easiest to build these sections separately, then put it all together at the end.

.

Some posts you may find helpful in this build:

  • How to cut down plywood sheets
  • How to apply edge banding
  • How to use a pocket hole jig

Step 1: Assemble Mid Century Modern Head Board

Since the headboard was the biggest piece, I started with it first. I ripped a few 5″ wide strips from a ¾″ thick plywood sheet to build a frame.

RELATED: How to cut down plywood sheets with a circular saw

.

I basically cut and assembled a plywood frame the size I wanted the headboard to be using pocket holes and screws.

RELATED: How to use a pocket hole jig

Assemble headboard frame using pocket holes

Once the frame was together, I cut a piece of ¾″ plywood that was the same width, but ¾″ SHORTER in height than this frame. There’s no need to edge band any of this as trim will cover these edges up later.

.

I glued and screwed this frame onto the BACK side of the panel leaving ¾″ hanging over the bottom edge.

Apply glue to headboard frame

This frame isn’t totally necessary, but it does add a little strength and rigidity to the large panel and also allows me to use longer screws to secure the brackets later.

Secure headboard frame to headboard panel

Step 2: Build and Attach Modern Legs to Head Board

If you’ve seen the other pieces in this series, this leg design probably looks familiar.  I used this exact same template to draw out identical legs as what I used on the nightstands and the dressers previously.

.

The only difference was that I made the top section about 2″ thick vs the 1 ½″ I had done earlier.

Mid century modern foot template

This just helped add some strength.

.

I drew these out on my board and cut them out with a jig saw.

.

Now, just like with the other projects, I used some poplar here for these legs.  However, it was 1” thick poplar and not regular 1x material (which is actually only ¾″ thick), so it was a little thicker than is normal. 

.

I think these will hold just fine for this guest bed, but I would probably recommend going with 2x (or 1 ½”) thick material for the legs just for a little extra strength at the corners. 

.

I wouldn’t recommend ¾” thick material for these legs in this application.

.

I used some scrap ¾″ plywood strips and laid these legs across them at a 45 degree angle and marked where to cut using a speed square. I cut these pieces at a 45 degree angle so that the leg would fit fully across the diagonal.

Mark where to cut foot plates for mid century feet

I cut four of these—one for each leg.

.

Then, I glued and screwed these legs onto these pieces using (at least 2 per leg!) 2 ½” wood screws.

Screw foot plates to mid century modern feet

Then, I attached two of these onto the headboard.

.

I glued and screwed two of these leg pieces into the headboard using four 2” screws—two through the headboard from the back side and two through the bottom up into the headboard panel.

Screw foot plates to headboard bottom

I attached these so that they are ¾” in from the outside edges so the side rails will fit beside them later.

.

*NOTE: There are other ways to add these feet, and you’re welcome to use your own method if you prefer.

The weight will be distributed quite a bit once the mattress is in place, so there really shouldn’t be a lot of concentrated stress on them individually. But, make sure they are secured well, here.

.

Once the headboard was together, I moved it out of the way and began assembling the footboard.

Step 3: Assemble Foot Board Panel

The footboard was just a solid panel like the headboard, but without a frame.  So I cut down a piece of 12″ wide plywood the same width as the headboard to use as the footboard.

.

Then, I cut a piece of 5” wide plywood to run across the back side of this piece. I cut this 5″ piece so that it would be 1 ½” narrower than the footboard panel to leave an extra ¾” space on each side.

Screw footboard support to footboard panel

This plywood strip on the back side will help keep this panel more rigid, but also allow me to use longer screws with the brackets I’ll install later.

.

I glued and screwed this in place ¾” up from the bottom edge and ¾” in from each side.

.

Then, I installed the little foot pieces just like with the headboard with glue and two screws through the bottom and two through the headboard keeping them ¾″ in from each outside edge.

Screwing foot plates to footboard of mid century modern bed

Step 4: Assemble Modern Bed Side Rails

Each side rail consisted of one 9 ¼” strip and one 5” strip of ¾″ plywood. 

.

So, I ripped two 9 ¼” wide plywood strips from one of my plywood sheets and trimmed them to length on the miter saw to make the side rails. Then, I cut two 5″ wide strips ¾″ shorter than these side rails.

.

After I cut them to length, I glued and screwed the 5” strip to the side rail ¾” up from the bottom edge and ¾″ inset from the FOOTBOARD end of the rail.

Secure side rail supports to side rails

Keep in mind that this means the side rails will be mirrored–so pay attention to inset these on the FOOTBOARD side of each rail.

.

Now, because I don’t like exposed plywood edges, I edge banded the tops of these side rails, but that’s totally optional.  If you’re interested in how to apply edge banding, I’ll link a detailed guide here.

Step 5: Assemble the Bed and Install Brackets at Corners

I found it easiest to kind of dry fit the four sides of the bed together and attach the brackets at the corners.  

.

Basically, I assembled the pieces together loosely (it helps to have another person to hold the pieces steady while you fit them together) so that the side rail supports rest on the sides of the foot pieces on the head and footboards.

Bed side rails resting on corner foot pieces at footboard

They make many types of brackets to assemble bed frames, but I’ve used these particular ones in several beds and they work great and are fairly inexpensive.

.

Check out the video for more details, but each corner will get a bracket with “teeth” and a bracket with “slots”. Make sure the “teeth” are pointing DOWN when installed. I just slid the brackets together, placed in the corner and screwed in place.

Close up of bed brackets--teeth pieces and slot pieces

I used 1 ¼” long screws in all the holes in the brackets and once installed, I test fit each corner to make sure it could come apart and go back together smoothly. You’ll simply lift the side rails up to remove the teeth from the slots to separate.

Screwing brackets into corners of bed between footboard and side rails

When you put them back together, MAKE SURE THE BRACKET GOES TOGETHER SNUG and the teeth go all the way down into the slots.

Step 6: Add Bed Slats

Once the brackets were installed, I used what plywood I had left to rip some strips to use as the slats.

.

This design allows you to skip a box spring by using slats spaced along the side rail supports, but these need to also be supported in the middle.

Secure middle slat supports to bed slat pieces

I’ve seen people use a 2×4 running from the head to the footboard in the middle, and you could do that I guess, but I prefer to add some 2×2 pieces in the center from the slats to the ground as this is less likely to sag over time. 

.

I marked the middle of each slat and screwed a 2×2 in there with 2 ½″ wood screws so that the slats are level all the way across from side rail to side rail.

Step 7: Trim Out Head and Foot Boards

The final part of this bed was adding some trim around the edges of the head and foot boards.

.

I used some scrap plywood strips, cut them to fit, and edge banded the edges that will be exposed. However, if you had some 1x2s or 1x3s you wanted to use for this, instead, that works great as well.

.

I glued and nailed them along the edges of the footboard and the headboard.  I used 2” wide pieces around the headboard and 1 ½” wide pieces around the footboard.  But you can play around with the thicknesses of your trim pieces to suit your style.

Glue and brad nail trim pieces around footboard

The bottom piece on the footboard was just ¾” square and I nailed it across the front instead of along the bottom so that it would cover the screw heads leftover from attaching the feet pieces.

Step 8: Finish and Assemble

I gave these pieces a few coats of clear poly, then brought it inside to assemble it for use.

.

Once the pieces were where the bed was going to stay, I attached the side rails between the head and foot boards using the brackets from step 5. Once the teeth were securely in the slots, the side rails should be resting on the corner braces for the feet.

.

These corner braces are attached to the head and footboards, but not to the side rails at this point.

.

So once the side rails were in place, I drove a screw up through the bottom of these foot braces into the side rail supports so they will be secured on both edges.

Secure foot plates to side rails of modern bed

After securing the feet to the side rails, I evenly spaced (just eye-ball this…it doesn’t have to be EXACT) out the slats on the side rails, and screwed them in place.

Bed slats spaced and secured to side rails

Then, I threw on the mattress, the sheets, the comforter, pillows, blankets, and all the things that make a bed look pretty, then took a break to recover from the build haha.

Shara Woodshop Diaries sitting on modern bed assembled in bedroom with matching modern nightstands

All in all, this mid century modern bed frame was a fairly straightforward build, and is simple enough to work with any style if you want to mix and match furniture. 

.

But, I have to admit, it looks pretty good with the matching nightstands here.

Finished plywood mid century modern bed with white comforter and matching nightstands

If you want to grab the plans with all the details for this, or any of the pieces in the matching series, be sure to check them out here:

  • Mid Century Modern Bed Plans
  • Mid Century Modern Nightstand Plans
  • Mid Century Modern 6-Drawer Dresser Plans
  • Mid Century Modern Dresser Console Plans

.

I hope you guys enjoyed this series and this build.  And if you can’t wait to see what’s next, I’d love if you’d subscribe to my newsletter to be the first to know about new projects and posts!

And if you’d like to save this DIY mid century modern bed project for later, be sure to pin it or share it to your favorite social platform!

Pinterest collage image with modern finished bed at bottom and computer diagram at top with text "how to build a mid century modern bed" and "plans for full, queen, and king size"

Until next time, friends, happy building!

DIY Modern Console–With Stenciled Doors

August 28, 2021 by Shara, Woodshop Diaries

In this post, I’ll show you how to build your own DIY modern console dresser as part of the matching mid century modern bedroom furniture series!

Maple mid century modern console cabinet with doors, drawers, and open shelf. Mid century stenciled doors on left and right

If you’ve seen any of the other parts of this series, you’ll know that I’m building a series of matching bedroom furniture with a mid century modern feel.

.

I actually already shared a matching mid century modern dresser build here, and matching nightstands here. But because I LOVE building dressers, I decided to build a second dresser design so you’d have two to pick from *wink wink*

.

This DIY modern console dresser design has an open shelf, two large drawers, and two cabinets with doors and shelves inside. That makes it perfect for use as a bedroom dresser, dining room console, or even as a TV stand.

.

If you build your own, you can use it however you wish 🙂

.

I’m sharing the build video with details on how I stenciled the doors here and I’ve got the building plans below.

This post contains affiliate links. See website policies.

Tools & Materials:

Tools:

  • Circular Saw (cutting guides optional, but helpful)
  • Jig Saw
  • Drill/Driver
  • Pocket Hole Jig
  • Shelf Pin Jig
  • Concealed Hinge Jig
  • Stapler (optional)
  • Table saw or router to cut drawer dadoes (optional)

Materials:

  • (2) sheets ¾″ plywood (I used maple)
  • (2) 2x4x8 boards
  • (½) sheet ¼″ plywood
  • Scrap 1x or 2x material to cut legs from
  • Wood Glue
  • 1 ¼″ pocket hole screws
  • 2 ½″ pocket hole screws
  • 2″ wood screws
  • (2) pair 16″ ball bearing drawer slides
  • (2) pair inset concealed hinges
  • Shelf pins
  • Edge banding
  • Stain/Poly/Wood Finish of your choosing
  • Modern Handles

What You’ll Need for the Stenciled Door:

  • Cricut Joy Machine
  • Cricut Joy Permanent Smart Vinyl
  • Cricut Joy Transfer Tape
  • Cricut Starter Toolset

*NOTE: this tutorial will not go into great detail on the stencil design. Please refer to video for more details on the stencil how-to.

DIY MODERN CONSOLE PRINTABLE BUILDING PLANS:

Some Notes About this Modern Dresser Console:

This project is part of a matching mid century modern series. You can check out all the parts of this series below:

  • 6 Drawer Modern Dresser
  • Open Shelf with Drawer Nightstand
  • Mid Century Modern Bed *coming soon!*

.

The overall dimensions of this project are 60″ wide, 18 ¼″ deep, 36″ tall.

Overall dimensions of modern dresser console diagram

You may find these guides/posts helpful to refer to during the build process:

  • Top Ten Tools for Cabinet and Furniture Making
  • How to Cut Plywood Sheets with a Circular Saw
  • How to Apply Edge Banding
  • How to Use a Pocket Hole Jig
  • How to Build and Install Drawers
  • How to Install Concealed Hinges
  • How to Square Off Rounded Board Edges

Step 1: Assemble Main Console Carcass

To begin, I started cutting down my plywood sheet into the pieces to build the main body of the dresser.

RELATED: How to cut plywood sheets with a circular saw

.

I have a plywood cut diagram in the plans for exact measurements, but I cut two top and bottom pieces, two side pieces and two divider pieces from my ¾″ plywood sheets.

.

Note that the divider panels are 17″ deep and the rest is 18″ deep here. The dividers should be inset from the front edge 1″.

Main carcass assembly diagram of DIY mid century dresser console body

I edge banded the plywood edges that will be exposed, then used a pocket hole jig to drill pocket holes to assemble.

RELATED: How to use a pocket hole jig

ALSO RELATED: How to Apply Iron On Edge Banding

.

Note that the pocket holes are on the INSIDE of the side panels at both the top and bottom, but are on opposite sides on the divider panels. The pocket holes at the top of the divider panels should be on the CABINET side of the dresser and the holes at the bottom should be facing the middle drawer section of the dresser.

.

I assembled this dresser carcass using ¾″ pocket holes, 1 ¼″ pocket hole screws, and wood glue at each joint.

Step 2: Install Middle Shelf

I used ¾″ pocket holes and 1 ¼″ pocket hole screws again to install a middle shelf between the divider panels 18″ up from the bottom panel like shown in the diagram.

Install middle shelf diagram in modern console main body

Step 3: Add Pieces to “Fake” Inset Frame

As part of the design element in this series, I’m building these pieces to have some extra dimension on the front so it looks like “a box within a box”.

.

To save on plywood, instead of actually building an entire second box inside of this dresser box, I used some smaller pieces to “fake” it.

.

I cut and glued two pieces–one at the bottom of each cabinet section like shown here so that they were 1″ inset from the front edge:

Panels installed into bottom of cabinet sections of dresser

Then, I glued some 2 ½″ wide ¾″ plywood pieces in place along the top and the bottom middle sections. These areas don’t need a full pieces as they won’t be seen. Again, these should be 1″ inset from the front edge.

trim pieces installed on top and bottom of console carcass body

And the last piece of the “fake inset frame” was the drawer divider. I cut another 2 ½″ wide strip of ¾″ plywood like shown and used ¾″ pocket holes and 1 ¼″ pocket hole screws to secure it between the dividers to evenly space out the drawer sections.

Drawer divider diagram showing installed using pocket holes and screws

Step 4: Build Mid Century Modern Console Base

The base of this dresser consists of a 2×4 frame assembled with pocket holes like shown below.

.

Now, 2x4s typically come with rounded edges and to make cleaner joints, I like to square these off. This tutorial walks you through that process.

.

That’s totally optional, but do keep in mind that if you do trim your edges, you may have to adjust your measurements below since what’s shown below assumes a full 3 ½″ wide 2×4.

Base assembly for DIY dresser console with mid century modern legs

Once the base was assembled, I cut out 4 legs like shown on a scrap piece of poplar. I just cut one out with a jig saw, sanded it smooth, and traced the other three on the board to cut out.

.

You could use any 1x or 2x scrap for this or even some ¾″ plywood. I just happened to have some scrap poplar handy to use for this.

Mid century modern leg template diagram

After the base frame was assembled and the legs cut, I used some wood glue and 2″ wood screws to secure the legs onto the base frame at each corner.

.

I wanted these to angle in, so I used a speed square to help me angle the legs at 45 degrees while securing.

Shara Woodshop Diaries installing legs onto base of dresser

Step 5: Install Base onto Cabinet

I used wood glue and 2″ wood screws to secure the dresser base to the dresser cabinet leaving 2″ overhang on the left and right and 1″ overhang on the front and back.

Diagram showing installing dresser base onto bottom of dresser console cabinet

Step 6: Install Drawer Slides

I installed 16″ ball bearing drawer slides into the dresser so that the front edges were flush to the front edge of the divider panels.

.

For more information on installing drawer slides, check out this detailed drawer building guide.

Shara Woodshop Diaries installing drawer slides onto cabinet of dresser body

Step 7: Build and Install Drawer Boxes

I built two identical drawers using ¾″ plywood for the sides and ¼″ plywood for the bottom.

exploded view of drawer boxes for dresser console cabinet

I cut ¼″ dadoes into the drawer box sides to insert the bottom panel, but if you don’t have a table saw or router to cut your dadoes, you can simply staple or screw the ¼″ plywood bottom onto the bottom of the drawer box instead.

.

I assembled these drawer boxes using ¾″ pocket holes and 1 ¼″ pocket hole screws.

RELATED: How to measure, build, and install drawer boxes

.

Then, I installed them into the dresser onto the slides.

Diagram showing drawers installed into dresser console

Step 8: Add Adjustable Shelves to DIY Modern Console

At this point, it makes sense to go ahead and drill the shelf pin holes before you start attaching the doors to make things easier.

.

I used a shelf pin jig to drill shelf pin holes along the sides of each cabinet section in order to install shelf pins that will allow me to have adjustable shelves.

RELATED: Learn more about shelf pin jigs in this post

Using shelf pin jig to drill shelf pin holes into cabinets for adjustable shelves

You can cut the shelves now or later, but I cut mine to 14″ deep x 16 ½″ wide, ensured they fit, then set them to the side for now.

.

As a side note, since these shelves are only 14″ deep, make sure not to drill the front shelf pin holes more than 14″ from the back edge. Don’t ask me how I learned that lesson haha.

Step 9: Cut and Install Doors and Drawer Fronts

The doors and drawer fronts were a little odd here because I didn’t follow the TYPICAL spacing rules. Normally, with doors and drawers, ⅛″ is the typical spacing gap.

.

However, I cut these drawer fronts to allow ½″ space at the bottom, ¼″ between the two, and they overhang each side ¼″. I cut these fronts from ¾″ plywood, edge banded, and screwed them onto the drawer boxes from the inside.

Drawer front dimensional diagram showing installed onto drawer boxes

Then, I cut the doors from ¾″ plywood, edge banded, and applied the stencil design.

Door dimensional diagram showing installed onto DIY mid century modern dresser

Now, before I attached the doors to the dresser, I added the U shape stencil design.

.

I share the details on the stencil design and plenty of additional stencil options in the video above, so if you want to add that to your dresser, I highly recommend checking out the video.

.

But here’s a quick run through…

.

Once the doors were cut, I used my Cricut Joy machine, and Cricut Design Space to design and cut some permanent Cricut Smart Vinyl to use as my template. Then I used transfer tape to apply it to the door.

.

I added painters tape along the edges to give it a “frame” around the edges.

Shara Woodshop Diaries staining between stencil pieces on mid century modern dresser doors

I stained over the stencil with Minwax Early American between the stripes to give it some color, then removed the stencil to reveal the natural wood left underneath. You can do so many different designs here, so feel free to get creative!

.

Once the design was applied, I used a Kreg Concealed Hinge Jig to drill my hinge cup holes and installed inset concealed hinges onto the door.

RELATED: How to Install Concealed Cabinet Hinges

Installing concealed hinges onto doors

I set the doors in place on a scrap piece of ½″ plywood to help me keep my spacing correct (there should be ½″ space at top and bottom of door on front side).

.

I found it easiest to install these from the inside of the cabinet by crawling in the back side. Note that these should be about ¼″ inset from the front edge so they are flush against the inset bottom and top pieces from step 3.

Inside cabinet view of hinges installed onto dresser

Adjust hinges so that there is about ⅛″ gap between the door and dresser side.

Step 10: Install Back and Add Shelves

Once the doors are installed, all that’s left is to add the back panels and the shelves.

.

I cut and stapled two ¼″ plywood back panels onto the cabinet sections of the dresser like shown below. If you don’t have a stapler, you can use screws or brad nails too.

Back panel dimensional diagram

Now, install the shelf pins inside each cabinet and place shelves where desired.

Finished DIY mid century modern dresser console with stenciled door open to show adjustable shelf

Step 11: Finish As Desired

Now you can finish as desired. Paint…stain…poly…wax. You can get as creative with the finish as you wish.

.

I simply applied three coats of Minwax Helmsman Poly to the dresser to protect it, but keep it’s natural color.

.

Then, I added these simple black handles and this DIY modern console was complete!

.

PSSST…Notice that Woodshop Diaries shirt?? Check out all the latest woodworking t-shirt designs available in my shop here and grab a few of your favorites!!

Shara Woodshop Diaries showing off natural and stained stenciled mid century design doors on DIy modern console

I LOVE LOVE LOVE how this turned out! I also love the idea of having cabinets in a dresser as the shelves really help add some useful storage space for things like clothes, blankets, and linens.

.

This would also be amazing as a TV stand with the open shelf in the middle for modems, DVD players, and other electronics.

.

I really hope you enjoyed this project and this build and if you want to stay up to date on the latest new projects in this matching series, be sure to subscribe below to follow along!

And if you want to build one of these for yourself, don’t forget to grab the printable plans here!

.

If you’d like to save this for later, be sure to share it to your favorite social channel or pin it for later!

Pinterest diagram showing overall dimensional diagram of dresser console at top and finished dresser at bottom with text "how to build a mid century modern Dresser console"

Until next time, friends, happy building 🙂

The Best Ladders for DIYers and Homeowners

August 26, 2021 by Shara, Woodshop Diaries

In this post, I’ll share my picks for the best ladders for DIYers and homeowners and the pros and cons of each type!

This post was sponsored by The Home Depot as part of the ProSpective Program and contains affiliate links.  See policies.

Collage image showing two types of ladders to be covered in this blog post

There are a few essential items I recommend every homeowner or DIYer have in their garage or their toolbelt.

RELATED: You can check out a few of my recommendations here!

.

And one of those things is a ladder.  Without a ladder, you’re limited to work you can only do about head level or below.  That means you can’t clean your gutters, paint your ceiling, caulk your trim, or reach the top shelf!

.

But with so many ladders on the market, which kind do you need for the basic household stuff? Here are a couple of my favorite styles that are easy to use, easy to store, and feel safe/comfortable using.

Louisville Ladder Cross Step Fiberglass Leaning Ladder

Check out the Cross Step Ladder on The Home Depot’s website here.

So…why this particular ladder?

Overall, this is my top pick for a ladder if you only have the space or budget for one in your home.  The selling point for me is the fact it is two ladders in one! That’s great for your budget and great for saving storage space.

Shara leaning cross step against wall

All the added features I’ll mention in detail below are great, but to sum it all up in two words, I love that it’s both sturdy and versatile. 

.

I was seriously impressed the first time I used this style ladder.  I felt comfortable and safe using it as both a leaning and a step ladder. And with it’s dual functionality, the 6 ft size shown here is great for almost any application around the home.

.

Oh and to top it off, it’s lightweight and easy to carry!

Shara Woodshop Diaries carrying Louisville ladder cross step in garage showing lightweight

I’ll list some of the key features this Louisville Cross Step Ladder offers below.

It’s 2 Ladders In 1

This is definitely my top pick for versatility.  Like I mentioned already, it’s basically a 2-in-1 ladder that you can use for applications that need a step ladder, or applications where leaning is best. 

.

You can open it up, like your typical step ladder for maximum height reach.

Shara Woodshop Diaries climbing Louisville Ladder Cross Step ladder in garage

But, the top area also has these “rubber grippies” designed for securely LEANING the ladder against the wall, or on the corner of a post. So you can use it either way!

.

Take note, though, that leaning the ladder will slightly reduce the maximum height you can reach vs. using it as a step ladder. You can see the grips below.

Louisville Ladder laying on it's side on concrete floor showing close up of rubber grips on back side of top section

Storage Features

And speaking of the top area, it has holes to secure your most used tools, and a magnetic strip to help hold screws, drill bits, etc. so you don’t keep losing them while you work.

.

The center hole is large enough to accept a drill which is convenient as well!

Close up of top section of Louisville Ladder cross step ladder with magnetic strip

Size Options

This Cross Step ladder is lightweight since it’s made of fiberglass, but boasts a 300 lb load capacity and comes in various sizes for whatever height you’d need. 

Shara using cross step ladder on corner post of hammock stand to drive screw up high

The smaller 6 ft ladder is ideal for shorter heights, but has a reach of about 10 ft so it’s great for 1 story homes, or around the house use.  But it also comes in a smaller size as a 4 ft, and a larger size as an 8 ft.

Safety Features

The ladder comes with lock latches that secure the ladder from opening/shifting while using in a leaning position and storing.

Shara Woodshop Diaries latching clips to secure cross step ladder while in leaning position

And when unlocked, and opened, the angles on the ladder allow you to get 20% closer to your work area than average step ladders.

.

These Cross Step ladders also come with Shox impact absorption and raptor boot non-marring, slip resistant tread on the bottom to keep them from slipping or moving while you work.

Close up of foot stepping on bottom rung of Cross Step Ladder with Shox

Overall, I would definitely recommend the Cross Step ladder for around the home or the worksite use. It can easily replace some of my older, heavier, bulkier ladders that are a pain to set up and use.

.

But, if you want to check out some other options, I’ll share another below.

Louisville Ladder Fiberglass Step Ladder

Check out this ladder on The Home Depot’s website here!

So…why this particular ladder?

Step ladders are my go to for doing work up high.  Step ladders are the kind that “fold open” so they make an A frame.  For most of my work up high around the home, I feel safest on a step ladder with wide feet.

Shara Woodshop Diaries climbing Louisville step ladder otuside

Louisville Ladders makes several great options for step ladders in various sizes, but this style is a great general purpose option.

.

The cross step ladder I mentioned earlier is a great option if you can only get one.  But if you have budget and space for multiple sizes and styles of ladders, I’d definitely recommend grabbing a step ladder in at least one, if not more, sizes.

.

These basic types of ladders are quick to set up, store away, and typically provide a good size work area up top to set things, hold things, and keep your tools handy.

Size Options

Now, the cross step ladder I talked about before is nice in that it’s a 2-in-1 option.  But, the downside is that it’s only available in “shorter” sizes. 

Shara Woodshop Diaries carrying 8 ft Louisville step ladder next to shed

Louisville makes several sizes of step style ladders up to 16 ft tall!  Keep in mind that the ladder height is the height the ladder is when it’s set up.  Your REACH height is the height you should be able to reach.

.

Your typical expected uses with it will determine which size is best for you. I’m using an 8ft ladder in these images and it’s the perfect height to reach the top of my one story house to clean the gutters or repaint the shed. But it’s a little too tall to use inside with 8 ft ceilings.

.

So if you plan to use it mostly indoors with average ceiling heights, a shorter size is recommended.

Lightweight & Sturdy

I love fiberglass ladders because they are strong, but also fairly lightweight.  I can easily carry and set up these ladders wherever I need to work.

Shara Woodshop Diaries folding up 8 ft step ladder next to shed

But, they can hold up to 300 lbs, so despite they are a lightweight, they can carry a heavy load.

Storage Features

Like the cross step ladder I talked about earlier, this step ladder also has tons of up-top storage including a magnetic strip to hold screws, drill bits, paint can openers, etc. 

Close up of top section of Louisville step ladder with paint can, hammer, caulk gun clipped on

And it also has a handy little lip here on the edge to hang a paint can.

Shara Woodshop Diaries hanging paint can on step ladder clip

Safety Features

Just like the Cross Step ladder, this step ladder also has Shox impact absorption and raptor boot non-marring, slip resistant tread on the bottom to keep them from slipping or moving while you work.

.

Overall, if you’re needing a study, lightweight, and well built general purpose ladder, these Louisville Fiberglass Step Ladders are a great option.

.

.

I hope you enjoyed checking out the features of these ladders and if you’re in the market for one, I hope this helps you as you make your decision.

.

If you’d like to check out more tool guides and reviews, I’ve got a few you can browse here.

And if you want to save this for later, be sure to pin it!

Shara Woodshop Diaries on ladder with round graphic overlay reading "The Best Ladders for Homeowners & DIYers"

Until next time, friends, happy building 🙂

DIY Mid Century Modern Nightstand

August 14, 2021 by Shara, Woodshop Diaries

In this post, I’ll show you how to build an adorable DIY mid century modern nightstand from one sheet of plywood and a few wood scraps!

Pair of maple plywood mid century modern nightstands with open shelf at top and large drawer on bottom

Do these look familiar at all?? Maybe they remind you of the recent DIY mid century modern dresser from a few months back?

.

After I built that dresser, I had so many requests from you all for matching mid century modern nightstands, so here we are! 🙂

.

I love a good mid century furniture project, so I’m actually planning an entire matching series–be sure to subscribe to the newsletter below to make sure you don’t miss out on any of those projects!

In the mean time, I’ve got the step by step video, plus the plans and tutorial below to build these DIY nightstands, so let’s get building!

This post contains affiliate links. See website policies.

Tools and Materials:

Tools:

  • Circular Saw (cutting guides helpful, but not required–Check out this post for how to use them)
  • Miter Saw (optional)
  • Drill/Driver
  • Pocket Hole Jig
  • Jig Saw
  • Table Saw (optional)

Materials:

  • 1 sheet ¾″ plywood
  • ¼ sheet (2’x4′) ¼″ plywood
  • 1x8x8 board OR scrap 1x or ¾″ plywood to cut the legs from
  • 1 ¼″ pocket hole screws
  • 1 ¼″ wood screws
  • 2″ wood screws
  • (1) pair 14″ ball bearing drawer slides
  • Wood Glue
  • Edge banding

PRINTABLE BUILDING PLANS:

Notes About the Mid Century Modern Nightstand Build:

Design:

This design used simple butt joints on the corners. However, if you wanted to, you could definitely miter these corners instead for a little more seamless look.

RELATED: Check out this desk that has mitered corners for an example

.

You can use iron on edge banding to cover any exposed plywood edges you don’t want to see on the corners and the front.

.

The drawer is optional. This design looks great with or without the drawer.

.

Overall dimensions:

This DIY mid century nightstand is 16″ deep, 24″ wide, and 23 ½″ tall.

Overall dimensional diagram of mid century modern nightstand--16" deep, 24" wide, 23 ½" tall

Material:

This simple nightstand was made from ¾″ maple hardwood plywood. Any ¾″ plywood would work for this project, but hardwood plywoods (like maple, birch, oak) are the best looking/feeling options.

.

You only need a small piece (13″ x 19″) of ¼″ plywood for the drawer bottom, so a ¼ sheet is plenty, or you can browse your scrap pile to see if you can use what you already have.

.

I cut these leg pieces from some 1x poplar scraps. However, you can use any 1x material you have available or even use leftover ¾″ plywood to cut them from.

.

Note that plywood tends to shred a little when using a jig saw, so a solid wood option might look better.

.

Some helpful posts to reference during this build:

  • How to cut plywood sheets
  • How to apply iron on edge banding
  • How to use a pocket hole jig
  • How to build and install drawers

More DIY projects using this mid century modern style furniture leg:

  • DIY Dog Bed
  • DIY Mid-Century Modern Dresser
  • DIY Upholstered Storage Bench
  • DIY Modern Open Bookshelf

Step 1: Assemble Inside Nightstand Box

This build is basically just a box inside of a box with legs and a drawer. So first, I built the box on the inside. The “inside” box was 15″ deep and the outside box was 16″ deep.

Dimensional diagram showing inside box piece dimensions for mid century modern nightstand assembled with pocket holes

I ripped a piece of ¾″ plywood from the sheet 15″ wide and cut it down into two sides, two pieces for the top and bottom and one middle shelf.

.

I applied iron on edge banding to the FRONT edges of all these pieces before assembling.

RELATED: How to cover plywood edges

.

Since this inside box will be covered by the “outside” box, all the joinery will be covered. So you could either use ¾″ pocket holes and 1 ¼″ pocket hole screws or just simply use 1 ¼″ wood screws to assemble.

RELATED: How to use a pocket hole jig

.

I used pocket holes and screws to assemble the main box.

Shara Woodshop Diaries driving pocket hole screws to assemble inside nightstand box

DON’T FORGET! All the details, dimensions, cut list, and diagrams can be found in the printable plans here.

Step 2: Add Middle Shelf

To help evenly space the shelf, I used some 5″ wide scrap blocks to space my shelf 5″ from the top (it’s upside down in the picture) and used 1 ¼″ wood screws through the sides to secure the shelf.

Shara Woodshop Diaries driving screws through side panels to attach shelf in place

Step 3: Attach Sides and Top

Now, it’s time to add the “outside” box. For this, I ripped a second strip from my plywood sheet 16″ wide and cut these pieces to fit around this box.

Side and top panels attached to inside box--diagram showing dimensions of outside box pieces attached

I edge banded the exposed plywood edges before assembling, but you could also do this after.

.

These pieces will simply be glued and clamped in place. You can use brad nails or screws to add strength, but glue will hold fine if you use plenty of it.

.

I recommend cutting the two sides first, gluing them on, then measuring the top and cutting it to fit with the sides already in place.

Step 4: Cut Mid Century Modern Nightstand Legs

Before attaching the bottom panel, I needed to add the legs to it.

.

You may have seen this leg design on a few of my past projects–like this upholstered bench, this modern dog bed, and this bookshelf.

template diagram to cut mid century modern nightstand legs

I drew out this template onto a scrap piece of poplar and cut it out with a jig saw. You can use 1x scraps, a 1x board, or some ¾″ plywood for this.

.

Once I had the first one cut out, I sanded it well, then traced it three more times onto the board and cut these out the same way.

four mid century legs cut out and laid on workbench

Step 5: Attach Legs to Bottom Panel

I cut another piece from my 16″ wide plywood strip to fit across the bottom, just like the top piece, and edge banded the sides.

.

Then, I used wood glue and 2″ wood screws to secure the legs into this panel through the top. I found it easiest to flip this upside down to attach the legs.

.

I used a speed square to help me position them so that they were turned 45 degrees toward the center and about 2 ¼″ inset from the corner. Once I had it in position, I predrilled a hole through the plywood and up into the leg.

Shara Woodshop Diaries attaching modern legs to bottom nightstand panel

Then, I could drive a 2″ wood screw through this hole until it was just barely sticking out of the plywood, apply some wood glue, and reposition the leg so the tip of the screw was going into the predrilled hole.

.

Then I could drive the screw all the way in and add a second screw. I repeated for all four legs.

Bottom panel with four mid century modern legs attached at corners

DON’T FORGET! All the details, dimensions, cut list, and diagrams can be found in the printable plans here.

Step 6: Attach Bottom Panel to Nightstand

Once the legs were attached to this bottom panel, I glued it onto the nightstand just like the sides and the top.

Bottom panel glued onto bottom side of nightstand with legs attached

Now at this point, if you didn’t want to add a drawer, it’s complete! You can skip to the finishing process and paint/stain as desired.

.

But, if you want to add a drawer, here’s how. 🙂

Step 7: Install Drawer Slides

I installed 14″ ball bearing drawer slides into the bottom section of this nightstand so that they were flush to the front edge of the INSIDE box like shown below.

RELATED: Learn how to install drawer slides in this helpful drawer guide.

Diagram showing drawer slides installed into bottom cubby of nightstand flush to the front edge of inside box

Step 8: Build Mid Century Nightstand Drawer Box

Cut ¾″ plywood pieces for the drawer box and a ¼″ plywood piece for the drawer bottom like shown below.

Exploded diagram of drawer box pieces with dimensions

I used a table saw to cut a ¼″ dado ¼″ deep ½″ from the bottom edge of the drawer box pieces to insert the ¼″ plywood bottom.

.

However, if you don’t have a table saw, a router would work as well, or you could skip the dadoes, cut the bottom a little bigger, and just glue and staple or screw it onto the bottom of the drawer box once it’s assembled.

.

For more details on how to build drawers, check out this detailed drawer building guide!

.

I assembled this drawer box using ¾″ pocket holes and 1 ¼″ pocket hole screws.

Shara Woodshop Diaries assembling plywood drawer box on workbench

Step 9: Install Drawer Box Into Nightstand

Once the drawer box was assembled, I installed it onto the slides. I used some ¼″ scrap blocks to set the drawer on in this cubby while I installed it so that it would be about ¼″ up from the bottom.

.

Then I screwed it onto the slides and remove the plywood. This allows for some room underneath the box so it doesn’t scrape the bottom when it’s pulled in and out.

Diagram showing drawer box installed into nightstand

Step 10: Attach Drawer Front

I cut a ¾″ plywood piece to use as the drawer front and installed it onto the drawer using 1 ¼″ wood screws through the front of the inside drawer box piece.

.

There should be about ⅛″ gap on the sides and the bottom. This drawer front will be INSET to the outside box, but OVERLAY the inside box.

Diagram showing drawer front installed on drawer box in mid century modern nightstand

Step 11: Finish Mid Century Modern Nightstand

Now it was ready for finish! I applied three coats of Minwax Helmsman clear coat and added a simple modern handle and it was complete!

Finished nightstand--maple plywood finished with clear coat and a modern black handle on drawer.

I LOVE how cute these turned out and I’m so excited to build the rest of the matching pieces in this bedroom furniture set!

.

I hope you enjoyed this mid century modern nightstand build and if you’d like to build your own, be sure to check out the plans here and the YouTube video guide here.

.

And if you want to subscribe to my newsletter so you don’t miss out on any upcoming projects, subscribe below for priority access to brand new plans, projects and videos!

.

Don’t forget to save this for later by pinning or sharing to your favorite social channel!

Pinterest collage image showing dimensional diagram of nightstand at top and Shara Woodshop Diaries with two finished night stands at bottom with text "How to build a mid century modern nightstand"

I hope you enjoyed this project and until next time, friends, happy building! 🙂

Scrap Wood Keepsake Box

August 7, 2021 by Shara, Woodshop Diaries

If you’re looking for a great DIY gift idea or a simple weekend scrap wood project, this one’s for you! In this post, I’ll show you how to build this scrap wood keepsake box with a divider and lift off lid!

Shara Woodshop Diaries holding simple keepsake box with lid lifted off

There are so many ways to make a simple keepsake box, but here’s one that’s super easy to customize the size and looks really nice!

.

No fancy tools required and you can use a combination of whatever scrap wood you have on hand!

.

If you’re looking for more keepsake box ideas, here’s a few favorites!

  • Hexagon Keepsake Box made from walnut and tile
    Scrap Wood Keepsake Box
  • How to build a DIY wooden keepsake box with splines and picture frame top
    DIY Picture Frame Keepsake Box
  • How to Make an Easy DIY Scrap Wood Keepsake Box
    Customized Keepsake Box

I’m sharing a fun video showing 3 easy scrap wood project ideas and how to complete them (including this keepsake box!) here. And I’ve got the complete step by step tutorial below:

Check out the other two project tutorials here:

  • DIY Blanket Ladder
  • DIY Life Size Ruler

This post contains affiliate links. See website policies.

Tools & Materials:

Tools:

  • Saw (whatever you prefer to use to cut straight lines)
  • Drill
  • Nail gun (optional…if you don’t have a nail gun, you can use a hammer and finish nails OR screws)

Materials:

  • Scrap 1x or ¾″ plywood
  • Scrap ¼″ plywood
  • Scrap lattice, shims, or 1x to frame out the sides
  • Wood Glue
  • Finish or brad nails (for nail gun or for use with a hammer)
  • Edge banding (optional…for use to cover plywood edges)

Notes about this Scrap Wood Keepsake Box Project:

This box was made using ¾″ plywood for the sides, bottom and top, ¼″ plywood for the inside divider and some thin scrap lattice trim for trimming out the sides.

.

However, you can use whatever size scrap wood pieces you have for this and adjust your sizing as needed.

.

I used a forstener bit in my drill to make a “hole” to remove the lid, but if you don’t have a forstener bit, you could also use a hole saw, spade bit, or simply add a knob or handle to the top to remove it instead.

Step 1: Cut Main Box Pieces

First, I visited my scrap wood pile to find pieces to make the sides and bottom of the box. For this, I used some scrap ¾″ plywood and cut the following using my miter saw.

  • (2) 6 ¾″ x 7″ pieces for the sides
  • (2) 6 ¾″ x 10 ¼″ pieces for the front/back
  • (1) 5 ½″ x 10 ¼″ piece for the bottom
pieces of keepsake box cut and laid out on workbench ready to assemble

But, you can customize your sizing however you wish 🙂

.

Then, I edge banded the top edges of the sides and front/back pieces to hide the plywood. This is totally optional and it’s not necessary if you’re not using plywood.

RELATED: How to cover plywood edges

Step 2: Assemble Keepsake Box

I used wood glue and 1 ¼″ long brad nails with my nail gun to assemble this box.

Shara using nail gun to glue and nail keepsake box together

However, if you don’t have a nail gun, a hammer and finish nails would work or you can also use wood screws.

.

I glued all the joints for a strong bond. I actually had planned to install the bottom panel a different way, but changed my mind.

.

It would be easiest to assemble 3 sides of the box, then install the bottom, and finally the last side. But I had already assembled all four sides when I changed my mind on how I wanted to install the bottom, so I just applied wood glue on the edges and tapped it in place.

Using rubber mallet to tap bottom panel of scrap wood keepsake box in place

I used brad nails through the box sides to secure it.

.

This box was intended to store keepsake cards and letters, so it won’t be holding a lot of weight on the bottom. If you plan to weigh yours down, you may consider using screws to secure the bottom.

Using nail gun to secure bottom panel through sides

Step 3: Line Inside and Add Divider

I added a divider into this box and there are a million ways to do that. You could use a table saw or rabbet to cut dadoes, or simply nail a piece in place here.

.

However, I wanted this divider to be removeable and didn’t want to introduce another tool into the mix.

.

So, I ventured back over to my scrap wood pile and pulled out some small ¼″ plywood scraps.

.

I cut four 5″ square pieces to line the inside of the box with. Since the inside of the box was 10 ¼″, I could add two of these squares on each side and leave ¼″ gap between them in the middle.

.

Then, I could cut a divider piece to slide into this gap. It would be easily removable, and extremely easy to do.

Shara Woodshop Diaries inserting removable divider piece into keepsake box

Note that I made these 1″ shorter than the inside opening of the box. The ¾″ thick lid will rest down into the box on top of these pieces later leaving a small ¼″ “lip” around the top. You can customize this sizing as needed for your application.

.

I simply glued and clamped these pieces into the insides of the box and double checked that I could, in fact, fit a divider between them before I let the glue dry.

Divider liner pieces glued into scrap wood keepsake box

NOTE: DOUBLE CHECK IT WILL FIT before the glue dries and adjust/trim as needed. Once the glue dries, it’s too late to change it.

.

Then, I cut a ¼″ plywood divider piece 5″ tall x 6 ⅛″ to go inside. Basically, I cut it the same height as the pieces I glued in and about ⅛″ smaller than the width of the box to give it a little wiggle room to slide in.

Step 4: Trim Out Keepsake Box (Optional)

Since I had left the exposed edges of my plywood sides showing on my box, I decided to use some scrap trim pieces to frame out the front and back sides to hide these edges.

.

Now, you can use iron on edge banding, if you want, but this extra “framing” gives it some detail and dimension.

.

I had some thin poplar strips leftover from cutting down legs for a previous project, but you could also use lattice trim, any thin strips or shims you may have around the shop, or even go thicker and use some 1x scraps as well.

Lattice trim cut to fit to frame out front and back of keepsake box

You are free to get as creative here as you wish 🙂

.

I just cut these pieces to fit around the front edge and glued them in place. You can use clamps or painters tape to hold it while it dries. Then, I flipped it over and repeated on the opposite side.

.

You could trim out all four sides if you wanted, but I just did the front and back sides.

Step 5: Make a Lid

I measured the inside opening of my box and subtracted ¼″ from each dimension. That would allow for ⅛″ gap around all sides.

.

I cut a piece of ¾″ plywood to that size and edge banded it.

.

I used a forstener bit to drill about half of a 1″ diameter hole into the edge of the top in order to be able to remove it. However, you could just add a knob or handle if you preferred.

Simple plywood box with lift out lid sat in place

This lid will rest on the liner pieces from step 3 and be about ¼″ inset into the box. I liked that extra dimension and it also allows you to add some more thin lattice trim around the top as well if you wanted to frame it out, too.

Plywood keepsake box with divider and lid removed

Again, there are a million ways to make a basic keepsake box, so I hope this project just gets your creative juices flowing to find a fun way to customize your own!

.

You can finish as desired, but I simply applied some Polycrylic clear coat to seal mine and it was complete.

.

I really hope you enjoyed this scrap wood keepsake box project and I hope you check out some more fun scrap wood projects here:

  • DIY Blanket Ladder
  • Scrap Wood Planter with Trellis
  • Easiest Picture Frame EVER
  • Scrap Wood Lanterns
  • Scrap Plywood Coat Rack

If you want to be the first to learn about new projects and plans on Woodshop Diaries, be sure to subscribe to our newsletter below!

And if you enjoyed this project and want to save it for later, be sure to pin it or share it to your favorite social channel!

Pinterest collage image showing Shara Woodshop Diaries at top opening lid of keepsake box and closed keepsake box at bottom

Until next time, friends, happy building! 🙂

How to Make a Life Size Ruler– A One Board Project!

August 6, 2021 by Shara, Woodshop Diaries

Have you seen those adorable life size ruler boards?? In this post, I’ll show you how easy it is to make your own from a single board of any size!

Shara Woodshop Diaries standing next to life size giant ruler board growth chart checking her height

These big wooden rulers are great to use as growth chart boards in kid’s rooms.

.

But I think they would also be cute in a home gym, really useful in a workshop or garage, or great for some whimsical décor in any room of the home.

.

This is the perfect one board project, makes an excellent gift idea, and can easily be completed in a weekend.

.

I’m sharing a video sharing 3 fun and easy scrap wood projects (including this life size ruler tutorial!) in this video and I’ll share the step by step tutorial below.

Check out the other two project tutorials here:

  • DIY Blanket Ladder
  • DIY Keepsake Box

This post contains affiliate links. See website policies.

Tools & Materials:

Tools:

  • Saw to cut board to length
  • Cricut Joy (or other vinyl cutting machine)
    • OR, you can free hand cut your own stencil if you don’t have a cutting machine
  • Scissors
  • Tape measure
  • Cricut Starter Tool Kit (optional, but helpful)

Materials:

  • (1) board
    • You can use 1×4, 1×6, 1×8, etc. or a scrap strip of ¾″ plywood however long you want your ruler to be
  • Vinyl for cutting stencil (I used Cricut Smart Vinyl with my Cricut Joy Machine)
  • Transfer tape (to transfer the vinyl to the board)
  • Painters Tape
  • Spray paint
  • Poly or clear coat to seal the wood

Some Notes About this Life Size Ruler Project:

Ruler Size

For this project, all you need is a single board…it can be scrap plywood a 1×6, 1×8, whatever. 

.

I used a strip of ¾” plywood that was about 7” wide.  You can make this however tall you want, but I made mine about 78” or 6 ½ feet long.

Shara Woodshop Diaries measuring giant ruler board width on workbench

Paint vs. Vinyl

I used a Cricut Joy machine to cut a vinyl stencil, removed the line marks and numbers, and transferred this “blank” to the board so that I could paint these on.

.

However, if you want to, you can do the opposite and remove everything from the vinyl stencil EXCEPT the lines and numbers and actually just stick these vinyl pieces on instead of painting.

.

My concern with using the actual vinyl stickers was that with excessive handling, over time, they might peel off. I felt that paint may be a little “longer lasting.” But honestly, either method would probably be fine for this.

Step 1: Cut Ruler Board to Length

First, I cut my board to the length I wanted my ruler to be. You can make yours any size you want, but I chose to make mine about 78″ long (which is 6 ½ feet).

.

I cut this with a miter saw, but any saw that can cut wood would work fine for this.

.

Because I was using ¾″ plywood, I edge banded the sides, but if you’re using a solid board or you don’t mind seeing the edges, this step is totally optional.

RELATED: How to apply edge banding to plywood

Step 2: Pre-Finish the Giant Ruler Board

For the ruler marks, I was going to use a stencil and paint them on.  So, to prep the wood, I gave it a few coats of poly beforehand.

.

I could have waited and polyed after the fact, but I thought sealing it before would help prevent bleed through and allow for a more even paint job. 

Clear coat being brushed onto board on workbench

If you want to stain or paint the board, it’s best to go ahead and do that before painting/applying vinyl.

.

Allow finish to cure at least 24 hours before applying a sticky vinyl to it.

Step 3: Cut and Apply Life Size Ruler Stencil

For the stencil, there are a ton of options.  You can cut out your own stencils from paper or vinyl, purchase premade stencils, or, if you’re good at freehand, you can simply hand paint the lines and numbers.

.

I’m not good with any of the above, so for this, I used my Cricut Joy machine to cut a vinyl stencil. 

.

The Cricut Design Space software allowed me to perfectly space all the lines with the ruler on the sides so they’re accurate.

Laptop computer with Cricut Design Space pulled up with ruler marks spaced out

NOTE: I simply made rectangles here for these ruler marks–a larger one for the foot markers, slightly smaller ones for the ¼ foot markers, and slightly smaller for the ⅛ foot markers.

.

You can size these however you think looks best to fit the size board you are working with.

.

The large marks should be centered every 12″. The medium sized marks should be centered every 3″ between them. And the small marks should be centered every 1 ½″ between those.

.

My ruler was 6 ½ foot long, but the Cricut Joy would only cut a design up to 48” long. So I simply cut out two of them.

.

The Cricut Joy is designed to cut small things, so my design with the numbers was too wide to fit on one cut, so I actually cut my marks out first, then cut my numbers out separately and pieced them together on the board. This is so easy, so don’t panic!

Cricut Joy machine cutting out black vinyl stencil

I used black Cricut Smart Vinyl because that’s what I had plenty of.  Since I was going to be painting, I didn’t care what color I used for this. 

.

However, if you decide to use the vinyl sticker for your marks instead of painting, you’d want to use whatever color vinyl you want your lines and numbers to be.

.

Once it was printed, I cut my two 48″ long sections apart (remember I had to print 2 of these??), then, I removed the marks with a picker tool.

Shara removing the ruler marks from the vinyl

Once the parts I wanted to paint were removed, I used some transfer tape over the top of the vinyl to allow me to transfer the vinyl to the board.

.

Transfer tape is basically just a clear tape that goes over the top of the vinyl to keep everything in place as you remove the back and stick it onto the board.

Transfer tape being applied onto top of vinyl stencil

With the transfer tape applied, I peeled the backer off the vinyl on the bottom and positioned it on the board so that the first line was 1 ½” from the bottom.

.

All of these lines are spaced 1 ½” on center.

Vinyl stencil with ruler marks being applied to board at bottom edge

Then I continued pulling the backer off in small sections and smoothed it out on the board.

.

When I got to the end of the first 48” piece, I repeated with the second making sure to keep the marks spaced 1 ½″ apart on center.

.

Then, I simply removed the transfer tape from the top.

Removing transfer tape from top of vinyl stencil

I cut and applied the numbers the same way and used painters tape to cover over any exposed wood that I didn’t want to get paint on.

Applying painters tape to exposed wood before spray painting giant life size ruler board

Of course, you could have skipped the paint and done this opposite from how I did it by transferring the lines and the numbers to the board instead.

Step 4: Paint Giant Ruler Board Marks

I took it to the yard and gave it a good coat of matte black spray paint and let it dry well.

Spray painting over life size ruler board stencil to apply marks and numbers

You could brush paint this as well, but spray paint is quick and gives great results.

.

Once the paint was good and dry, I removed the stencil and it was complete!

Shara Woodshop Diaries removing vinyl stencil from life size ruler board to reveal marks and numbers

Now, at this point, you can definitely apply a clear coat protectant on top if you’d like…that’s optional. Either a brush on poly or a spray poly would be fine.

.

And now you have a life size wooden ruler to use as a growth chart, a huge measuring tape, gym décor, whatever 🙂

SIDE NOTE: Do you like this new MAKER shirt?? Grab your own here!

Shara Woodshop Diaries holding life size ruler board

I hope you enjoyed this easy and fun one board project! This post is in no way sponsored by Cricut, but if you are looking for a fun, new tool to add to your shop, a vinyl cutting machine is a great option to make customizations and professional looking signs and décor.

.

I’ve gotten way more use out of this machine than I ever expected in the short time I’ve owned it. The Cricut Joy is a relatively inexpensive option compared to many other cutters and is SUPER quick to set up and get started cutting…simply plug in, design, and cut.

.

For more Cricut Projects, check these out!

  • DIY Plant Ladder with Tags
  • DIY Custom Wooden Sign

Anyway, this was such an easy project and I hope you enjoyed it! If you’d like to keep up with all the latest tips, videos, and DIY projects on Woodshop Diaries, be sure to subscribe to my newsletter to be the first to know about new posts!

And if you’d like to save this for later or share with a friend, don’t forget to pin it or share to your favorite social channel!

Pinterest collage showing applying cricut vinyl stencil at top and Shara Woodshop Diaries standing next to life size ruler board at bottom with text "how to make a life size ruler board"

Until next time, friends, happy building! 🙂

Modern DIY Blanket Ladder

August 5, 2021 by Shara, Woodshop Diaries

In this post, I’ll show you how to build this simple, modern DIY blanket ladder from some 2x2s and dowel rods!

Shara Woodshop Diaries adjusting white and navy striped blanket on two tone DIY wooden blanket ladder

A blanket ladder is a practical, simple, and creative way to add some style, storage, and life to a room.

.

You can use it in the bathroom for hanging towels, the living or bed room for storing and displaying blankets. Or think way out of the box and decorate it with wreaths, greenery, etc. and use it as part of your seasonal décor!

.

Whatever you use it for, this easy modern DIY blanket ladder is a great weekend scrap wood project and would make the perfect DIY gift idea for your next party as well.

.

I’m sharing a video tutorial here with 3 easy scrap wood ideas that you can tackle this weekend–including this blanket ladder project! And I’ve got the step by step tutorial for you to build it below.

Check out the other two project tutorials here:

  • DIY Keepsake box
  • DIY Life Size Ruler

This post contains affiliate links. See website policies.

Tools & Materials:

Materials:

  • (2) 2x2x8 boards (See notes below)
  • (2) ¾″ diameter dowel rods
  • Wood Glue
  • Painter’s tape (optional)
  • Paint (optional)

Tools:

  • Saw (any saw that can cut basic straight lines is fine)
  • Drill
  • ¾″ diameter forstener bit
  • Clamp, tape, or ratchet strap (to hold pieces together while glue dries)

Some notes about the Blanket Ladder Project:

This DIY blanket ladder is a great project to use up some scraps you may have on hand.

.

This is a great opportunity to use up some 2x2s that you may have deemed “inadequate” for a nicer furniture project. So if you have one tucked away that’s slightly bowed, twisted, or just not the best to look at, this is a great project to use it on because those issues may not be super critical in a small project like this.

.

Also, I had scrap ¾″ diameter dowel pieces in my scrap pile (leftover from this DIY toddler floor bed build!) to use up. You don’t have to use ¾″ if you have another size on hand or if you prefer something different.

.

Any size dowel between about ½″ up to 1 ¼″ would work well here. Just make sure whatever size you use that you have a forstener bit size to match it so you can drill your holes.

.

And lastly, you’ll notice I built this blanket ladder so that it tapers towards the top. You can adjust your taper (I’ll show you below), or not taper it at all if you don’t want to. Feel free to get creative for your own project 🙂

Step 1: Cut and Mark Blanket Ladder Sides

First, I cut two 2x2s down to the height I wanted my ladder to be. I cut my pieces about 60″ (5 foot) long. However, if you want a taller ladder with more rungs, feel free to make this longer.

.

Once these two 2xs were cut, I laid them together on the workbench and used a measuring tape to mark out every 12″ down the length because this is where I planned to place my dowel rungs.

Shara Woodshop Diaries marking dowel rung locations on 2x2 boards

Step 2: Measure and Cut Dowel Rungs

I chose to taper my ladder towards the top, but this is totally optional. I didn’t measure any angles or do any fancy math for this.

.

I simply laid a scrap board on my workbench and butted my 2×2 pieces up against it and laid them out how I thought it looked good.

.

Since I already marked my dowel locations in step 1, I measured across these pieces and found that at whatever angle this was, each dowel would need to be 2 ¼″ longer than the one above it.

Shara measuring dowel lengths on tapered wooden blanket ladder

So I started my top dowel at 12″, and cut the next 14 ¼″, then 16 ½″, and finally 18 ¾″.

.

If you don’t want to taper yours, you can cut them all the same length. And if you want a different taper than what I did, just lay yours out how you like it and measure your own dowel lengths from your marks.

Step 3: Drill Out Holes For Ladder Rungs

I laid out my dowels between the sides to check that they fit and measured the width at the bottom and the width at the top. Mine ended up being 13″ wide at the top and 24″ wide at the bottom.

Blanket ladder 2x2s and rungs laid out on workbench to test fit

If you do some simple math, here, 24″ – 13″ = 11″. So, 11″ divided by 2 is 5 ½″, so that’s how much each side tapers in from the bottom to the top.

.

So I found some scrap blocks that stacked together would be about 5 ½″ tall and rested one end of the 2×2 on it.

2x2 board propped up on scrap blocks to make angled holes

I measured and marked out my dowel locations on the edge here (centered side to side and all 12″ apart), then used a forstener bit to drill out each hole. Use a forstener bit that matches the size dowel you’re using.

.

I only drilled until the cutter head was flush to the top of the board and tried to keep it as straight vertically as I could.

Drilling holes at an angle by propping board end up on blocks

Ideally, you would want to use a drill press for an application like this where you need to drill the hole as straight as possible, but there is enough wiggle room in this project, that it doesn’t have to be perfect.

Step 4: Glue DIY Blanket Ladder Together

Now that the pieces were all cut and the holes were drilled, I applied some wood glue into the holes on one side and inserted the dowels.

.

Then, I applied some wood glue into the holes on the other side, and flipped the first side over and inserted the other end of the dowels into their holes.

Shara applying wood glue into holes on 2x2 blanket ladder sides

I used some pipe clamps to clamp it snug until the glue dried, but you could also use a ratchet strap, or wrap some painters tape around it to hold it in place until it’s dry.

Clamping light pressure on blanket ladder dowels

Step 5: Finish as Desired

I wanted to give this blanket ladder a two tone or “dipped” finish, so once the glue was dry, I wrapped some painters tape along the sides, and covered the top section well.

.

Then, I applied some matte black spray paint onto the bottom section below the tape. (PS don’t laugh at my dog and cat food bags to catch my overspray HAHA!)

Spray painting to give bottom of ladder a "dipped" finish

You could use spray paint or simply brush paint this section. Feel free to get creative with your own colors and design!

.

Once it was dry, I gave the entire ladder a clear coat (I used Minwax Polycrylic) and it was ready to use!

.

I love how simple and quick this project was and how easy it is to customize.

DIY wooden black and wood blanket ladder leaning against the wall with white and navy blanket hanging on it

I also love how simple, yet unique it is and how it fits in with my modern style!

.

I hope you enjoyed this fun little scrap wood blanket ladder project as much as I did and if you can’t wait to see what projects are next, join the newsletter below to stay up to date on all the latest tips, tricks, and projects on Woodshop Diaries!

And if you want to save this project for later, don’t forget to pin it or share it on your favorite social channel!

Pinterest image showing Shara Woodshop Diaries adjusting blanket on ladder at top and two tone DIY blanket ladder leaning against wall at bottom with text DIY modern blanket ladder

Until next time, friends, happy building!

DIY Floor Bed

July 31, 2021 by Shara, Woodshop Diaries

In this post, I’m sharing the building plans to build this adorable DIY toddler floor bed using basic 2x4s and some wood dowels!

Simple pine wood twin size floor bed frame with side rails.  White comforter and burnt orange bedding against a light great wall

A friend of mine recently asked me to build her little boy a “big boy bed” so she could move him out of his crib. 

But since he’s still fairly young, she didn’t want anything she would worry about him rolling out of.

So I built her this super simple floor bed and used some dowel rods as side rails. 

HOW ADORABLE, amiright??

I’ve got all the plans and dimensions for a twin OR full size DIY toddler/kids floor bed below and I’ve got a quick video tutorial for you here as well.

Check out the full length tutorial video on YouTube here.

This post contains affiliate links. See website policies.

Tools & Materials:

Materials:

  • (4) 2x4x8 boards
  • (3) 2x2x8 boards
  • (3) 2x3x8 boards
  • (14) ¾″ diameter x 48″ long dowel rods
  • 2 ½″ pocket hole screws
  • 2 ½″ wood screws
  • 2 ⅞″ timber screws (optional)
  • Wood Glue
  • Sandpaper

Tools:

  • Miter Saw
  • Drill/Driver
  • Pocket Hole Jig
  • ¾″ forstener bit
  • Kreg Multi-Mark (helpful, not required)
  • Various clamps (helpful, not required)
  • Rubber Mallet (helpful, not required)

Some Notes About the DIY Toddler Floor Bed Project:

Dimensions:

The floor bed design shown below is made for a standard twin size mattress. Standard twin mattress dimensions are 38″ x 75″.

Printable building plans for EITHER a twin OR a full size floor bed can be found here.

The opening for the twin bed is 39″ x 76″ to allow for some wiggle room to get the mattress inside and to allow for some bedding around the edges.

Overall project dimensions ended up being 21 ½″ tall, 44″ wide and 81″ long.

Overall dimensional diagram of DIY toddler floor bed--21 ½" tall, 44" deep, 81" wide.

Bed Rail Spacing:

There are “industry standards” for rail spacing for cribs in certain countries.

However, since this isn’t a “crib” for a baby, but is a bed specifically made for an older toddler child, the standards don’t necessarily apply in this case.

So, please be aware, crib standards are not followed in this plan as it’s not intended for use with infants/small toddlers.

The great thing about building it yourself is that you can customize it however you wish.

And since this particular project was built for an older toddler, the spacing for the rails used here are adequate for his larger size.

However, if you prefer to stick to the standards, please take note to do your own research before building your own as these “industry standards” are always subject to change.

I encourage you to do what you are comfortable doing and add more rails if in doubt.

If you want to change the spacing in the plans below to match the standard, it’s a matter of simply changing the spacing between your marks where you will drill the dowel holes.

Another option is to install solid panels or bumpers on the INSIDE of the bed behind the dowels to leave the look of the dowels, but create solid sides. Then these can be removed as the child grows, if desired.

Lumber Sizing:

Instead of using precut 2x2s and 2x3s in my project, I opted to rip a few 2x4s into a 1 ½″ wide piece (which is the equivalent of a 2×2) and a 2″ wide piece (which is ALMOST the equivalent of a 2×3).

This saved me a few dollars in lumber.

Whether you make your own or purchase them precut, the project is the same except for the last step.

In the last step, you will add these “2x3s” along the top to trim out the top edge.

It’s best to cut these to fit as the sizing will vary slightly based on whether you are using actual 2x3s (which are 2 ½″ wide) or 2″ wide pieces ripped from a 2×4.

Rounded Board Edges:

Normally, when working with construction lumber, I like to make my joints a little cleaner by removing the rounded over edges on the boards (like in this tutorial).

However, since this is a toddler bed, I kept the rounded corners on the boards to avoid having sharp edges.

I would need to sand down any sharp corners to prevent injury at the end of the project anyway, and since typical construction board edges are already rounded over, I used this to my advantage and left them as is.

GRAB PRINTABLE PLANS HERE:

Step 1: Assemble Toddler Bed Side Rails

I began assembling the side panels first by cutting a piece of 2×2 and a piece of 2×4 for the top and bottom (You need one of each PER SIDE, so two of each total).

Prefer to print? Grab the printable building plans here!

I used this handy Kreg Multi-Mark tool for making most of my marks.  I set it to mark ¾” offset and drew a line down the middle of each of these pieces on the narrow side.

Shara Woodshop Diaries using Kreg Multimark tool to draw centerline of board for dowel locations

Then, I marked the center.

NOTE: For each side panel of this bed, to make things easier, I used an odd number of dowels so that I could start in the center and go out from there marking where my dowels would go.

Shara Woodshop Diaries setting Kreg Multimark to 4 ¼"

Then, I set my Multi-Mark to 4 ¼” and made several marks out from this center point down the length of the boards all 4 ¼” apart. 

I clamped the top and bottom pieces together and transferred the marks to each piece so they’d match perfectly.

Shara Woodshop Diaries marking 4 ¼" offsets down length of board for toddler bed rail locations

Once all my dowel locations were marked, I used a ¾” forstener bit to drill out each location. 

Shara Woodshop Diaires transferring dowel locations to second board so they will match

I drilled until the cutter head was flush with the top of the board for each hole (it was about ⅜″ deep). 

You could use a stop collar to be extra precise if you wanted, but it’s not super critical as long as you are pretty consistent.

Drilling out ¾" diameter holes with a drill and a forstener bit

Once all the holes were drilled, I pulled out my pocket hole jig and drilled 1 ½″ pocket holes into the ends of the 2×4 and one on each end across the top side of the 2×2 piece.

RELATED: How to use a pocket hole jig

Then, I sanded these pieces really well, and cut my dowels to roughly 16” long.

NOTE: The dowels were exactly 48” long, so in order to get three equal length dowels from each piece, I had to cut them SLIGHTLY under 16” to account for the blade kerf when making the cuts.  So these ended up being about 15 15/16” long.

Then, I applied wood glue into the holes and inserted the dowels. 

Shara Woodshop Diaries Assembling side rails of DIY toddler floor bed using a rubber mallet to tap dowels in place

Getting everything to line up is a little tricky and will require some patience. I found it easiest to glue the dowels into the one of the boards first, then add glue into the holes of the other.

Then, I could flip the board with the dowels installed upside down and use a rubber mallet to tap them into the holes on the other board.

Once these rails were together, I used a large clamp to press everything together and checked for a consistent height from side to side.

Then, I repeated this process two get two identical sides.

Step 2: Add Floor Bed Corner Posts

I measured the overall height of the pieces from step 1.

Depending on the length you cut your dowels and the depth you drill your holes, yours may vary slightly, but mine was 20″.

Printable plans for the build with cut list and diagrams available here!

So, I cut two pieces of 2×4 to 20” long for each side panel.

Diagram showing corner posts attached to side rails of floor bed

I used 2 ½″ pocket hole screws to assemble these 2x4s on each end and once this first side panel was done, I repeated because the other side is exactly the same.

Step 3: Assemble Back Bed Rail Panel

The back piece is exactly like the sides, only it’s longer and won’t have the 2x4s on the ends.

So I began by cutting down a 2×2 and a 2×4 and found the center of each just like I did for the sides earlier.

I used my Kreg Multimark tool to mark the center line and to make marks 4 ¼” apart.

I drilled out the ¾″ diameter holes just like before and cut the dowels just like before as well. 

However, in this case, I didn’t add pocket holes, and skipped right to sanding and gluing.

Diagram showing dowel locations on back panel of toddler floor bed

Step 4: Attach Back and Sides

Once this back panel was together, I pulled the side panels back out to attach them to it.

For this, I pulled out these 2 ⅞″ timber screws.  You may have seen these in a few of my recent projects.  (Like these DIY end tables, this DIY grill cart, and this DIY swing bed.)

Shara Woodshop Diaries attaching bed sides to bed back panels using timber screws

They add strength, but also a nice decorative detail.

I used these—two at the bottom and one at the top—to attach the side panels onto the back panel. 

These screws are pretty big, so I do recommend predrilling to help prevent the wood from splitting when driving them.

If you didn’t want to use timber screws, regular 2 ½″ or 3″ long wood screws would work fine OR you could use 1 ½″ pocket holes and 2 ½″ pocket hole screws instead.

Step 5: Assemble Front Bed Rails

For the front, I cut a 2×4 to the full length and a 2×2 to a little over half the length of the back side.

Since these top and bottom boards aren’t the same length, I found the center of the shorter 2×2 piece and measured my dowel locations on it just like before. 

Then, I lined up the right ends together, clamped, and transferred these locations to the right side of the bottom 2×4 piece so the holes will line up properly. 

I drilled a pocket hole in the inside end of the 2×2 (see diagram below), then glued and installed the dowels and clamped it all down.

Then I cut a 2×4 to add on to the end of the dowel rails (shown in yellow below).

I drilled 1 ½″ pocket holes in the bottom end of this 2×4 and assembled using 2 ½″ pocket hole screws.

Front bed panel showing 2x4 attached on inside edges of bed rails

Step 6: Attach Front of Floor Bed

Once the front panel was assembled, I used timber screws again to attach the front panel between the two sides.

Diagram showing how front bed rail panel attaches between two side panels

Step 7: Add Top Rails to Toddler Bed

The final pieces were the 2” rails I added along the tops.  At the beginning of the post I mentioned that I ripped 2x4s into strips to use for this.

But, if you didn’t have a table saw, you can use precut 2x3s instead.  

Since I ripped these, they are 2” wide, but 2x3s would actually be 2 ½” wide. 

These are basically just decorative pieces added to smooth out the top and cover up the pocket holes, so the difference in width wouldn’t matter structurally. 

Dimensions below are shown using actual 2x3s (2 ½″ wide boards).

I trimmed these down to fit, then used wood glue and 2 ½” wood screws to secure them from the bottom side.

I started at the back and kept all the inside edges of the bed flush—so the overhang falls on the OUTSIDE of the bed frame.

Then, I added the left side.  Then, the front.  And finally the right side.

Close up of Shara Woodshop Diaries attaching top bed rails around floor bed frame

Since this is a kid’s bed, I sanded out and rounded over any sharp edges left at the end. 

Then, I applied a few coats of clear coat (Polycrylic), sanding well between coats.

But you can stain or paint as desired. Check out this guide for helpful tips on finishing raw wood furniture.

And finally, it was complete!

Finished DIY toddler bed frame sitting on floor with white bedding

I actually didn’t have a twin size mattress to stage this with, so I stacked up a pile of pillows and threw a comforter on top haha.

I’m sure this will look much better with an actual mattress inside.

This is such an adorable little bed for a toddler to grow into and will last for many years until they need something a little higher off the ground.

Simple pine floor bed frame sitting on floor completed

RELATED: Looking for more DIY bed projects?? Here’s a few favorites!

Shara Woodshop Diaries reading in DIY Kids House Bed Frame
DIY House Bed
Free Building plans to build your own DIY King size storage bed
DIY Storage Bed
DIY Modern Bed

I hope you enjoyed this DIY toddler floor bed project and if you’re interested in building your own, be sure to check out the full length build video for helpful tips to walk you through the build!

And if you can’t wait to see what’s next, I’d love if you’d subscribe to my newsletter for all the latest projects and plans!

Don’t forget to share this to your favorite social channel or pin it!

Pinterest collage image showing overall bed dimensional diagram at top and completed bed at bottom with text "How to build a toddler floor bed" in middle

Until next time, friends, happy building!

DIY Toddler Floor Bed

DIY Toddler Floor Bed

Yield: 1 toddler floor bed

Make this DIY toddler floor bed from 2x4s and dowels. Transition them from a crib to a regular bed without the worry that they will fall out.

Materials

  • 4) 2x4x8 boards
  • (3) 2x2x8 boards
  • (3) 2x3x8 boards
  • (14) ¾" diameter x 48" long dowel rods
  • 2 ½" pocket hole screws
  • 2 ½" wood screws
  • 2 ⅞" timber screws (optional)
  • Wood Glue
  • Sandpaper

Tools

  • Miter Saw
  • Drill/Driver
  • Pocket Hole Jig
  • ¾" forstener bit
  • Kreg Multi-Mark (helpful, not required)
  • Various clamps (helpful, not required)
  • Rubber Mallet (helpful, not required)

Instructions

  1. Assemble the toddler side rails by marking drilling for the location of the dowels and glueing them into the 2x4s.
  2. Add the floor bed corner posts using pocket holes and 2 ½" pocket hole screws.
  3. Assemble the back bed rail panel the same as you did the side rails.
  4. Attache back and sides using 2 ⅞" timber screws.
  5. Assemble the front bed rails the same way as the side and back.
  6. Attach front of the floor bed using timber screws.
  7. Add top rails to the toddler bed using wood glue and 2 ½" wood screws.
  8. Sand and round out any rough edges.
  9. Add mattress and bedding and it's ready!
© Shara, Woodshop Diaries
Project Type: kids projects and furniture / Category: Bedroom Furniture Plans

DIY Vinyl Record Shelf

July 17, 2021 by Shara, Woodshop Diaries

In this post, I’ll show you how to build a unique, modern DIY vinyl record shelf from a single sheet of plywood!

Black and wood modern, tilted DIY vinyl record album display shelf against gray wall

It seems vinyl records are trending again. Honestly, I wish CDs would make a comeback, but I won’t hold my breath HA!

.

Anyway, a friend of mine has a large collection and asked me to make something unique to both store and display some of his favorites. So I built him this modern, angled, DIY vinyl record shelf!

.

If you’re like me, and don’t have any vinyl records, though, you could definitely still use it for books, pictures or anything else you may need a unique shelf for.

.

I’m sharing the complete plans, dimensions, and cut diagrams below and I’ll show you how it came together in this video:

This post contains affiliate links. See policies.

Tools and Materials:

Tools:

  • Circular saw
  • Cutting Guides (Kreg Rip Cut and Kreg Accu-Cut recommended)
  • Jig saw (OR hand saw)
  • Drill/Driver
  • Drill bits for pilot holes
  • ⅜″ forstener bit
  • Square
  • Oscillating saw (OR hand saw)

Materials:

  • (1) sheet ¾″ plywood
  • ⅜″ wood dowels (optional)
  • 1 ¼″ and 2″ long wood screws
  • Wood Glue
  • Edge banding (optional)

Some Notes About This DIY Vinyl Record Shelf Build:

All the shelf openings in this project are designed to be 12 ¾″ x 12 ¾″. Typical vinyl record covers are between 12″ and 12 ½″ square, so they should fit perfectly with just a little wiggle room.

.

The shelves are designed to be 12″ deep.

.

The overall size of this project is 12 ¾″ deep, 28 ⅝″ wide, and 67 ½″ tall.

Overall dimensional diagram of DIY vinyl record shelf--67 ½" tall, 28 ⅝" wide, 12 ¾" deep.

Cut List:

With a little creative cutting, you can make this entire shelf from just a single sheet of ¾” plywood.

Plywood cut diagram for DIY modern vinyl record shelf

I recommend first ripping the 12″ wide strip off the right side shown above, then cross cutting the 26 ¼″ section off the sheet and ripping those into 12″ strips. Then, cut the last 12″ x 12 ¾″ piece from the corner.

.

If you cut in that order, then you can set the leftover piece aside to trace out the back panel onto later.

.

Note that it’s best to cut these pieces SLIGHTLY less than 12″ wide to account for the blade kerf. A plywood sheet is 48″ wide, so if you cut three 12″ pieces, because of the blade width, the 4th piece will be slightly narrower than 12″.

.

Some posts you might find helpful throughout the build:

  • How to cut plywood sheets
  • How to cover plywood edges
  • How to finish raw wood furniture

Step 1: Cut and Edge Band Plywood Shelves

I first cut down my plywood sheet to get all my shelf pieces (see diagram above). I needed:

  • (2) 12″ x 12 ¾″ pieces
  • (4) 12″ x 26 ¼″ pieces
  • (1) 12″ x 27″ piece

RELATED: How to cut down plywood sheets

.

I visualized the final project and tried to mark out which shelf edges will be exposed so I could edge band over them.

.

I applied iron on edge banding along these edges, then sanded everything smooth.

RELATED: How to apply iron on edge banding

Step 2: Assemble Vinyl Record Shelf Pieces

There were a few ways I could assemble these shelves, but I decided the easiest and quickest way was to use wood glue with 2″ wood screws.

.

I didn’t want the screw heads to show on the finished project, so for each screw, I predrilled a pilot hole for the screw, then used a ⅜″ forstener but to countersink each hole about ¼″ deep. See video for details.

Shelf assembly with countersunk holes--using wood glue and dowel plugs to fill them

Once the screws were in, I could go back and glue in some ⅜″ wood dowels to plug the holes. Of course, if you prefer, you could leave the screw heads exposed or use wood putty instead.

.

The bottom shelf has a short shelf piece on the right edge and a long shelf piece at the middle. 

.

Since it has this additional piece on the right end that the other shelves don’t have, this piece needed to be ¾” longer to keep all the shelf openings the same.

Dimensional diagram showing how to assemble the DIY modern vinyl record album shelf pieces

So notice that this bottom shelf piece is 27″ long and the rest are 26 ¼”.  I used a speed square to make sure the pieces stayed square while assembling. I started at the bottom and worked my way up.

.

I used the second short shelf as a “spacer block” to space the rest of the shelves on this project 12 ¾” apart.  I clamped it in place and lined the next shelf up with it.

Shara Woodshop Diaries using small shelf as spacer block for long shelves

And when I got to the end (the top of the shelf), I had to attach this short piece, so I couldn’t use it as a spacer.  So I just measured and marked instead.

.

I glued the dowels into the holes and came back later to trim them all down.

Step 3: Trace and Cut Out Back Panel

Once the entire DIY vinyl record shelf section was together, I placed the remaining plywood sheet on my workbench and laid the shelf assembly on top. 

.

I lined up the left side against the edge of the sheet and checked that it was straight and square.  Then I traced out where it needed to be cut for the back panel. 

Shara Woodshop Diaries tracing out back panel of record shelf

I used a straight edge and a speed square to help me trace the squares between all the shelves.

.

NOTE: I made a mistake in the video and lined up the bottom edge of the shelf with the bottom edge of the plywood. But, the back panel should extend ¾″ BELOW the bottom shelf corner.

.

So when you trace, make sure left side is lined against the left edge of the plywood and the bottom corner is ¾″ up from the bottom edge.

Shara Woodshop Diaries tracing out shelf back panel on sheet of plywood

Once I had the back panel traced out, I used my circular saw to rip the excess off the right side of the sheet so I can use that for scrap later, then I used my Accu-Cut and circular saw to cut along all the lines.

.

If you don’t have a saw guide, you can use a straight edge and some clamps.

Shara Woodshop Diaries using circular saw to cut out back panel of vinyl record album shelf

I cut right along the lines on the top side of the plywood sheet, then came back with a jig saw to finish the cuts along the inside corners. 

.

You could make all these cuts with a jig saw if you wanted, but I was afraid my lines wouldn’t be straight if I did that.

Shara Woodshop Diaries using jig saw to cut inside corners of back panel

Once the back panel was cut, I puttied over the plywood edges—you could edge band if you wanted, but I was running low on edge banding and since I was painting this, putty worked fine.

Step 4: Finish Record Shelf and Back Panel

I used an oscillating saw to flush cut the dowel plugs on the shelf, but you could also use a flush cut hand saw or whatever else you prefer to trim these down with.

Shara using Ridgid oscillating tool to flush cut dowel plugs in screws holes

I sanded both the shelf and back panel, then stained the shelf and base plate piece (shown in plywood diagram earlier) Minwax Provincial.

.

Then, I primed and painted the back panel with SW Black Magic. 

RELATED: Check out how to finish raw wood furniture with this tutorial!

Step 5: Attach Back & Bottom Panels

Once the paint and stain had dried, I installed the back panel onto the back side of the shelf.  Keep in mind that the back panel should extend below the bottom corner of the shelf ¾″.

Dimensional diagram showing how to install the back panel onto the record shelf

I used 2” wood screws here and when I was finished, I went back and painted over the back side of this as well.

.

Then, I installed the bottom panel onto the shelf using 2” wood screws at the back and a couple 1 ¼” screws through the bottom to secure it into the V of the bottom shelf.

dimensional computer diagram showing how to install the bottom plate of the modern shelf

I gave the entire piece a couple coats of poly, then it was complete!

.

As usual, the two tone finish was kind of a pain, but it was worth it for the end result. 

.

It fits record albums perfectly, but, again, you can always use this for books whatever else you want to display. 

Shara Woodshop Diaries standing next to DIY vinyl record shelf after it was complete

If you want to build your own, be sure to head over and watch the YouTube video here.

.

And if you enjoyed this project, and want to see more, go ahead and subscribe to my newsletter below to be the first to know about the latest plans and projects!

Don’t forget to save this project for later by pinning it or sharing to your favorite social channel! 

Pinterest collage showing Shara Woodshop Diaries with Vinyl record shelf at bottom and a dimensional graphic at top with text "How to build a vinyl record shelf"

Until next time, friends, happy building! 🙂

Built In DIY Closet System

July 10, 2021 by Shara, Woodshop Diaries

In this post, I’ll show you how to build your own built in (or stand alone, if you prefer) DIY Closet System!

DIY plywood closet cabinet system with long shelf at top, large drawers on bottom and shoe cubbies

Now, I know the image above shows this DIY closet system standing on its own–and that’s definitely a possibility. This piece can stand alone in a room.

.

But it was actually designed to fit into a nook in a friend’s house that just needed some extra storage space. Dimensions below 🙂

.

The large drawers, shoe cubbies, and long shelf provide plenty of storage for t-shirts, sweaters, shoes, and jeans.

.

However, if you need some hanging storage, you may want to check out my DIY closet cabinet project here that can show you how to build a hanging clothes cabinet.

.

But, if this DIY closet system is exactly what you’ve been looking for, I’ll show you how to build it in this video and in the detailed plans below:

This post contains affiliate links. See policies.

Tools and Materials:

Tools:

  • Circular saw
  • Kreg Rip Cut & AccuCut (optional cutting guides to use with circular saw)
  • Miter Saw (optional…you can use circular saw for everything if you want)
  • Table saw (also optional)
  • Drill/Driver
  • Kreg Pocket Hole Jig
  • Dowel Jig
  • Clamps
  • Stapler (optional)

Materials:

  • (4) sheets ¾″ plywood
  • (2) sheets ¼″ plywood
  • (1) 1″ x 48″ wooden dowel
  • (4) pair 16″ drawer slides (I buy the bulk pack because it’s cheaper)
  • (1) pair 14″ drawer slides
  • ⅜″ dowels
  • 1 ¼″ pocket hole screws
  • 1 ¼″ screws
  • Wood Glue
  • RapidFuse Glue
  • Edge Banding
  • (5) modern handles
  • 3″ screws (for securing to wall when complete)
  • Wood Putty
  • Clear Coat Finish

Grab the Printable version of these Building Plans here. And browse the step by step process in the post below:

Some notes about this DIY Closet System

Sizing:

This project is basically a mini built-in closet. It was designed to be “built into” a nook roughly 4 ft wide, 2 ft deep and 8 ft tall.

.

In case you’re curious, the full backstory: My friends removed an old vanity sink in their house that had been recessed into this odd nook between the bedroom and bathroom. Instead of wasting the space after removing the vanity, they wanted this closet storage added to it.

.

So I built this project to be 47″ wide, 20″ deep and 7 ft tall to allow for some wiggle room to get it installed.

Computer diagram of plywood DIY closet system installed into nook in the wall

Any gaps after installation can be covered with half round, cove, or some other type of thin molding or trim, if desired.  And the space at the top can be left for extra storage.

.

This could be easily modified, doubled up on, or added on to to fill a whole closet, or to fit your specific space as needed.

Design:

I designed this project to be built in two separate sections so it’s easier to build, move and install–the top has a long shelf, shoe cubbies, and a pull out belt/tie rack.

.

The shoe cubbies were built to be 8″ square openings.

Diagram showing two separate sections (top and bottom) of the closet system project

The bottom section is basically a dresser cabinet–just a box housing four large drawers.

Materials:

This project was built from almost 100% birch plywood except for the dowels used in the pull out tie rack.  This kept things simple, quick, and as inexpensive as possible while still getting a clean, nice looking result.

Additional Resources You May Find Helpful For This Build:

  • How to Cut Down Plywood Sheets
  • How to Use a Pocket Hole Jig
  • How to Apply Edge Banding
  • How to Build and Install Drawers
  • How to Build Cabinets
Grab the Printable Plans here!

For more closet cabinet inspiration, check out these awesome projects, too!

  • DIY Armoire Cabinet
  • DIY Wardobe with Drawer
  • How to Build Your Own Stand Alone DIY Closet Cabinets With Clothes rod and adjustable shelves and even a shoe rack!
    DIY Closet Cabinets

Step 1: Assemble Bottom Closet Cabinet Box

The first thing I did was cut down one of my ¾″ plywood sheets into 2 strips 20″ wide. From these two strips, I cut and assembled a cabinet like shown below using ¾″ pocket holes and 1 ¼″ pocket hole screws.

RELATED: How to Cut Down Plywood Sheets

ALSO RELATED: How to Use a Pocket Hole Jig

.

Because these edges will be exposed on the front side, I applied edge banding to the front edges of these pieces before assembling. You can apply edge banding after assembling, but it’s a little more difficult to sand smooth.

Dimensional diagram of bottom closet cabinet system

Check out this post to learn how to apply edge banding to plywood edges.

.

Once the main box was together, I added a 3″ tall toe kick piece(this was cut from ¾″ plywood) 3″ inset from the front edge along the bottom. I installed this using ¾″ pocket holes and 1 ¼″ pocket hole screws.

.

This cabinet will need to be secured to the wall behind it once it’s in place, so I added two ¾″ plywood pieces between the side panels at the top and bottom along the back edge using ¾″ pocket holes and 1 ¼″ pocket hole screws.

dimensional diagram showing toe kick and back bracing on bottom cabinet of closet system

These pieces at the back are how you will attach the cabinet to the wall once it’s complete to secure it in place and prevent tip-over.

.

Now, I had an issue with my plywood tending to bow in once I got my drawers installed, so I added this little ¾″ plywood strip as a “spacer brace” in the middle here to keep the sides equal distance apart between the top and bottom.

Diagram showing middle bracing strip on bottom closet cabinet box

I installed it 1″ inset from the front edge using ¾″ pocket holes and 1 ¼″ pocket hole screws.

Step 2: Install Drawer Slides

I laid the cabinet on its side and installed four 16” drawer slides so that they were ¾” inset to allow for inset drawer fronts. 

Shara installing drawer slides into cabinet box

I have a detailed guide for how to install drawer slides here that you may find helpful.

.

And also a diagram for where to install them, below.

Dimensional diagram showing drawer slide placement on bottom closet section

Step 3: Build Drawer Boxes for Closet System

I drug out another sheet of plywood and began ripping 7 ⅞″ wide strips to make the drawer boxes from.

.

I trimmed the strips to length to make four drawers total (see lengths in diagram below) and began cutting dadoes along the drawer box pieces to install the ¼” plywood bottom panel. 

Exploded diagram of drawer box dimensions

You can use a dado blade or a router to cut the dadoes, but I prefer to just set my table saw blade height to ¼” high, adjust my rip fence to cut about ½” from the bottom edge, make a pass, then adjust the rip fence closer to the blade and make 1-2 more passes until the dado is about ¼” wide.

.

You can see this in the video above.

RELATED: How to Build Drawer Boxes

.

Once these dadoes were cut, I cut ¼” plywood panels to fit inside and assembled the drawer boxes using ¾″ pocket holes and 1 ¼″ pocket hole screws.

Shara Woodshop Diaries stacking assembled drawer boxes on top of cabinet

NOTE: These drawers were pretty wide, but since they were only about 16” deep, the ¼” plywood seemed to hold fine without a lot of room for give.  However, if you wanted, since they are larger than normal, you could use ½” plywood instead. 

.

I feel like that would be overkill for a few sweaters and some jeans in a closet haha. But, to each their own 🙂

Step 4: Install Drawer Boxes

Once the four drawers were assembled, I began installing them into the cabinet. 

Computer diagram showing drawer boxes installed into dresser cabinet

Check out this post for a detailed guide on building and installing drawers and slides. 

.

I used some spacer blocks to space out the drawer boxes and screw the slides onto them.

Shara Woodshop Diaries installing drawer boxes onto drawer slides with spacer blocks

Since these are such large drawers, it’s important to get several screws in the slides to help with both the weight and the alignment. 

.

I used four screws per side of each slide. I had to remove each drawer from the main slide attached to the cabinet to insert the screws in the back hole.

Step 5: Add Drawer Fronts

Once all four drawers were installed, I cut drawer fronts from ¾” plywood and edge banded them.  Then, I installed them onto each drawer box using wood screws from the inside. 

Drawer front dimensional diagram

There are a lot of tricks to lining up drawer fronts, but honestly, I just eye balled it to see that the gaps looked even, clamped them, then screwed them in place. You can see this in more detail in the video above.

.

I began at the top and worked my way down.

Step 6: Add Back Panel to Bottom Closet Cabinet

I cut and stapled a ¼” plywood back panel onto the back side of this cabinet to finish it up. If you don’t have a stapler, you can use wood screws or brad nails instead to secure it.

Computer diagram of bottom closet system box back panel installed

Step 7: Assemble Top DIY Closet System Cabinet

Just like the bottom, the top was basically just a large plywood box.  In this case, I cut the pieces a few inches narrower than the bottom section—the bottom was about 20” deep, but I made the top about 16” deep.

Top section of closet system dimensional diagram

To keep things extra simple, I just glued and screwed these pieces together with 1 ¼″ wood screws through the top and bottom panels. 

.

You can edge band the front and side edges before or after assembly, but again, I find it easier to edge band before.

Step 8: Build Shoe Cubbies

There are a lot of ways I could have built the shoe cubbies—dadoes, or lap joints, pocket holes, etc.  But, I chose to use dowels because:

  1. This is a shoe rack and doesn’t need to hold hundreds of pounds.
  2. I didn’t want to see any pocket holes and the spaces were really too small for them anyway.
  3. I didn’t trust myself to cut this many dadoes or lap joints with very good accuracy or maintain the patience to do so.

.

Of course, you’re welcome to use whatever method you feel most comfortable with.  But for me, it was dowels. 

.

I cut four vertical divider panels to the size shown below. In THREE of the four, I drilled ⅜″ holes at the locations shown below using a ⅜″ dowel jig. I didn’t drill holes in the fourth panel.

Then, I cut 8 pieces like shown and drilled ⅜″ holes into the sides in the center, and ⅜″ in from the front and back edge. These holes need to line up with the holes drilled in the divider panels.

Shoe cubby shelf dimensions and dowel locations

I used some RapidFuse glue to glue ⅜″ dowels into the holes in the three vertical panels so that they stuck out a little on each side.

Shara Woodshop Diaries applying glue to install dowels

Then, I used wood glue to attach the shelves onto these dowels.

.

I glued up one section at a time and let them dry about an hour before moving onto the next section.

Shara Woodshop Diaries gluing up shoe cubby section with dowels--hammering pieces together in workshop

Once I had them all glued up—12 cubbies total—I screwed the outside piece on using 1 ¼″ wood screws.

Shara Woodshop Diaries aligning shoe cubby pieces for gluing in workshop

These screws will be hidden once it’s installed in the top piece of this closet system, so I wasn’t worried about them showing.

DIY closet system cubbies assembled diagram

I edge banded the shoe cubby pieces before assembling, but I ended up sanding most of it off because I got messy with the glue so I reapplied it again after it was assembled. 

.

This was by far the most stressful part of the project (mostly because of the glue haha), but once the shoe cubbies were together, it was smooth sailing.

Step 9: Install Shoe Cubbies and Add Shelf

For no particular reason other than just for looks, you’ll notice that I made the shoe cubby piece about 1” narrower than the overall cabinet. 

.

I placed the shoe cubby inside the top cabinet from step 7 and carefully measured, clamped and screwed this piece in place with 1 ¼″ screws keeping all the cubbies perfectly square and flush to the back side.

.

Again, since this is going into a nook, none of these screws on the side or bottom will be seen once it’s installed.

Then, I added a ¾″ plywood shelf on the top of the cubbies.  I just used 1 ¼″ wood screws again .  You will be able to see the screws on the top of the shelf here, but since this is going to be about 7 ft high and covered with clothes, I wasn’t concerned. I’ll putty over them later.

.

However, if you were concerned with seeing the screws, you could opt for dadoes here instead or plug the screw holes.

Step 10: Install Top Cabinet Bracing and Back Panel

I cut a scrap strip of ¾″ plywood and attached at the top of this cabinet flush with the back side using ¾″ pocket holes and screws. This piece will be used to secure the top section to the wall studs once it’s complete to prevent tip over.

Then, I cut a ¼” plywood panel to fit over the back of the top cabinet section and simply stapled it in place.

Back panel dimensional diagram for top section of closet

Step 11: Build Tie/Belt Rack for Closet System

The friend I was building this for has a lot of ties and wanted somewhere to hang them and tuck them away.

.

So I rummaged around in my scrap pile to find some ¾″ plywood pieces I could cut down to build a small box. 

Assembled diagram showing tie rack dimensions

Instead of adding a top panel here, I cut three pieces from a 1″ diameter dowel rod to screw into this box to use as racks.

.

I carefully measured each side of each dowel to make sure they were installed square and level, then screwed them in from the sides.

Step 12: Install Tie Rack

Once this box was built, I installed the 14″ drawer slides into the large left cubby on the top cabinet—one at the bottom and one at the top (both on the left side–see below), then I installed the tie rack box onto the slides.

Shara Woodshop Diaries installing tie rack into cabinet

I was pleasantly surprised that worked as well as it did, and all it needed was a front. 

.

So, I cut to fit a ¾″ plywood front, edge banded it, and screwed it on from the inside leaving ⅛″ gap on the top, bottom, and left side. This way, it actually overlaid the divider panel on the right. 

Step 13: Finish and Install Closet System

I puttied the screw holes (I used DAP Wood Putty), sanded, and applied a couple coats of clear coat (I used Minwax Helmsman) to the project.

RELATED: How to Finish Raw Wood Furniture

.

I added these black, modern handles and put the pieces together to see how they looked!

Finished plywood DIY Closet system with dresser on bottom and shoe cubbies and shelving on top.

Broken down into sections, this closet project really wasn’t difficult, though it is rather large. 

.

These closet cabinets could easily be modified, added on to, or doubled up on to add to a nook, closet, laundry room, or any other space you might need some additional cabinetry or storage space. 

Close up shot of inside tie rack pull out in closet system

To install it, you’d simply level and attach the cabinets to the wall through the back braces (from steps 1 & 10) into the wall studs using 3″ screws.

.

I’d probably also use a few 1 ¼″ screws through the underside of the dresser top up into the top cabinet to secure them together as one unit.

.

Now, honestly, with this natural birch finish, the wood putty is almost un noticeable on the sides where I covered the screws. 

.

However, if this wasn’t going into a nook and you didn’t want to see the putty, adding a veneer over the entire side, using wood plugs, a thin “end cap” board or some trim pieces are an easy way to cover the screws, add a decorative touch, and give you a seamless finish.

.

If you want to build your own DIY closet system, don’t forget to check out video above for additional details. And if you enjoyed this project, be sure to subscribe to our newsletter so you don’t miss out on what’s coming next!

To save this for later, don’t forget to share it to your favorite social channel or pin it!

Pinterest image showing computer diagram of closet system at top and completed closet system on bottom with text "build your own closet system free building plans"

Until next time, friends, happy building! 🙂

DIY Porch Swing Bed

July 2, 2021 by Shara, Woodshop Diaries

Shara sitting in DIY porch swing bed small

In this post, I’ll show you how to build a DIY porch swing bed!

I’m sharing printable building plans below for both a TWIN and a CRIB size mattress porch swing in this design. So, let’s get building!

Shara Woodshop Diaries sitting in dark stained DIY hanging wooden porch swing bed with brick background

A friend of mine recently asked me to build her a porch swing bed large enough to fit a twin size mattress.  Which…is quite large, but I must admit, it’s a good size for napping ha!

.

So if you can make it fit, I recommend going with the twin size. 

.

However, if a twin is a little too big for your space, I’m sharing the printable building plans for BOTH a twin size and a smaller crib size mattress swing in this post so you’ve got a couple sizing options ????

.

I’m also sharing a step by step tutorial below to show you how the pieces come together, plus a YouTube video tutorial here:

This post contains affiliate links. See policies.

Tools and Materials:

Tools:

  • Drill/Driver
  • Saw to cut straight lines–Can use miter, jig, or circular saw
  • Pocket Hole Jig (optional)
  • Saw to cut plywood (see step 7)–Can use jig or circular saw
  • Nail Gun (can use screws instead if you don’t have one)
  • ¾″ spade, hole saw, or forstener drill bit

.

Materials:

*Materials will vary based on the size porch swing bed you’re building. Check printable plans below for specifics on each size. The following is based off a twin size.

  • (2) 2x2x8 boards
  • (6) 2x4x10 boards
  • (2) 2x6x8 boards
  • (5) 1x4x8 boards
  • (1) 1x6x8 board
  • (1) sheet ½″ or ¾″ plywood (optional–see step 7)
  • 1 ¼″, 2″, 2 ½″, 3″ wood screws (use exterior rated if using outdoors)
  • 2 ½″ pocket hole screws (use exterior rated if using outdoors)
  • Timber Screws (optional)
  • Wood Glue
  • Rope Kit
  • (4) eye screws
  • (4) carabiner clips

PRINTABLE BUILDING PLANS:

Some Notes About this DIY Porch Swing Bed Project:

NOTE #1:

You’ll notice that I used untreated pine/spruce for this project.  This swing is going under a large covered porch.  The way it is positioned, it will not have any direct sunlight and will not be subject to much, if any, rain. 

.

So I just kept it lighter weight and cheaper by using untreated. 

.

However, if you need more protection from the elements in your case, this would work fine with treated, cedar, redwood, or a more weather/moisture resistant wood.

.

NOTE #2:

Before beginning, keep in mind the weight this will be holding and make sure you have enough support in the ceiling and the hardware you use to hang it to hold both the weight of the swing and the people who will be using it.

.

NOTE #3:

This design did call for using a couple 2×2 boards. I cut my own 2x2s from one of the 2x4s using my table saw.  You can purchase these precut, or make your own 2x2s from 2x4s using this tutorial.

.

Some posts you may find helpful to check out before starting this project:

  • How to Make 2x2s from 2x4s
  • How to Use a Pocket Hole Jig
  • How to Cut Plywood Sheets

Now that all that info is covered, let’s get to the fun stuff and start building!

Computer diagram of overall DIY hanging porch swing bed project

Step 1: Assemble Swing Seat Frame

This project started off with building a frame for the seat. The dimensions will vary depending on the size you are building. Refer to the printable plans for your particular size for specifics.

2x6 and 2x4 swing seat frame assembled--computer drawn diagram

The front and back pieces were 2x6s (in yellow above) and the shorter side pieces were 2x4s (in blue above).  I trimmed these boards down to length, then assembled using 2 ⅞” timber screws. 

.

Regular wood screws would work fine here, but I had a few extra of these in the shop and I liked how the bigger black screw heads looked for this, so I used them.

Close up of Shara Woodshop Diaries screwing swing bed seat frame together with timber screws

Notice that I kept the 2x4s flush to the bottom side of the 2x6s.  The mattress will sit down into the frame a little and rest on these 2x4s.

Step 2: Add Corner “Posts” to Seat Frame

I added 2x4s at each corner for what I will call the “corner posts.”

Close up of Shara Woodshop Diaries installing corner swing posts using timber screws

Again, wood screws would work fine here, but I liked the look of the timber screws.

Step 3: Complete Swing Bed Frame

Next, I attached 2x2s between the 2x4s at the corners using 1 ½″ pocket holes and 2 ½″ exterior grade pocket hole screws. 

RELATED: How to Use a Pocket Hole Jig

.

Now, if you don’t have a pocket hole jig, you can use 4” wood screws through the 2x4s to secure these, toenail the screws by driving them at an angle, or just simply screw these pieces on the top side of the 2x4s instead of between them. 

Wide picture of Shara Woodshop Diaries in workshop installing 2x2 supports at top of swing frame using pocket holes and screws

If you add these on top, you’ll need to cut the vertical slats in the next step about 1 ½″ longer, but it’s not a big deal.

.

Notice the back 2×2 is inset about ¾” from the back edge here.

Step 4: Install Slats

I used 1×4 boards for the slats—5 on each side and 10 across the back (for the twin size).  The ones on the back are a little shorter than the ones on the sides to allow for some seat supports to be added later. Refer to the plans for specifics.

.

Once they were cut to length, I found the center of each 2×2 and started there working my way out using a scrap 1×4 piece to evenly space them 3 ½″ apart.

Shara Woodshop Diaries screwing slats in place on side of swing bed frame

I used 2” exterior wood screws at the top through the 2×2 supports making sure to predrill every hole to prevent splitting.  Then, I used the same screws to secure them at the bottom.

.

I added slats to both sides first, then across the back.  Notice that the slats on the sides are attached on the outside of the bottom frame, but the slats on the back are attached on the inside of the bottom frame.

Shara Woodshop Diaries installing slats on back side of swing bed frame using spacer block

Step 5: Add “Arm Rests” to Swing Frame

Once all the slats were in place, I cut and attached 2x4s along the top edge to act as an arm rest.  I used several screws from the underside of the 2x2s to attach these so you wouldn’t see the screw heads from the top.

Close up of installing arm rests on swing frame through underside of 2x2s

Step 6: Trim Out Side Slats

Then I cut two pieces of 1×6 board to trim out the bottom of both sides of the swing.  This 1×6 will cover the screw heads from the slats and also match the 2×6 thickness on the front, so it’s basically just for looks. 

Shara Woodshop Diaries using a nail gun to install trim piece on side of swing frame

I used exterior grade wood glue on the slats and brad nails to attach. If you don’t have a nail gun, you could use screws instead.

Step 7: Install Swing Bed Mattress Supports

To give the mattress some support, I added some 2x4s on the bottom using pocket holes and screws. 

.

You don’t HAVE to use pocket holes.  If you don’t have a pocket hole jig, you could use regular or timber screws through the front and back supports instead.

Shara Woodshop Diaries screwing mattress supports in place in bottom side of swing frame using pocket holes and screws

I evenly spaced three supports along the bottom 2″ down from the top of the frame so it’s even with the 2x4s on the sides. If you’re using a spring mattress, this would probably be plenty of support. 

.

But the foam mattress my friend was using was a little flimsy, so I actually cut a piece of ¾” plywood to sit down into this frame on these supports. 

Computer diagram showing plywood panel placed in seat of porch swing bed frame

You could save a little money (and weight) by using ½″ plywood instead of ¾″, but I knew I could use the rest of the ¾″ sheet for another project, so that’s why I used it.

.

I recommend cutting this piece to fit, but not securing it yet. It adds quite a bit of weight, so it’s nice to be able to remove it to hang the swing. After it’s hung, you can place it in the seat and secure it in with 1 ¼″ wood screws.

Step 8: Add Bottom Runner Supports

Now it was time to add the final pieces, which were the runners that the ropes will be tied to to hold the swing.

.

I cut two 2×4 boards—one for the front and one for the back–so that they overhung each side by about 6”.

Shara installing bottom runners along front and back of swing frame using screws

I screwed these in from the bottom side using several screws into the frame of the swing.

Step 9: Finish and Attach Ropes

Then, I used an outdoor stain and sealant (I used Valspar Canyon Brown outdoor semi-transparent sealant) to give it some color and help protect the wood.

.

Once that was dry, I could attach the ropes.

.

I purchased this rope kit from Amazon to hang this swing with. It came with 4 ropes–one for each corner of the swing. This one was for a 10′ ceiling, but they make them for 8′ and 9′ as well.

.

I used a ¾” forstener bit to drill holes through the bottom 2x4s to slip the ropes through and tied a knot. 

Close up of rope tied to corner of porch swing bed frame

Since these ropes are fully adjustable, I could just tie them on and once we get it installed, adjust the rope length as needed to get the seat height where we wanted. Check out the video for more details.

Step 10: Hang Swing Bed

*If you are unsure about this, contact a professional to ensure your ceiling and the hardware you use can handle the weight.

.

To hang this swing, we we located the rafters in the attic and found the ones that most closely matched the holes drilled for the ropes in the swing. 

.

Due to the location of the rafters, you’ll notice the ropes do angle out slightly, but that’s better than angling in because this way, they don’t rub the arm rests.

.

Once we located the rafters we wanted to attach to, we predrilled pilot holes and installed four ⅜″ x 4 ½″ eye screws through the ceiling here and into the rafters above. 

Close up of eye screws and carabiner clips used to hang DIY porch swing bed

Then I used carabiner clips to hook between the eye screws and the rings on the ropes.

.

We adjusted the height of the swing by adjusting the ropes. Check out the video for more details.

.

Once we got the porch swing bed hung, I slipped the plywood piece from step 7 into the seat frame and secured it to the seat supports with a few 1 ¼″ screws.  Then, added the mattress, pillows and blanket ha!

.

And now it’s ready for swinging, napping, or lounging all summer long. 

Completed DIY porch swing bed hanging on brick porch with ropes on each corner and green and navy pillows along back side of swing.

This was such a fun outdoor project to put together and I really hope you enjoyed watching the process.

.

I hope you learned something new and will grab the plans and build your own DIY porch swing bed!!

.

If you liked this project, check out more outdoor projects here:

  • 2 Tool Outdoor Grill Cart
  • How to make your own DIY concrete planter pot with wooden base
    DIY Outdoor Chair
  • DIY Hammock Stand
  • DIY Privacy Fence

And if you want to follow along, be sure to subscribe to our newsletter (it’s totally free!) and so you don’t miss out on all the upcoming DIY projects!

Don’t forget to grab the plans to build your own! And if you want to save this project for later, be sure to pin it or share it to your favorite social channel!

Pinterest collage showing overall computer diagram of DIY porch swing bed project at top and completed swing photographed on brick porch at bottom with text "DIY Porch Swing Bed"

Until next time, friends, happy building!

Easy DIY Shelf with Baskets

June 25, 2021 by Shara, Woodshop Diaries

This post will show you how to build an easy DIY shelf with basket cubbies using basic tools and lumber! I’m sharing FREE building plans below 🙂

White and wood six cubby DIY shelf made with plywood and 2x2s.  Three khaki baskets are in the shelf cubbies

I recently built this basic shelf project for a friend who wanted cubbies for six identical storage baskets to help contain her kid’s toys. (I borrowed the three above to take some photos haha!)

.

This was a simple project, but the key was building it to fit the specific baskets she wanted to use. Of course, if you aren’t using baskets, this design is the perfect little bookshelf, folding table, or console to store or display whatever it is you need a place for!

.

In this video, I’ll show you exactly how I figured out the measurements and walk you through the building process. But, I’ve also provided the written step by step plans below in this post 🙂

This post contains affiliate links. See policies.

Tools and Materials:

Tools:

  • Circular saw (saw guides optional–Check out how to cut down plywood in this post)
  • Miter saw (or any saw that can cut straight lines)
  • Drill/Driver
  • Pocket Hole Jig

Materials:

  • 1 sheet ¾″ plywood (I used birch plywood)
  • ½ sheet ¼″ plywood
  • (2) 2x2x8 boards
  • 1 ¼″ pocket hole screws
  • 1 ¼″ & 2″ wood screws
  • Wood Glue
  • Edge Banding
  • Wood Putty
  • Storage Baskets (optional)

A Few Notes About the Build:

I decided to keep this project VERY simple and use ¾″ plywood for the shelf and 2x2s for the base.

.

The overall dimensions were 14 ¾″ deep, 33 ¾″ tall and 46″ wide.

Overall dimensional diagram of DIY shelf--33 ¾" tall, 14 ¾" deep, 46" wide

The cubbies fit these specific baskets perfectly.

.

For easier cutting, I’ve provided a plywood cut diagram for the ¾″ plywood here:

plywood cut diagram to build easy DIY shelf project

Some posts you might find helpful before or during the build:

  • How to cut plywood
  • How to use a pocket hole jig
  • How to apply edge banding
  • How to make your own 2x2s
  • How to finish raw wood furniture without a sprayer

.

For more DIY Shelf Projects, check out this list!

  • Industrial Open Bookshelf
  • Mid Century Bookcase
  • One Sheet Plywood Bookshelf
  • Modern Bookshelf
  • How to build a DIY X Base Console Table--free building plans!! Minwax Early American stain makes this inexpensive console table look like a million bucks! Perfect for living room, bedroom, or dining room for displays and storage!
    X Base Console Shelf

Step 1: Assemble DIY Shelf Sides and Bottom

First thing was first–I cut down my plywood pieces. Now, normally, I don’t recommend cutting all your pieces at once. Cutting to fit as you go is usually the best method.

.

However, in this case, since it is so simple and so few pieces, It’s not a bad plan to cut all the ¾″ plywood pieces first. Just make sure the 14″ pieces are 14″! If they get off, the rest of the pieces will, too.

.

Once the pieces were cut, I applied iron on edge banding to the edges that will be exposed.

RELATED: How to Apply Iron On Edge Banding

.

Then, I used wood glue and 1 ¼″ wood screws (don’t forget to predrill to prevent splitting!) to attach the side panels at each end of the plywood bottom.

Computer diagram attaching side panels to bottom panel of basic shelf build

Note that I used screws THROUGH THE BOTTOM and into the sides. This will hide the screws from view as they will be on the bottom.

Step 2: Add Divider Panels

Since the shelves are 14″ square, I found it helpful to use them to help properly space the middle dividers. You can see this in the video above.

Two divider panels installed 14" from side panels--computer diagram showing shelf assembly

I attached the two divider panels using 1 ¼″ wood screws through the bottom so that the panels were all 14″ apart.

Step 3: Install Middle Shelves

I installed the middle shelf here using 1 ¼″ wood screws through the two middle dividers and into the shelf. This just saved a little time–check out the video to see.

.

Then, I installed the left and right shelves using ¾″ pocket holes and 1 ¼″ pocket hole screws.

RELATED: How to Use a Pocket Hole Jig

Middle shelves installed into cabinet using pocket holes

You can use pocket holes for all three shelves if you’d rather.

Step 4: Attach Top of Shelf Box

Once the shelves were in, I installed the top using wood glue and 1 ¼″ screws from the top side.  Since I was painting this piece, it would be easy to simply putty and paint over these screws.

.

However, if you planned to stain and don’t want to see the putty or screw heads, you may want to opt for pocket holes on the side panels or use some braces along the top to screw through. Check out the video for more details.

Computer diagram showing top panel dimensions and installation using screws from top side

Once the top is installed, putty over any joints or screw heads you want to smooth out.

Step 5: Paint & Attach Back Panel

While the putty dried, I cut a piece of ¼” plywood panel to fit over the back side of the shelf.  Note: These dimensions are ¼″ smaller than the overall size to allow for a little wiggle room on each side.

¼" plywood backer dimensions for back side of DIY shelf

Once the putty was dry, I sanded the shelf and the back panel well and used a roller and a brush to apply two coats each of primer and paint (SW Alabaster was the color) to both the shelf and the back panel.

RELATED: How to finish raw wood furniture

.

Once the paint was dry, I stapled the back panel onto the back side of the shelf. If you don’t have a staple gun, you can also use wood screws instead.

plywood backer panel installed on back side of shelf

Step 6: Build DIY Shelf Base Frame

I ripped down a 2×4 into 2x2s to begin making the base.  You can purchase precut 2x2s at the store, but I prefer to make mine from 2x4s to give me straighter boards with squared corners.

RELATED: How to make your own 2x2s

.

I cut four legs and 4 pieces to complete the base frame.  I ended up making this about 13 ½” x 44” so that the cabinet overhung the base ½” on each side and the front—kind of like the top.

.

I assembled the frame using wood glue and 1 ½″ pocket holes with 2 ½″ pocket hole screws. 

Base frame dimensions made from 2x2s and pocket hole screws

By the way, when I’m using 2x2s, I’ve found wood glue and one screw tends to do better than two screws.  Whenever I use two screws, they are much more likely to split. 

Step 7: Attach Base to DIY Shelf Box

I flipped the shelf on its back to attach the base.

.

I made sure to predrill first, and used 2” wood screws to attach the base to the shelf.

Attaching base onto bottom side of DIY shelf

And once that was installed, I flipped it back over and it was complete.  All that was left was filling the shelf cubbies with baskets!

Shara placing baskets into shelf cubbies

This was a really simple project and I hope you enjoyed watching it come together.  If you’d like to build your own DIY shelf with basket cubbies, be sure to check out the video above for additional tips.

.

And if you’d like to stay up to date on all the latest projects and DIYs, I’d love if you’d subscribe to my newsletter here:

And if you’d like to save this for later, don’t forget to pin this or share it to your favorite social channel!

Pinterest graphic showing overall dimensional diagram at top and Shara with shelf and baskets at bottom with text "DIY shelf with basket cubbies"

Until next time, friends, happy building! 🙂

DIY Planter Box with Trellis–From Wood Scraps!

June 15, 2021 by Shara, Woodshop Diaries

In this post, I’ll show you how to build a DIY planter box with trellis–from scrap wood!

DIY treated scrap wood planter box with trellis on back with flowering plant in plastic box set inside

After my latest hammock stand build I had several treated wood scraps leftover that I needed to get rid of, but I hated to just trash them.

.

Since I don’t work with treated lumber much in my workshop, I would very likely never have a use for them unless I made something specific with these random pieces in mind.

.

And there wasn’t enough left to make anything very big. 

.

So I laid out what I had and started brainstorming some options.  The goal was to use as much of the scraps as I could, but not buy any additional lumber.

.

I had two 8 foot long 5/4 decking boards that I had purchased extra for the deck part of the hammock stand, several off cuts of the same size, some random 1x2s, 2x6s, and two lattice panels.

.

After some thought, I decided to make two planter boxes and I could use the leftover lattice pieces for trellises on the back side.

.

I’m sharing the video of the build process here and the step by step plans below. The video will show how I was able to use up most of the scraps, but the plans below will give you the directions to build from scratch.

This post contains affiliate links. See policies.

Notes About the DIY Planter Box with Trellis Project:

I knew I wasn’t going to have enough scrap wood to make a solid bottom on the boxes, so I purchased some cheap plastic window boxes to actually hold the dirt.

.

The wooden part would basically just be a façade to hide the plastic pot.

.

So I measured the window boxes and began figuring the sizing I needed my project to be so it could fit inside.

Shara Woodshop Diaries measuring the overall size of the window box planters for planter box

Now, I totally get that you may not have the scraps in your shop to build this with. SO, if you are starting from scratch, I’ve got the materials list below and you can follow the same plan 🙂

.

Mine ended up being about 15″ deep, 41 ½″ wide and 49″ tall overall.

Overall size diagram of Planter box with trellis back

The box fit a planter pot 27″ long, 10″ tall, and 12″ deep. These are the ones I used.

Tools and Materials:

*Note the materials list is PER PLANTER BOX. However, if you choose to build two (like I did), one full lattice sheet (4×8) is more than enough for both and you’d only need one additional 1×2 (3 total, not 4).

Materials:

  • (1) 5/4 x 6 x 10 decking board
  • (2) 1x2x8 treated board
  • (1) 4×8 sheet lattice
  • (1) 2×2, 2×3, OR 2×4 treated board 4ft long (optional–see step 4)
  • (1) plastic window planter box
  • 1 ¼″, 2″, 2 ½″ exterior wood screws

Tools:

  • Saw (any saw that cuts a straight line would work)
  • Jig saw (to cut lattice)
  • Drill/Driver

Step 1: Cut and Assemble “Partial” Planter Box

I didn’t have enough wood to make 2 four-sided boxes for the plastic pots to sit inside. BUT…I did have enough to make 3 of the 4 sides 🙂

.

Ideally, I would have liked to have a solid back at the bottom here, but I didn’t have enough lumber—so you can definitely add that if you wanted—I just didn’t want to buy more wood haha.

.

So I screwed the three sides together using 2″ wood screws–I needed two of these PER PLANTER. Since I was making two identical planter boxes, I made four total.

Diagram of partial boxes assembled for planter

And then, I just screwed two of these together by “toenailing” them—which is basically just driving a screw at a steep angle. 

.

You could also use pocket holes and screws, or use some wood slats on the inside of the box to attach them together.  There are a lot of options here, but simply angling the screw from the inside of the box (so you won’t see it) was quick and easy.

Partial box pieces assembled--top and bottom together

Step 2: Attach Trellis Frame

Once the partial box was assembled from step 1, I trimmed 1×2 pieces down to the height of the lattice panels (my panels were 48″ tall and about 30 ½″ wide) and screwed them into the back side of the box using 2″ wood screws.

1x2s added to sides of planter box to frame out lattice

I cut, and screwed another 1×2 piece to go along the top between these two pieces using 2 ½″ screws, then prepared to trim the lattice panel.

Top piece of trellis frame added between 1x2s on sides of planter box

Step 3: Attach Lattice on Planter Box Frame

By some miracle, the lattice panel was almost the exact same size as the frame I was planning to mount it to.  I absolutely didn’t plan that and expected to have to trim it down some. What a pleasant surprise haha.

.

If, however, you did need to trim your lattice panel, you could use a circular saw or a jig saw to do so—I prefer a jig saw as the staples you are likely to hit in the lattice can screw up a blade and jig saw blades are cheaper to replace. (Been there…done that!)

Lattice panel sizing diagram--lattice installed onto back of planter box frame

Anyway, I simply screwed the lattice onto the back side of this 1×2 frame in several places around the edges using 1 ¼″ screws.  It’s helpful to predrill here as this thin lattice tends to split easily.

Step 4: Add Top to Trellis

At this point, I built the second one just like it and evaluated the lumber I had remaining.  Technically, it’s complete after step 3, but I had some 2×6 leftover that could still be of some use.

.

So, I ripped it in half and added the pieces on the top of each trellis. These could be 2x2s, 2x3s, or even 2x4s if you wanted. These pieces were just for some extra detail and are totally optional.

Scrap wood board added to top of trellis

I simply centered and screwed these into the top of the frame. 

.

I wanted to add some extra details to use up the rest of the wood, but all my remaining pieces were too short for any of my ideas, so I did end up with a few short blocks of 2×6 and two small 1×2 pieces left that will make their way to the trash bin.

.

Sad day…

Two completed DIY planter boxes with trellis sitting in garden space next to house

But, the vast majority of these scraps now have a new life in my garden.  I’m going to try these vine-y flowering plants this season and maybe next year, use it for sweet peas or tomatoes.

.

If you’re interested in more outdoor or garden projects, you may like to browse a few of these fan favorites!

  • DIY Hammock Stand
  • Scrap Wood Lanterns
  • 2 Tool Outdoor Grill Cart
  • DIY Privacy Fence
  • DIY Louvered Planter Box
  • DIY Backyard Garden Patio

I hope you enjoyed this DIY planter box with trellis project and if you’d like to save it for later, be sure to pin it or share it to your favorite social channel!

Pinterest collage image showing overall planter box with trellis overall dimensions diagram at top and Shara watering plants inside at bottom with text "DIY scrap wood planter box with trellis"

If you want to follow along, I’d love if you’d subscribe to our newsletter to stay up to date on all the latest projects, plans, and DIY tips!

Until next time, friends, happy building! 🙂

DIY Outdoor Hammock Stand {with Floating Deck & Pergola!}

June 4, 2021 by Shara, Woodshop Diaries

In this post, I’ll show you how to build an outdoor DIY hammock stand –with a floating deck and a pergola top!

Vertical view of DIY hammock stand with floating corner deck and corner top pergola

We recently turned our side yard into a large garden area and I had plans to add some seating to this space throughout the summer to give us somewhere to hang out outside of our tiny garage house.

.

I still have a lot of project ideas to tackle, but I decided to build a hammock stand first. 

.

I didn’t want to put this DIY hammock stand into the ground in case we decided to move it around to another spot in the yard or we move and want to take it with us. 

.

So I built it with a floating deck type base to weigh it down and a pergola top to give it some extra strength and also a little bit of shade. 

.

I’m so excited about this build, so let’s dive right in with the how to!  I have a video tutorial here and the printable building plans for this project linked below along with a step by step tutorial.

*This post contains affiliate links. See policies.

Some Notes About the Project:

Material Choices for DIY Hammock Stand:

Since this was an outdoor project, I used treated lumber for it so it will withstand the weather better.  If you have access to cedar, redwood, or another rot resistant option, you could use that as well. 

.

Also, since this is an outdoor project, be sure to use EXTERIOR grade hardware (screws, nails, bolts, staples) to assemble. Timber screws work well, but I used mostly decking screws.

Size & Weight Specifications:

I used 4x4s for the corner posts, 2×6 for the framing and pergola part and 5/4 decking boards for the top of the deck section.

.

I used this hammock with this project and it was 9′ long overall. If your hammock is longer, you’ll need to make your stand wider to accommodate the extra length.

.

This hammock was rated for 450 lbs, so theoretically, the structure needs to hold at least 450 lbs. I didn’t have 450 lbs to test it, but it held just fine for 350 lbs in the hammock (we both crammed into it and added the dog to see if it would hold haha).

.

I don’t expect any issues with 450 lbs (which is the max the hammock would hold anyway), BUT, I’m not a structural expert and if you are in doubt as to the structure’s integrity for your application, consult a professional.

.

The overall dimensions ended up being about 11′ 6″ wide, 8′ 6″ tall, and 72″ deep at the longest pergola piece at the top.

What You’ll Need To Build This DIY Hammock Stand:

Materials:

  • (3) 4x4x8 posts (treated)
  • (1) 2x6x12 board (treated)
  • (8) 2x6x10 board (treated)
  • (6) 5/4 x 6×10 boards (treated)
  • (2) 2x2x8 boards (treated)
  • (6) 1x2x8 boards (treated)
  • (2) Lattice Sheets
  • 2 ⅞″ timber screws
  • 1 ½″, 2 ½″ x 3″ exterior screws
  • (2) 7″ eye bolts
  • (4) washers
  • (2) nuts to fit eye bolts
  • Hammock

Tools:

  • Circular saw
  • Jig saw
  • Drill/Driver
  • Miter saw (optional)
  • Stapler

PRINTABLE BULDING PLANS:

Step 1: Build Front Frame of Pergola Hammock Stand

First, I cut and assembled the front frame of the hammock stand. I used 4×4 posts and 2×6 boards.

.

The bottom board was 9′ 6″ long, the top was 11′ 6″ long and the 4×4 posts were both 8′ long. I assembled like shown using 2 ⅞″ timber screws (2 per joint).

Front frame of hammock stand made of 4x4 posts and 2x6 boards

For the top board, you can use a jig or circular saw to cut a decorative “pergola-ish” design on the ends if you want. I just trimmed off the corners to give it a modern feel.

Step 2: Assemble Pergola Hammock Stand Frame

Next, I built the rest of the frame using 2x6s for the “triangle” pieces and one more 4×4 post for the back corner.

.

The 2×6 boards will have one square end and one end beveled 45 degrees. You can cut these boards to length, then bevel one end using a circular saw with angle beveled 45 degrees or a miter saw beveled to 45 degrees.

.

I cut and attached two triangles like shown below using 3″ wood screws.

Triangle pergola and deck frame

Just a note here—if you plan to add the lattice on the sides like I did, I recommend hanging onto these little 45 degree cut off pieces.  You can use them again later.

.

Grab an extra set of hands (it’s much easier to attach the top triangle with two people) and screw one triangle in at the bottom and one at the top with a 4×4 post between them at the back corner. Use 2 ½″ – 3″ screws and attach to both the front 2x6s and all three posts where possible.

Hammock stand framing diagram showing 2x6 and 4x4 post placement

Use at least 2 screws per joint and into each post.

Step 3: Add Floating Deck Framing

In order to install the decking boards, I needed extra support inside the large bottom triangle. So I cut some more 2×6 pieces for additional framing supports.

.

I cut these with one square end and one 45 degree beveled end and screwed in place with 2 ½″- 3″ decking screws.

floating deck framing in corner triangle

Step 4: Add Decking to Hammock Stand

I used a circular saw and a jig saw to cut down the front board to fit around the posts leaving ½″ overhang along the front. I screwed it in place using 1 ½″ decking screws.

Front board of corner floating deck installed around corner posts of hammock stand

Once the first piece was in place, I laid the next piece down and marked on the underside where it needed to be cut and trimmed each end with the circular saw.

Deck boards installed onto deck frame cut computer diagram

For the very back piece, I used the piece in front of it to determine it’s length, then used my speed square to draw out where to cut to fit around the back post. See video above for details.

Step 5: Add Pergola Top to Hammock Stand Frame

I cut and installed the center piece on the pergola first.  This ended up being 72” long and I trimmed the corners off the ends to match the top board.

.

I placed it on the center line of the top front board and then set the other end at the back corner and left 9″ overhanging the front side.

long middle pergola board installed onto corner pergola frame

To keep things quick and easy, I just toenailed these boards in place by driving screws through them and into the framing at a steep angle.

.

After the middle piece was in place, I added two more pieces on each side 2 ft apart.  Since these were two feet away from the middle, they needed to be 2 ft shorter, so I cut those 48” long.

center pergola boards installed onto corner pergola top

Before I attached, I made sure the boards were evenly spaced and had equal overhang on the front to stay consistent.

.

I followed up with two more pieces on the outside 2 ft away again, so 2 ft shorter, so 24” long.

short outside pergola boards installed into corner pergola top

Step 6: Add Privacy Lattice Framing

I installed some braces into the corner posts to mount the lattice onto.  Since the front corner posts are turned 45 degrees from the back post, I used those leftover 45 degree pieces I cut off the end of the boards and mounted them to the front posts with two 2 ½″ screws per piece.

.

See video above more more details. Then, I screwed a 48″ long 2×2 onto them. 

2x2 bracing mounted to 45 degree blocks on front posts

The back 2x2s can screw straight into the back post.  I made sure these were the same height off the deck.

Diagram showing 2x2 lattice screen bracing on back corner post of floating deck pergola build

Step 7: Add Lattice and Trim

Then, I cut a piece of lattice sheet to fit between the posts and stapled it onto the 2x2s. 

Diagram showing lattice screen installed into hammock stand on one side

Next, I trimmed out the lattice using 1x2s. I screwed them into the 2×2 framing and stapled the lattice onto the top and bottom boards on the back side.

.

Now, if there was one thing I wish I had done differently with this project, it’s that I wish I hadn’t cheaped out on the trim around the lattice.  What I used here worked fine, but I feel like it looks scrawny and I wish I had beefed it up a little more. In hindsight, I wish I had used 1x4s or 2x4s for this.

.

It would have been significantly more expensive, but I think thicker trim would have looked a little nicer and been a little easier to install.

Computer diagram highlighting 1x2 trim pieces around lattice screen of hammock stand

Nonetheless, here we are 🙂 The 1x2s worked perfectly fine.

Step 8: Hang Hammock

I grabbed some eye bolts for this, a couple washers and some nuts to fit the bolts.  Now, I’m losing my mind and only got two washers when I meant to get 4.  But I wasn’t about to drive back to town for two 20 cent washers so I made do with what I had. 

.

BUT, you should have two 7″ eye bolts, two nuts to fit, and 4 washers to fit.

.

I grabbed a drill bit slightly larger than the bolt and measured about 5′ up from the deck and drilled out a hole. You could make your hole higher or lower, but 5′ was a good height for me to easily get into the hammock.

.

You want to install the bolt through the hole so that there is a washer on the front AND BACK side of the hole, then tighten the nut onto the back side.

Shara lying in hammock on hammock stand over floating deck with privacy lattice

Once those were installed, I pulled out the hammock and used the included clips to hang it up. The hammock I used included two clips that clip onto the loops of the hammock and you simply clip those onto these eye bolts.

.

I was pleasantly surprised it worked, it fit, and I was finished haha.

.

This was a large project, but I had it finished in a day and a half working mostly alone and I was surprised how easily it came together. Don’t forget to grab the building plans if you’d like to build your own!

.

This will be a great place to hang out this summer and I think the dog loves it even more than I do.

Shara Woodshop Diaries sitting in hammock on hammock stand with pergola

I hope to add more projects to this space as the summer progresses, so if you aren’t already subscribed, be sure to follow along so you don’t miss out on what’s next.

I hope you enjoyed this DIY hammock stand project and if you’d like to save it for later, be sure to pin it or save it to your favorite social channel 🙂

Pinterest collage showing overall hammock stand dimensions at top and Shara laying in hammock on bottom with text "how to build a hammock stand with deck and pergola"

Until next time, friends, happy building!

DIY Modern Bookcase Cabinet with Drawer

May 28, 2021 by Shara, Woodshop Diaries

In this post, I’ll show you how to build a Modern Bookcase Cabinet with Drawer!

Black and wood mid century modern DIY bookcase cabinet with adjustable shelves and drawer against plan white wall

This post is actually part 2 of an “unplanned” bookshelf series! You can check out part 1 here. I recently decided to build a bookcase, but I had two different designs in mind.

.

You may recall that I took a poll on Instagram asking which you’d rather see–an open shelf design or a cabinet style build.

.

The results were almost 50/50 and after getting several messages from people wanting to see how to build both, I decided to make two posts. 

.

I shared the open shelf design here and now we are tackling the enclosed, cabinet style design in this post.

.

So if you’re ready to get building part 2, let’s go. I’ve got the video below and the build plans following:

SOME NOTES ABOUT THE BUILD:

Because both of these projects are *almost* exactly the same except for the sides, instead of making two separate bookcases, I decided to “repurpose” the first one and make the modern bookcase cabinet version.

.

You can see more of that in the video above.

.

However, the plans below will walk you through the steps to build this bookcase completely from scratch.

.

The overall dimensions are 18″ deep x 28 ½″ wide x 74 ½″ tall.

overall dimensional diagram of modern bookcase cabinet

The cabinet and drawer are made from birch plywood and the base is made from 2x4s for the frame and scrap 1x material for the legs.

.

You might find these posts helpful in the building process:

  • How to cut plywood sheets
  • How to use a pocket hole jig
  • How to edgeband plywood
  • How to build and install drawers

What You’ll Need to Build a DIY Modern Bookcase Cabinet

*This post contains affiliate links. See policies.

Materials:

  • (1 ½) sheet ¾″ plywood
  • (1) 2x4x8 boards
  • (½) sheet ¼″ plywood
  • 1x scraps to cut legs from
  • 1 ¼″ & 2 ½″ wood screw
  • 1 ¼″ pocket hole screws
  • 2 ½″ pocket hole screws
  • Edge banding
  • (1) pair 16″ ball bearing drawer slides
  • Paint & stain as desired (I used SW Black Magic and Minwax Provincial)
  • Shelf Pins

Tools:

  • Circular saw (cutting guides optional, but helpful)
  • Miter saw
  • Jig saw
  • Table saw (optional)
  • Pocket hole jig
  • Drill/Driver
  • Stapler (optional–can use screws instead to attach back panel)
  • Shelf Pin Jig

Grab the Modern Bookcase PRINTABLE PLANS HERE:

Step 1: Build Modern Bookcase Base

The base of this modern bookcase cabinet consists of a 2×4 frame with mid century style legs attached to the corners.  So, first, I cut down 2×4 pieces and assembled a frame using pocket holes and screws plus some wood glue. 

RELATED: How to use a pocket hole jig.

Base frame dimensions of bookcase cabinet

I puttied the joints to prep for paint later and while it was drying, cut out the legs.

.

These legs are the same style legs I used in the open bookshelf, the recent mid century dresser build, and I’ve also used them before in an upholstered bench, a dog bed, and a dog food bowl stand.

Diagram of mid century modern legs used on bookshelf

I used some scrap 1x poplar I had in the shop for these. But, you could also use ¾″ plywood, or any 1x material you have handy.

.

Once I drew out the shape shown above on my board, I cut it out with a jig saw, then cut three more identical feet and sanded them smooth.

.

I used a speed square to measure and mark 2” in from the corner at a 45 degree angle, and used wood glue and 2 ½” wood screws to attach all four legs to the base frame.

Black and wood modern base frame assembled

I primed and painted the base frame SW Black Magic and stained the legs Minwax Provincial. You can paint/stain later, but I thought it was a little easier to do it before adding all the pieces on top.

Step 2: Build Drawer Cabinet Box

I cut down my ¾″ plywood sheet and began building the box to hold the drawer.

RELATED: Check out this post for how to EASILY cut down a plywood sheet.

.

Before assembling, I applied iron on edge banding to the front edges of the box pieces. This is totally optional, but does hide the plywood edges so you don’t see them.

RELATED: How to apply iron on edge banding.

.

To assemble the drawer box, I used wood glue and pocket holes and screws to attach the top side, but since the space was so tight, I used regular 1 ¼″ wood screws on the bottom side. 

Diagram of plywood box assembled using pocket holes and screws

If you had a 90 degree angle drill attachment, you could use that to drive the pocket holes in this tight space, but screws on the bottom side work fine, too and won’t be seen in the finished project.

Step 3: Build and Install Drawer Box

I installed a pair of 16” drawer slides into the box ¾″ inset from the front edge.

plywood box with drawer slides installed

Then, I built a drawer box to fit inside. I have a complete guide to building and installing drawers here.

.

I built the sides of the drawer box from ¾″ plywood and used ¼″ for the bottom. I cut dadoes in the drawer box sides to insert the plywood bottom, but you could also just glue and staple it onto the bottom if you didn’t want to cut dadoes.

exploded view of drawer box build

I assembled the box using ¾″ pocket holes and 1 ¼″ pocket hole screws.

.

Then, I installed it into the drawer cabinet box ¾″ inset from the front edge and cut a ¾″ plywood drawer front to fit on the front.

.

I edge banded the drawer front and screwed it in place through the inside of the drawer box using 1 ¼″ wood screws. There should be ⅛″ gap around all sides of the front.

diagram showing drawer front installed onto drawer box

Step 4: Assemble Bookcase Cabinet

I used my circular saw and Kreg Rip Cut to cut down two strips to mount on each side of the drawer box at the bottom of this shelf.

RELATED: How to cut down plywood sheets.

.

I applied edge banding to the edges that will be exposed on the finished piece to give it a cleaner look, then I stained them in Minwax Provinial before attaching to the sides of the drawer box with 1 ¼″ wood screws from the inside.

Diagram showing dimensions of side panels for bookshelf build

That gives me two sides, but I needed a couple of support pieces to go at the top of this cabinet to be able to mount the top panel to.

.

So I grabbed a couple thin ¾″ plywood strips (mine were about 2 ½″ wide, but they don’t have to be exact) in my scrap pile and cut them to 23 ½″ long.

.

I drilled pocket holes into these thin top support strips stained them. Then, I attached the thin strips at the top—one in the front and one in the back. 

Top supports installed onto bookshelf

Step 5: Attach Bookcase Top

Then, I attached the ¾″ plywood top through the top supports using 1 ¼″ wood screws.

Computer diagram showing installing the top panel onto the bookcase cabinet

Step 6: Attach Cabinet to Base

Set the cabinet from step 5 onto the base from step 1 and attach together through the bottom side of the drawer cabinet box.

Computer diagram showing attaching the main bookcase cabinet to mid century modern base frame

You can remove the drawer or pull it out to access the inside of the cabinet box to attach.

Step 7: Add Adjustable Shelves to Bookcase Cabinet

I used a shelf pin jig to drill shelf pin holes along the sides of the cabinet to position the shelves.

Shara drilling shelf pin holes into cabinet sides

I used a scrap piece of plywood clamped to the front edge to make sure my shelf pin holes were drilled about 12″ from the back edge of the cabinet. This ensures the pins will be far enough back that the shelves will rest on them.

RELATED: Learn more about shelf pin jigs here.

.

Then I cut three ¾″ plywood shelves 13 ¾″ deep x 23 ¼″ wide and installed them with shelf pins.

Computer diagram showing how to install the adjustable shelves into the bookcase cabinet

Step 8: Add Back Panel

I cut to fit a ¼″ plywood panel onto the back side of this cabinet. To give it a little interest, I painted it SW Black Magic before stapling it onto the back.

computer diagram showing installing the back panel onto the bookcase cabinet

Note that you can cover or not cover the bottom section where the drawer box is. I show it covered here, but I didn’t cover it when I built it–I just covered the open top section of the bookcase.

.

Also note that I made this 24″ wide so that you could use a 2×8 sheet of ¼″ plywood to complete this project. However, that only leaves ¼″ overhang on each side of the opening. If you have a whole sheet, you might consider cutting it 25″ wide to give you more room to staple. Either way works fine.

.

And, now I have a modern bookcase cabinet with drawer!

.

Truth be told, I voted for this style bookcase when I took the poll between this one and the open shelf design. However, I’m pretty torn on which one I like better now that they’re both built! 

Shara Woodshop Diaries standing next to black and wood modern style bookcase cabinet with shelves and drawer

Either way, I’ve got plans for both so now matter which one is your style, I’ve got you covered 🙂

.

I hope you enjoyed this short series and watching me make two similar designs differently. 

.

I’ll be back soon with more projects and plans, so if you want to follow along to see what’s next, I’d love if you’d subscribe so you don’t miss out on the latest projects!

If you’d like to save this for later, don’t forget to pin it!

Pinterest collage image showing overall dimensions at top and Shara standing by bookcase at bottom with text "how to build a modern bookcase cabinet"

Until next time, friends, happy building! 🙂

Easy Custom DIY Wooden Sign

May 24, 2021 by Shara, Woodshop Diaries

In this post, I’ll show you how to make an easy DIY wooden sign that you can customize however you want!

Shara Woodshop Diaries with DIY custom wooden signs in workshop--one on wall and one on base plate sitting on workbench

I made a new logo a while back and really wanted to put it on a sign to hang in the shop and/or one to sit on my desk. (Did you notice both in the picture above?? *wink wink*)

.

I wanted my new, modern logo to look clean and professional, so I pulled out the Cricut Joy for this one and used some vinyl stencil to create a crisp, clean line design I’m really proud of!

.

This post is NOT sponsored, but adding this little Circut Joy machine to my shop has been a game changer for customizations. If you do any type of sign making, or like to add decorative details, overlays, or stencils to your projects, I highly recommend checking it out.

.

Anyway, if you want to see how I made this custom DIY wooden sign, here’s what you need.

Tools & Materials:

*This post contains affiliate links. See policies.

  • Scrap 1×6 and 1×2 board
  • Spray paint in your desired letter color (I used black)
  • Cricut Joy Machine
  • Circut Joy Smart Vinyl (any color)
  • Transfer Tape
  • Cricut tool set (optional, but helpful with small letters)
  • Painters tape
  • Saw (to cut scraps to size)
  • Super Glue

NOTES ABOUT THE PROJECT:

I made this simple DIY wooden sign from some scrap 1×6 oak wood I had in the shop. For the one that stands up, I used a 1×2 as a base plate, but that’s totally optional.

.

Because I was using oak, I thought it would be cool to fill the grain with grain filler like I share in this post. But again, this is totally optional and is just purely for looks.

Step 1: Design Your Wooden Sign

The first step was designing the sign. I wasn’t sure how large my design would be and wanted to make sure to cut my sign board long enough.

.

So I got onto Cricut Design Space and designed a simple logo with “Woodshop Diaries” and a box around it. I also added “Design. Build. Repeat.” as well.

Shara designing custom sign lettering on Cricut Design Space

You can customize and design your sign however you wish! Once I was finished designing, I checked the length of my design. It was about 19″ long total.

Step 2: Cut and Prep Wooden Sign Board

Now that I knew how long my logo was, I cut my 1×6 sign board to a little longer than my design–22″.

Using miter saw to cut sign board

I recently played around with some grain filler in oak in this post about painting oak. And after it was sanded, the filler gave the oak a cool whitewashed effect.

.

In that post, I was showing how to paint over it, but I tried it again on this sign board and instead of painting it, I just left it as is after sanding. That is totally optional–I just thought it added a neat look to the board before I added the lettering.

Using grain filler to add whitewash effect to wooden sign board

If you wanted to hang this sign, you don’t need a “base plate.” But for the sign I was wanting to sit around and stand on its own, I also cut a 1×2 piece a little longer than the sign–about 24″–to glue onto the bottom later.

.

Once everything was sanded well, I grabbed my Cricut Joy and began cutting my stencil.

Step 3: Cut and Apply Stencil

I let my Cricut Joy cut out my logo design on some vinyl. Since I’m only using this for painting my logo, it doesn’t really matter what color vinyl I used.

Cricut Joy cutting vinyl stencil to make wooden sign

After it was cut, I used a little “pick” from the Cricut tool kit to carefully remove the lettering on this vinyl.

.

I removed everything that I wanted to paint from the stencil.

Using picker tool to remove lettering from vinyl stencil

Then, I used transfer tape on top of this stencil to be able to transfer it to my board. The purpose of the transfer tape is to keep all the stencil in tact and in position while you remove the back of the vinyl.

.

It’s just a clear, sticky tape that you smooth out over the top of the vinyl.

Applying transfer tape to vinyl stencil

After the transfer tape was applied, I took it to the shop and removed the back of the vinyl.

.

I had to use the picker tool on some of the small pieces to carefully remove them from the backer and make sure they stuck to the transfer tape.

Removing back from vinyl stencil to add lettering to DIY wooden sign

Then, I centered and stuck the stencil onto the board. Try to remove all the air bubbles and keep it centered. It’s not going to be easy to remove and reposition, so you need to get it in the right place the first time.

Smoothing out stencil onto wooden sign board

Once it was stuck, I removed the transfer tape from the top and covered the exposed edges with painters tape to get ready to paint the logo!

Remove transfer tape from vinyl stencil on oak board

Step 4: Paint Wooden Sign and Base Plate

I placed the sign board into a box to contain the overspray and used some flat black spray paint to paint over the logo. Notice that I covered the edges and sides with tape so only the logo will get painted.

Spray paint sign lettering black

I also spray painted the base plate the same color. You could get creative here and paint (or not paint) the plate whatever color you wanted.

.

I just liked the simple black, white, and wood style 🙂

Spray painting base plate for wooden sign black

Step 5: Remove Stencil and Finish

After the paint was dry, I removed the stencil from the wooden sign board and revealed the logo!! This was the most satisfying part of the whole project–peeling away that vinyl to see the clean paint lines!

Removing vinyl stencil from wooden sign

For the sign I hung on the wall, I just attached a little sawtooth hanger in the middle on the back side to hang it from.

.

But for the one with the base plate, I used some RapidFuse glue (any quick drying super or wood glue would work as well) to attach it in the center.

Applying super glue to base plate to attach wooden sign board
Gluing vertical custom wooden sign onto base plate to stand on its own

And now it’s ready for display on my desk or in my office or wherever I decide to put it!

.

I also made one without the base to hang over the window in my shop.

.

I love how simple this project was and now I’m brainstorming all kinds of ideas for little signs and customizations I can add to things!

Woodshop Diaries custom sign on base plate sitting on workbench in workshop

These little DIY wooden signs would make really great gifts for weddings or baby showers–you can customize names and dates and designs a million ways.

.

So I hope you enjoyed this simple little project and inspires you to get creative with your scrap wood!

.

If you’d like to save this project for later, be sure to pin it or share it to your favorite social channel.

Pinterest collage image showing stencil application at top and completed custom wooden sign at bottom with text "how to make an EASY custom wooden sign"

Thanks so much for following along, friends, and until next time, happy building 🙂

DIY Modern Open Bookshelf with Drawer

May 22, 2021 by Shara, Woodshop Diaries

In this post, I’m sharing how to build a DIY modern open bookshelf with drawer!

Black and wood mid century modern industrial style open bookshelf with drawer at bottom.  Styled with plants, books, and blanket

This is actually part 1 of an “unplanned” two-part bookshelf series!

.

I designed two similar bookshelves and couldn’t decide which to build. So, I took a poll on Instagram and the results were pretty useless as it was almost a 50/50 split. 

Screenshot of instagram poll showing 54% to 46% on the poll for open or cabinet style bookshelf

I got several messages from people saying to “build both.” So here we are…starting a series that was supposed to be one build haha. But I’m here to help, so if you guys want both, I’ll make it my job to do both 🙂

.

I’m sharing the open bookshelf with drawer design this week and I’ll follow up with the cabinet style design next.  So if you aren’t already following along, be sure to subscribe to the newsletter below so you don’t miss part 2!

In the mean time, if you’re ready to get building, let’s dive in to part 1–the open bookshelf with drawer build.

.

I’ve got the plans below and the video here:

.

NOTES ABOUT THIS BOOKSHELF PROJECT :

The overall dimensions of this project ended up being about 28 ½″ wide, 18″ deep, and 74 ¼″.

Overall dimension diagram of open bookshelf with drawer

I built it from birch plywood and basic construction grade 2x4s. The shelf frame is made from 2x2s. I make my own 2x2s from 2x4s using this tutorial, but you can buy precut 2x2s instead if you prefer.

.

I used timber screws to assemble the frame as I thought it was a cool decorative detail, but, they are kind of pricey and were a pain to paint around. That said, if I were to do this again, I would just use 3″ wood screws instead and just putty and paint over the screw holes.

.

You may find these posts helpful in the building process:

  • How to cut your own 2x2s from 2x4s
  • How to cut plywood sheets
  • How to use a pocket hole jig
  • How to edgeband plywood
  • How to build and install drawers

What You’ll Need to Build It:

This post contains affiliate links. See policies.

Materials:

  • (1) sheet ¾″ plywood
  • (3) 2x4x8 boards
  • ¼ sheet ¼″ plywood
  • 1x scraps to cut legs from
  • 1 ¼″, 2″, 2 ½″ & 3″ wood screws
  • Timber screws (see notes above)
  • 1 ¼″ pocket hole screws
  • 2 ½″ pocket hole screws
  • Edge banding
  • (1) pair 16″ ball bearing drawer slides
  • Paint & stain as desired (I used SW Black Magic and Minwax Provincial)

Tools:

  • Circular saw (cutting guides optional, but helpful)
  • Miter saw
  • Jig saw
  • Table saw (optional)
  • Pocket hole jig
  • Drill/Driver

Step 1: Assemble Open Bookshelf Frame

I assembled two identical frames from 2x2s for the bookshelf sides. I used 2 ⅞″ timber screws for this for an added decorative detail, but don’t really recommend them as they were a pain to paint around.

.

You can substitute the timber screws for regular 2 ½″ or 3″ wood screws instead.

Diagram of side frames of open bookshelf

I used wood glue at all the joints as well and used a 12″ long scrap wood spacer block to equally space the shelf rungs.

.

I also predrilled all the holes before driving the screw as these 2x2s tend to split easily. See video above to watch the process.

Step 2: Build Bookshelf Base Frame

The base consisted of a 2×4 frame with mid century style legs attached to the corners.  So, first, I cut down 2×4 pieces and assembled a frame using pocket holes and screws plus some wood glue. 

diagram of dimensions for base frame for bookshelf

I puttied over the joints on this frame and the shelf frames from step 1 and while it dried, cut out the legs.

Step 3: Cut and Attach Mid Century Legs for Shelf Base

If you saw my recent mid century modern dresser, these legs may look familiar. I literally pulled them up from those plans on this website to copy them. 

.

I used some scrap 1x poplar I had in the shop for these. You could use ¾″ plywood, or any 1x material you have handy. Once I drew out the shape, I cut it out with a jig saw, then cut three more identical feet and sanded them smooth.

mid century modern furniture leg dimensional diagram

At this point, the putty was dry on the frame from step 2, so sanded it smooth and began attaching the legs. 

.

I used a square to measure and mark 2” in from the corner, and used wood glue and 2 ½” wood screws to attach all four legs to the base frame–see video above.

Base assembled for modern bookshelf--2x4 frame with legs at corners

Once it was together, I began the process of painting. 

Step 4: Paint Bookshelf Frames

This was BY FAR the worst part of this project.  There was a lot of weeping and gnashing of teeth haha.

.

I primed and painted the base frame and the two side frames SW Black Magic. But before I painted, I backed out the screws on the front side of the shelf frames and wrapped them in painters tape so I didn’t paint over them.

TImber screws with painters tape wrapped around

Again, in hindsight, I would have used different screws, but it is what it is.

.

Once the paint was dry, I tightened the screws back up on the side frames and set them aside to get back to building.

Step 5: Assemble Drawer Cabinet Box

I cut down my ¾″ plywood sheet and began building the box to hold the drawer.

RELATED: Check out this post for how to EASILY cut down a plywood sheet.

.

Before assembling, I applied iron on edge banding to the front edges of the box pieces. This is totally optional, but does hide the plywood edges so you don’t see them.

RELATED: How to apply iron on edge banding.

.

To assemble the drawer box, I used wood glue and pocket holes and screws to attach the top side, but since the space was so tight, I used regular 1 ¼″ wood screws on the bottom side. 

Dimensional diagram of drawer cabinet box for bookshelf

If you had a 90 degree angle drill attachment, you could use that to drive the pocket holes in this tight space, but screws on the bottom side work fine, too and won’t be seen in the finished project.

Step 6: Build and Install Drawer into Bookshelf

I installed a pair of 16” drawer slides into the box ¾″ inset from the front edge.

Drawer cabinet box on workbench with drawer slides installed

Then, I built a drawer box to fit inside. I have a complete guide to building and installing drawers here.

.

I built the sides from ¾″ plywood and used ¼″ for the bottom. I cut dadoes in the drawer box sides to insert the plywood bottom, but you could also just glue and staple it onto the bottom if you didn’t want to cut dadoes.

exploded diagram of drawer box showing dimensions and assembly

I assembled the box using ¾″ pocket holes and 1 ¼″ pocket hole screws.

.

Then, I installed it into the drawer cabinet box ¾″ inset from the front edge and cut a ¾″ plywood drawer front to fit on the front.

.

I edge banded the drawer front and screwed it in place through the inside of the drawer box using 1 ¼″ wood screws. There should be ⅛″ gap around all sides of the front.

Bookshelf drawer cabinet box with drawer installed and dimensions shown for drawer front

Step 7: Assemble Bookshelf and Add Top and Base

At this point, I was ready to start putting everything together, but I went ahead and stained the legs on the base and the drawer cabinet box and drawer front before doing that. 

.

I stained them Minwax Provincial. It’s easier to finish things before assembling when you are doing two different colors.

.

Once these pieces were stained, I used 1 ¼″ wood screws through the drawer cabinet box to attach the frame to each side.  You can either remove the drawer using the tabs on the drawer slides, or just push the drawer as far out as it goes and access the inside from the back side of the box.

Frames attached to drawer cabinet box

Then, I cut, edge banded, stained, and attached the top through the frame using 2” wood screws.  I left 1” overhang on the sides and front for this.

Dimensional diagram of bookshelf top attached to frame

And finally, I placed it on the base and used wood screws through the drawer box to secure it to the base frame.

Bookshelf on top of mid century modern base frame and legs

Step 8: Add Shelving

Now all that’s left is the shelves.  The shelves were easy—I three ¾″ plywood shelf pieces and applied edge banding to cover the edges. 

.

I stained these to match the base and top and placed them on the rungs.

Diagram showing shelves installed into open bookshelf

Since I am planning to take this apart as soon as I’m finished with it to build the second part of this bookshelf series, I didn’t bother screwing the shelves in place, but you can attach these shelves with 2″ wood screws from the bottom side of each rung if you wanted.

.

I polyed everything that was stained and added a drawer pull and the shelf was complete!

RELATED: Check out this post for how to finish raw wood furniture!

.

I feel like open shelves are “in” right now, so if this is your style, this would work great to display books, pictures, and décor.

Finished open bookshelf black and wood with drawer at bottom and mid century modern legs

I really like the option to have both open shelves and a little storage at the bottom, but you could also ditch the drawer and just add more shelves at the bottom as well.

.

All in all, besides the painting being a pain, this open bookshelf with drawer project was fairly easy and has a lot of different uses.

.

But, if you’re into the more classic cabinet style bookshelf, be sure to follow along so you can see how I take this and make part 2 next week!

.

In the mean time, if you’d like to save this for later, don’t forget to pin it or share on your favorite social channel!

Pinterest diagram showing overall dimensional diagram at top and shara with bookshelf at bottom with text "how to build a modern open bookshelf with drawer"

Until next time, friends, happy building! 🙂

The EASIEST Picture Frame Ever

May 18, 2021 by Shara, Woodshop Diaries

In this post, I’ll show you how to make the easiest picture frame ever!

Simple scrap wood and plexiglass floating picture frame sitting on shelf

I’ve built a few pictures frames throughout the years, but this is by far the easiest way I’ve tried! If you need a super quick floating frame, this is the tutorial for you!

.

But if you want to browse some other options, you can check out three more picture frame building tutorials I’ve shared here:

  • How to make your own Custom DIY Picture Frame for any size picture or print you want to frame. Save hundreds by making your own with these plans!
    DIY Large Custom Picture Frame
  • How to build a DIY wooden keepsake box with splines and picture frame top
    DIY Picture Frame Keepsake Box
  • 3 Easy DIY Floating Picture Frame Ideas {And how to cut plexiglass}

But for the EASIEST picture frame ever–the one I’m sharing with you in this post–here’s what you’ll need!

Tools and Materials:

*This post contains affiliate links. See policies.

  • Something to frame (I designed a simple “You Got This” design and printed it out on regular copy paper)
  • A piece of plexiglass (You can buy these in precut sizes, have it cut for you at your local glass shop, or cut it yourself with this tutorial)
  • Wood shims or scrap wood
  • Clear Spray Adhesive
  • Quick drying all purpose glue
  • Saw to cut the shims (any saw that can cut a straight line works fine)
  • Drill (optional)
  • Jute Rope (optional)
Supplies and materials to make simple floating picture frame with plexiglass and shims

A NOTE ABOUT THE PROJECT:

This project is completely customizable to any size you want. It’s designed to be a “floating frame” so the photo or picture “floats” on the plexiglass in the center of the frame.

.

But, you can get creative here and add a mat on the outside edges, cover the entire plexiglass space, or make your design as large or small as you wish. Get creative 🙂

Step 1: Cut Plexiglass and Picture to Size

I trimmed down my “You Got This” design into three pieces to attach them separately. Trim down whatever you’re planning to frame to the size you want it.

Shara Woodshop Diaries cutting paper to frame onto plexiglass

Once you have your picture cut to size, determine the size you want your plexiglass to be. You can buy plexiglass precut in several common sizes, get your local glass shop to cut you some or cut your own using this tutorial.

.

For this project, I used about ⅛″ thick plexiglass, but you can use thicker if you’d like.

Step 2: Frame Out Plexiglass Sheet

Grab some scraps or wood shims. In this case, I used some thin leftover scraps I had leftover from cutting my own 2x2s for a different project.

.

They were about ¼″ thick and 1 ½″ wide. You could use 1x2s, wood shims, lattice trim, whatever you’d like for this.

.

I marked the pieces to frame out the outside edge of this plexiglass.

Marking where to cut shim to fit around plexiglass sheet

Then, I cut them down using a miter saw. Any saw that can cut a straight line would work fine for this.

.

Once I had all my pieces cut, I test fit them around the plexiglass to make sure they fit okay.

Test fit shims around plexiglass sheet to make frame

If you wanted to paint or stain them, go ahead and do so before attaching. I just left mine natural.

.

Then, I used some DAP RapidFuse to secure these pieces in place right on top of the plexiglass. This glue worked really well, but you can use other options…just make sure it works with both wood and plastics.

.

NOTE: Before attaching, make sure you remove the protective film layer on the top side of the plexiglass!!

Apply clear glue to attach frame to front of plexiglass sheet

Allow the glue to dry well before moving on.

Plexiglass picture frame ready for picture

Step 3: Attach the Picture into the Frame

I placed the paper pieces I had planned to frame into a box and used some clear DAP RapidFuse spray adhesive to lightly coat the entire surface of all three pieces.

Using spray adhesive to coat paper to be framed

This worked PERFECT for this regular copy paper and dried completely clear, and I would imagine it would work well for picture paper as well.

.

BUT, I would advise testing a small section or use a spare first just to double check the adhesive won’t affect the colors if you’re using this for something other than paper. This RapidFuse spray adhesive dried clear, but not all spray adhesives do.

.

Follow the directions on the can. Once the adhesive was tacky, I flipped the framed plexiglass upside down, removed the protective film and placed the paper upside down on the glass.

Smoothing paper onto back side of plexiglass

Make sure it’s centered and press firmly over the whole surface.

Step 4: Add Hanger to Frame

You can skip the hanger and simply place this on a shelf or desk, etc. Or, you can add a hanger on the back.

.

You can use a sawtooth hanger, or drill some small holes at the top corner and tie some jute or twine through it and hang it that way.

Tying jute rope around top of frame to hang it up

And that’s how to make the easiest DIY picture frame ever 🙂

.

I hung it up in my shop for a little extra motivation and to add something cute to the walls. But this would be perfect for making various sizes to hang on a floating shelf or picture frame ledge.

Shara Woodshop Diaries hanging Easy picture frame with motivational saying up on workshop wall

You could even make larger ones for a gallery wall or to hang down a hallway.

.

You can frame some of your favorite sayings, recipe cards, photos, even flower petals, preserved leaves, post cards, etc. This is such a simple and quick way to custom frame almost anything you can think of!

Shara Woodshop Diaries holding floating picture frame up showing "you got this" in the middle

I hope you enjoyed this project and if you want more framing ideas, check them out here. And if you’re looking for more project ideas, check out these easy DIYs here.

If you want to save this for later, don’t forget to pin it or share it to your favorite social channel!

Pinterest collage showing supplies at top and finished DIY picture frame at bottom with text "how to frame anything the easiest way ever

Until next time, friends, happy building 🙂

How to Fill Wood Grain Before Painting

May 14, 2021 by Shara, Woodshop Diaries

In this post, I’ll show you how to fill wood grain before painting to give you a smooth finish!

This is especially helpful when you are considering painting over oak cabinets.

.

Painting over old cabinets is a really popular DIY project that a lot of home owners have been tackling the last few years.

.

Oak was (and still is) a really popular wood to build cabinets out of so the majority of these older kitchens and bathrooms are filled with oak cabinets.

Red oak scrap block--unfinished with wood grain showing

But, many people tackle a project like painting their old oak cabinets and don’t realize until after the fact that oak has a very deep grain. And even though you can’t see the color through the paint, you can still see the wood grain.

.

Sometimes people like that…and sometimes they don’t.

Side by side comparison of painted oak without grain filler and painted oak with grain filler

So if you prefer a smooth painted surface (like the one on the right above), here’s an easy way to fill the grain (in cabinets, furniture, and even door/window trim) before you paint!

Two Quick Notes About Filling Wood Grain:

ONE: This doesn’t apply to ONLY oak. That’s just a common application. You can use this method to fill grain, blemishes, and uneven spots in any wood.

.

TWO: Normally I don’t recommend painting over nice hardwoods with deep grain (like oak) just because they’re pretty in their natural state and are usually expensive for that reason.

.

However, if you have an orange 90s kitchen you just aren’t feeling anymore and want to refresh without replacing, I don’t blame you in the least for painting it 🙂 Make your home what YOU want. YOU live there.

To Fill Deep Wood Grain, Here’s What You Need:

This post contains affiliate links. See policies.

  • DAP Premium Wood Filler
  • Water
  • Putty knife
  • Paint brush
  • Sandpaper (a sander makes the job easier, but you can hand sand as well)
  • Disposable plate or something to mix on
  • Primer, Paint and Finishing Supplies

RELATED: Check out this post for how to finish raw wood furniture and/or cabinets for more information on finishing.

Step 1: Prep Wood Surface

In this example, I’m using a small red oak scrap block that is unfinished. If your surface is unfinished as well, move to step 2.

.

However, if you are working with a surface that already has a finish (paint, stain, clear coat, etc.) on it, you will need to sand the surface to scuff it up a little. I’d recommend using 120-180 grit sandpaper over the whole surface.

.

Remove all oils, dirt, debris, and dust leftover after sanding.

Step 2: Mix and Apply Grain Filler

Once the surface is smooth, dry, and dust free, grab some DAP Premium Wood Filler.

Close up shot of DAP premium wood filler container

NOTE: This product is made specifically for filling grain. Not all wood fillers will work for this. But, there are other brands, methods, and products that will. I’m just sharing one way I’ve found to work well. It’s not the ONLY way.

.

Be sure to read the label on the filler as it gives more specific instructions.

.

I used a putty knife to scoop out the filler onto a Styrofoam plate. The amount you need will depend on the size of your project. If you’re doing a lot, you may want to use a small bucket or large cup instead of a plate.

Scooping out wood filler onto styrofoam plate

I mixed in some water and stirred it into a thin paste using my putty knife. Just mix a little at a time until you get the consistency of thick paint.

mixing grain filler with water to create a putty

Step 3: Apply Grain Filler to Wood

I used a paint brush (this stuff is water based, so it’s easy to clean up–you can use a good paint brush if you want since it won’t be ruined) to brush the filler paste AGAINST THE GRAIN.

using paint brush to apply wood grain filler against the grain on scrap red oak block

Normally, when you apply a finish, like paint, you want to apply it WITH the grain. But in this case, applying this paste against the grain gets it deeper into the grain to fill it better.

.

You want to apply a somewhat thick coat and brush it around well so it gets good into all the pores. Don’t worry about smoothing it out–focus on working it down into the grain.

Step 4: Sand Smooth

I let the filler coat get good and dry (a few hours) then sanded it smooth using 120 grit, then 220 grit. You can see below where the filler stays stuck in the grain.

orbital sander sanding wood grain filler down smooth

Step 5: Apply Final Finish

Once the surface is sanded, you can apply primer and paint as normal.

.

I only used one filler coat in this example, but if you aren’t happy with the results, you can do another coat.

applying finish coat to filled wood grain with paint brush

Check out my furniture finishing tips here for more information on finishing raw wood and getting professional results.

.

This was just a super quick example and I skipped primer (not recommended!!) and used a paint brush to apply the paint over the piece, so it’s not the best possible results. BUT, even so, it’s clearly a huge difference!

.

Imagine how it would look if I didn’t skip primer and used a roller vs a brush in this example!

side by side comparison of wood with grain filler and wood without grain filler both painted white

This post wasn’t sponsored, I purchased the wood filler to use in the shop and noticed that it said it worked as a grain filler, too. So, I gave it a try because I was skeptical about how well it actually worked.

.

Honestly, I was pretty impressed with the results so I wanted to share with you! I know painting oak cabinets is pretty common, so I hope this helps you get the results you want.

.

For a super quick video showing this process, check out this video I put together here:

@woodshopdiaries

A tip for painting oak! #learnontiktok #tiktokpartner #DIYwithDAP #grainfiller #woodfinishing

♬ original sound – Woodshop Diaries

If you want to save this for later, don’t forget to pin it or share it on your favorite social channel!

Pinterest collage image of unfinished red oak at top and side by side comparison of with and without grain filler on bottom both painted white

Until next time, happy building 🙂

DIY Wood and Epoxy Lazy Susan

May 11, 2021 by Shara, Woodshop Diaries

In this post, I’ll show you how to create your own DIY wood and epoxy lazy Susan in various colors!

Overhead view of red oak multicolored DIY wood and epoxy lazy susan with apples and grapes on top

Let’s be honest…epoxy projects can be a little intimidating at first. With the mixing and the pouring and the mess…it’s just sometimes a little…overwhelming.

.

So, I’m hoping to help you ease your fears and show you a fun and simple project that you can feel comfortable getting started with–this multi-color DIY wood and epoxy lazy susan!

.

You can get super creative with this and make a rectangle, circle, triangle, whatever. And you can lay out and stain the shims however you wish as well.

.

The basic concept is the same no matter how you choose to customize it, so if you’re ready to get started, here’s what you’ll need!

.

What You Need to Make a DIY Wood & Epoxy Lazy Susan:

*This post contains affiliate links. See policies.

.

  • Scrap wood to make Lazy Susan base plate
  • Wood shims or off-cuts to glue onto base plate
  • Wood Glue
  • Stain of your choice (I used Rustoleum Kona stain)
  • Varathane SuperGlaze Epoxy (I used both clear and turquoise for this)
  • Sand paper
  • Lazy Susan Hardware
  • Plastic mixing cups
  • Gloves
  • Stir sticks
  • Drill

Step 1: Design and Assemble Lazy Susan Plate

For this project, I used this large wooden piece of red oak that I had previously glued up and cut out into a circle. I had intended on making it into a clock last year and just never got around to doing so. So I pulled it out of the scrap pile for this 🙂

.

I also had some red oak shims I had saved from when I trimmed down the the legs when I built this red oak corner desk.

Unfinished red oak circle with red oak shims laid on top

However, if you don’t already have anything to use in your shop, you can purchase precut circles from the big box store or Amazon, use a piece of plywood, or glue up your own plate to cut down into whatever shape you want.

.

And you can also use lattice trim for the shims or purchase a pack of shims to use for this as well. Get creative 🙂

.

Before gluing the shims in place, I stained them in Rustoleum Kona–but you can stain them whatever color you want or mix and match as you wish. I didn’t stain the circle–I just left it as is.

Applying Kona stain to red oak shims

Once the shims were stained, I just laid them out on the circle how I thought they looked cool, and glued them in place.

Applying glue to attach stained shims to wooden circle

I used some painters tape to hold them in place while the glue dried, but you could also just set some heavy objects on top to hold them as well.

Stained shims glued and taped onto red oak wooden circle

Once the glue was dry, I used a jig saw to trim the shims flush to the side of the circle and sanded the edges well.

Step 2: Prepare the Lazy Susan Plate and Mix Epoxy

Once the circle was sanded, I removed all the sawdust from the surface and the sides. It’s important for this to be as clean as possible.

.

I laid out a trash bag (any plastic, cardboard, or paper would work as well) on my workbench, and set my wood plate up on a few scrap blocks so the epoxy could drip off the sides when I pour it.

Supplies needed for resin and wood lazy susan--super glaze epoxy and red oak circle laid out on workbench

Then I grabbed the SuperGlaze and my mixing cups. I started with the clear first and followed the directions carefully–check to make sure the air temperature is between 70-80 degrees F, and pour the resin into one cup and the activator into another cup.

.

These should be mixed 1:1, so I poured the same amount (by volume) into each cup. I was just guessing on the total amount of epoxy I’d need to cover my plate.

.

If you need more, you can just immediately mix more and pour right on top, so don’t panic if you mix too little the first time.

measuring out superglaze epoxy into separate cups

Once I had both parts poured equally into separate cups, I poured the activator into the resin and used a stir stick to mix them together according to the instructions.

.

After stirring for 3-5 minutes, I poured the mixture into another cup and mixed another 3-5 minutes and it was ready to pour on. The key here is to mix WELL.

Step 3: Pour Epoxy onto Wood Plate

I just poured this clear epoxy coat onto the two outside sections and allowed it to drip off over the sides. I used my stir stick to kind of “spread” it around and smooth the sides.

Pouring clear resin on sides of lazy susan wooden circle

Once the clear epoxy was poured, I repeated the steps for the turquoise epoxy and poured into the middle sections allowing it to drip off the edges a little.

Pouring turquoise epoxy between shims on red oak wooden circle

Don’t worry if the shims stick up higher than the epoxy–you can fix that later.

.

Most of the air bubbles will naturally come to the surface and pop, but after 30 minutes or an hour, you can come back and use a torch or a hair dryer to lightly blow heat across the surface to pop the remaining bubbles.

Step 4: Apply Final Epoxy Flood Coat

Follow the directions on the SuperGlaze for cure times. After about 5 hours, I came back and leveled out and sealed over the entire surface of the DIY wood and epoxy lazy Susan plate with a flood coat.

.

Basically, I just mixed another batch of clear epoxy and poured over the entire surface allowing it to overflow over the sides to seal everything and evenly coat it.

.

I used my stir stick (you could also use a cheap paint brush–but don’t use a good one as you’ll have to throw it out after you cover it with epoxy) to evenly spread the epoxy out and smooth the sides.

Pouring clear flood coat of epoxy over lazy susan

This should help level out any uneven spots where the shims stuck up higher than the first epoxy coat. If it’s still uneven after one flood coat, you may need apply another after the first one sets up–after 4-6 hours.

Step 5: Add Lazy Susan Hardware

After 24-48 hours, the epoxy should be set enough to flip over and add the lazy Susan hardware.

.

Where the epoxy dripped over the sides, there were some lumps and bumps on the bottom edge. I used some 80 grit sandpaper to smooth those out–you can see I didn’t get it perfect, because I got tired of sanding haha.

.

It’s on the bottom side, so you don’t see it. Then, I centered and screwed in a 6″ lazy Susan.

Upside down resin circle attaching lazy susan hardware on bottom

And then, it was complete! I absolutely love the pop of turquoise with this project. I cannot wait to try this color on another project soon.

.

I’m thinking coasters, or a vase or something…it’s a really beautiful color.

Round red oak wood and epoxy plate with multicolored resin used as a lazy susan with apples and grapes on top

I hope this has given you a little motivation and inspiration to tackle an epoxy project if you’ve been hesitant to try it. You got this, friend!

Close up of red oak shims on wood and resin lazy susan--turquoise and clear epoxy

If you want to save this for later, be sure to pin it! And if you’d like to follow along for more project ideas, be sure to subscribe to the newsletter below for the latest updates!

Pinterest image--close up of wood and epoxy circle with dark shims and turquoise resin strips with text "DIY wood and epoxy lazy susan"

Until next time, friends, happy building 🙂

DIY Wardrobe Armoire Cabinet–{Using 2x4s and Plywood!}

May 8, 2021 by Shara, Woodshop Diaries

In this post, I’ll show you how to build a DIY Armoire Wardrobe Cabinet from basic 2x4s and plywood!

Shara Woodshop Diaries with shop dog Lucy standing next to Finished plywood and 2x4 DIY armoire wardrobe cabinet in garage

If you’ve seen some of my latest projects, you may have seen that I’ve been building my dad some matching pieces for his office. 

.

I didn’t really know how many pieces would be in this “collection,” but I do think this is probably the series finale and the last piece I’ll be building for this matching set. You can check out the other pieces here.

  • DIY Writing Desk
  • DIY Computer Desk
  • DIY File Cabinet
  • DIY Display Shelf with Storage

It’s a little bittersweet since this series has been so fun to build, but I think I’m wrapping things up with my favorite piece, so let’s jump right in. 

.

I’ve got a build video here, along with a step by step tutorial and printable building plans below.

This post contains affiliate links. See policies.

About the DIY Armoire Wardrobe Build:

This project was made with basic 2×4 construction lumber and birch plywood. It was assembled with pocket holes and screws. You can use another wood type or joinery method if you prefer.

.

This would make an excellent stand alone closet or pantry, linen cabinet, or just some extra storage in any room of the house.

.

The overall dimensions of this project are 17 ¾″ deep, 30 ½″ wide, and 71 ¾″ tall.

Computer diagram showing overall DIY armoire wardrobe cabinet dimensions--17 ¾" deep, 30 ½" wide, 71 ¾" tall

The video above and the instructional steps below are NOT completed in a specific order. Once you get the main cabinet frame assembled, you can mix and match the order of the steps as you choose.

You may find these posts helpful in the build process:

  • How to Make Your Own 2x2s
  • How to Cut Down Plywood Sheets
  • How to Use a Pocket Hole Jig
  • How to Apply Edge Banding to Plywood
  • 4 Ways to Plug a Pocket Hole
  • 10 Must Have Tools for Cabinet Building
  • How to Build and Install A Drawer

Tools and Materials:

Materials:

  • (1 + ½) Sheet ¾″ birch plywood
  • (1) sheet ¼″ plywood
  • (8) 2x4x8 boards (use the off cuts to make your own 2x2s or purchase (2) 2x2x8 boards)
  • (8) 8 ft sticks cove Molding
  • (1) 14″ drawer slide
  • (2) pair pivot hinges
  • Edge Banding
  • 2 ½″ pocket hole screws
  • 1 ¼″ pocket hole screws
  • 2″ wood screws
  • Wood Glue
  • Shelf pins

Tools:

  • Circular Saw (cutting guides helpful, but not required)
  • Miter Saw
  • Table Saw (helpful, but not required)
  • Drill/Driver
  • Pocket Hole Jig
  • Shelf Pin Jig
  • Router & Rabbeting Bit (optional)
  • Staple gun

You can grab the printable plans for this DIY Armoire Wardrobe Cabinet here:

Step 1: Build Cabinet Corner Posts

Just like the other builds in this series, I made the “legs” by gluing up pairs of 2×4 boards. I trimmed down eight 2x4s to about 72″ long to glue together into four corner posts.

.

Once the glue had dried on the corner posts, I ran them through the table saw to clean up the edges and cut them into square posts. This is optional, but does look a lot cleaner.

.

I trimmed them to their final length on the miter saw and then added a taper.  Just like with all the other pieces in this series, I tapered the ends of the legs 60 degrees on two sides.

Diagram showing corner post dimensions for armoire cabinet build

The taper is totally optional, but is a quick way to add a little visual interest to an otherwise pretty plain leg.

Step 2: Assemble Side Panels

I cut two 11″ x 64″ pieces from my plywood sheet (cut diagram can be found in the plans) using my circular saw and Kreg Rip Cut.

.

From the remaining 2×4 pieces, I cut my own 2x2s for this frame, but you could also purchase precut 2x2s instead. I cut four 2x2s to 11″ long for these sides.

.

Then, I drilled ¾″ pocket holes around the outside edges of the plywood panels and 1 ½″ pocket holes into the ends of the 2x2s.

RELATED: Check out this post for how to use a pocket hole jig.

Wardrobe cabinet side panels assembled using 3" square corner posts, ¾" plywood panels and 2x2s at top and bottom frame

I assembled two side panels like shown using 1 ¼″ pocket hole screws in the plywood and 2 ½″ pocket hole screws in the 2x2s. Everything should be flush to the INSIDE of the legs.

.

Take note the direction of the leg tapers and make sure they face the inside as you assemble.

Step 3: Assemble Wardrobe Cabinet Frame

I cut five more pieces of 2×2 to 23″ long and assembled the rest of the cabinet frame like shown using wood glue, 1 ½″ pocket holes and 2 ½″ pocket hole screws.

DIY armoire wardrobe pantry cabinet frame assembled using 2x2 boards at front and back

Step 4: Install Cabinet Bottom Panel

I cut another piece of ¾″ plywood to fit inside the cabinet and installed it using ¾″ pocket holes and 1 ¼″ pocket hole screws so that it’s flush across the top of the middle 2×2 in the frame.

Diagram of plywood bottom panel installed into cabinet frame using pocket holes and screws

Step 5: Add Trim Molding

I cut to fit cove molding to line the side panels of the cabinet.  You can nail these in place, but I used wood glue and some clamps until it dried to avoid the nail holes.

Cove molding glued around outside side panels of pantry cabinet

I also plugged the pocket holes on the inside of the cabinet.  Now, I’m well aware pocket holes are a hot topic.  Use them, don’t use them.  Fill them, don’t fill them. 

.

It doesn’t matter to me…but I used a little wood glue and some pre cut plugs to fill and sand these down so they are almost invisible in the inside of this cabinet.

RELATED: 4 Ways to Fill a Pocket Hole

Step 6: Attach Back Panel of Armoire

For the back panel, grabbed a router with a rabbeting bit set to the thickness of the ¼” plywood I was adding for the back panel.

.

I routed out rabbets along the back side for the plywood to fit down into and used a chisel to sharpen the corners. I cut the panel to fit inside the rabbets and stapled it in place.

Back panel diagram with dimensions showing it attached onto back side of cabinet frame

However, if you didn’t have a router or didn’t want to bother with routing this section, you could also just staple this ¼″ plywood panel directly onto the back side.

Step 7: Add Shelving

After the back was in place, I drilled shelf pin holes along the sides of the cabinet to install adjustable shelves. 

Shara using shelf pin jig to drill shelf pins into sides of cabinet

I used a scrap block clamped to the front edge to help me line up my shelf pin holes a few inches from the front edge to make sure they wouldn’t interfere with the doors once they’re installed.

RELATED: Learn more about the shelf pin jig in this post.

.

I cut three shelves to fit inside, but set them to the side until the build is complete. These will be easy to place inside with shelf pins later.

Shelves cut and installed into DIY armoire wardrobe cabinet--computer diagram

Step 8: Add Top of Armoire Cabinet

Then, I centered and secured the ¾” plywood top panel with 2” wood screws through the top frame.

Diagram of top panel installed onto armoire wardrobe cabinet

HELPFUL TIP: Don’t forget to predrill! It’ll help prevent the 2x2s from splitting.

Step 9: Assemble and Install Wardrobe Doors

Normally, I would use concealed hinges for a build like this. However, if you remember from the matching computer desk build, I had to use pivot hinges with the door because with the cove molding on the front made it too thick for concealed hinges.

.

Using pivot hinges requires the doors to be cut a little smaller than usual, so take note that the “undersizing” here is intentional 🙂

.

I cut two doors from ¾″ plywood and applied iron on edge banding to cover the edges so they look a little cleaner.

RELATED: How to Use Iron On Edge Banding

.

Then, just like the matching builds, I glued cove molding around the front edges of the doors and drawer fronts. Painter’s tape works great as a mini clamp to hold the pieces while they dry.

Door diagram with dimensions--11 3/16" wide x 54" tall with cove molding glued on the front edges

Once the trim dried on the doors, I began installing the hinges. In order to do this, I had to drill out a hole to insert the bushing.

.

I measured ⅝″ from the side and ⅜″ from the front and drilled a tiny hole to start and worked my way up until the bushing fit snuggly into the hole. You’ll have to do this at the top and bottom of each side (two bushings per door).

Close up of pivot hinge bushing installed into cabinet frame

Then, I installed the hinge on one side of the door (top or bottom–whichever you prefer).

Close up of pivot hinge location to be screwed into door

I slid the attached hinge into the bushing, inserted the other hinge (the one not attached to the door) in the bushing, and then fit the door into it.

.

Then, I screwed the door to the “unattached” hinge from the inside of the cabinet.

Installing bottom hinge onto door from inside of armoire wardrobe cabinet

Step 10: Build and Install Drawer

I flipped the cabinet on its side and installed 14″ drawer slides at the bottom so that the front of the slide is 1 ½″ from the front edge. It might be helpful to install this slide before installing the doors, but either way is fine.

Shara Woodshop Diaries installing drawer slides into armoire wardrobe cabinet

From the remaining ¾″ plywood, I cut four pieces to build the drawer and applied edge banding to the tops of the pieces.

.

Then, I cut ¼″ dadoes ¼″ deep and ½″ from the bottom edge in the drawer box sides to install the ¼″ plywood bottom. I assembled the box using ¾″ pocket holes and 1 ¼″ pocket hole screws.

RELATED: Check out this post for how to build and install drawer boxes.

Drawer box exploded diagram with dimensions--¾" plywood sides and ¼" plywood bottom

And finally, I installed the drawer box into the slides.

Computer diagram of drawer box installed into armoire wardrobe cabinet frame

Step 11: Add Drawer Front

The final piece was adding the drawer front. I built the drawer front similar to the door–¾″ plywood with cove molding glued on the front.

Drawer front attached onto drawer box in pantry cabinet

After the glue was dry on the molding, I installed the front onto the drawer box with 1 ¼″ wood screws from the inside.

Step 12: Finish Wardrobe Armoire

The last thing this project needed was some clear coat—I just applied some Minwax Helmsman like I did for all the previous matching pieces.  However, you can stain/paint however you wish.

RELATED: How to Finish Raw Wood Furniture

.

And then I added the handles and installed the shelves using shelf pins.

Finished and completed DIY armoire wardrobe cabinet with doors open and shelves installed

I also decided to add little magnetic catches to hold the doors in place since these pivot hinges don’t really have a catch or a stop on them.

.

And that wrapped up this DIY armoire wardrobe/pantry cabinet project and this series on my Dad’s matching office furniture. 

Collage image of all the matching furniture pieces for home office collection

A lot of people asked to see it all together in his office and I’ll post a picture once we get this moved in and the office cleaned up. 

.

It’s definitely not “magazine worthy” or anything, but I’ll share it anyways so be sure to subscribe and follow along if you aren’t already so that you don’t miss that post.

I really hope you’ve enjoyed this project and this entire series as much as I have.  Don’t forget to grab the build plans if you want to make your own!

.

Save this project for later by pinning or sharing to your favorite social channel!

Pinterest graphic showing overall dimension diagram at top and finished project at bottom with text "how to build an Armoire Wardrobe Cabinet Building Plans!"

Until next time, happy building! 🙂

DIY Outdoor Scrap Wood Lantern

May 6, 2021 by Shara, Woodshop Diaries

DIY outdoor lanterns small

In this post, I’ll show you how to make and customize your own DIY outdoor scrap wood lantern!

.

How cute are these?? You can make just one or several in different sizes.

DIY outdoor scrap wood lanterns in three sizes on front porch

My mom recently asked me to make her some simple wooden outdoor lanterns that she could hang on her pergola in the back yard and put some solar lights inside.

.

She wanted different sizes, so I made these three and they’re super easy to customize so you can mix and match and make any size you need.

.

I dug around my shop and found some scrap cedar for this project. Cedar is great for outdoor projects since it’s naturally rot resistant, but you can use any wood for this and use a good outdoor paint or sealant to protect it.

Scrap cedar laid out on workbench

Now, let’s get building 🙂

Tools and Materials:

This post contains affiliate links. See policies.

Materials:

  • Scrap wood (amount depends on size and how many you make)
  • Wood Glue
  • Brad nails

Tools:

  • Table saw (optional)
  • Miter saw (or any saw that can cut a straight line)
  • Nail Gun

Step 1: Determine Lantern Base Size

My mom had purchased some little solar lights (I don’t know where she got them, but here are some similar) that she wanted to set inside the lanterns. So first, I needed to measure these and make sure to build these large enough for the lights to sit down into.

Measuring tape measuring the diameter of solar light

These were about 5″ in diameter, so I made my base about 7 ¼″ square. A typical 1×8 board is actually 7 ¼″ wide, so I just cut three pieces of 1×8 to 7 ¼″ long to give me three squares.

Step 2: Build Outdoor Scrap Wood Lantern Base

The bases of these lanterns are a simple box with these 7 ¼″ square pieces nailed to the top. So I cut four pieces that when put together, will make a 7 ¼″ square box.

Pieces cut and on workbench ready to assemble base

Now, I made these boxes different heights for each lantern.

.

For the tall lantern, I used 1x3s (which are 2 ½″), for the middle, I used 1x4s (which are 3 ½″) and for the short one, I trimmed the pieces to 4 ½″ wide so each box was 1″ taller than the other.

.

I glued and nailed these boxes together.

Nail gun and wood glue on workbench used to assemble small square box for lantern base

Then, I glued and nailed the 7 ¼″ square pieces on top of each box.

Top plate attached to square lantern base box

Step 3: Build Scrap Wood Lantern Frames

For the top sections of the lanterns, I used ¾″ square dowels. You can purchase these precut dowels from the big box store, but if you have a table saw, you can simply rip any 1x board into ¾″ wide strips and make your own.

.

Each lantern frame will have 4 corner pieces and 8 pieces about 5 ½″ long.

Pieces cut and laid out on workbench to assemble scrap wood lantern frame

To change the height of the lantern, simply adjust the length of the four corner pieces. I cut my tall ones 14″ long, the middle 11″ long and the small one 8″ long.

.

I glued and nailed two frames together.

Two rectangle frames assembled on workbench to make lantern top from

Then, I glued and nailed the other pieces between them at the corners to complete the whole lantern frame.

Lantern top frame assembled with wood glue and nails

Step 4: Attach Lantern Frame to Base

Once I had my bases and my frames complete, I put them all together.

.

I glued and nailed the tops to the bottoms like shown here.

Top outdoor scrap wood lantern frame attached to bottom base box

Step 5: Add Handle

You can leave as is, but since my Mom planned to hang these from her pergola, I added a little wooden piece at the top to hang them from.

.

I just used some of my scrap pieces and glued and nailed a little handle across the top section of each lantern.

Close up of scrap wood handle glued and nailed to top of lantern frame

You may think that these won’t be strong enough to hang from, but you’d be surprised how strong wood glue is. It’s pretty impressive.

.

I think this alone should hold them fine, but you could always add some screws or a beefier handle if you wanted 🙂 Feel free to get creative!

.

You can apply a clear coat or a finish of your choosing (if you plan to use these outdoor, be sure to use an EXTERIOR finish). But I left these natural cedar.

Three sizes of simple outdoor scrap wood lantern sitting on rug in front of front door

Add your own solar lights, plants, decor, etc. And bring them inside or leave them outside…lanterns are such a fun and versatile project, you can move them around and use them tons of different ways.

.

So I hope you enjoyed this DIY outdoor scrap wood lantern project and I hope it’s inspired you to dig around your scrap wood pile and see what you can make! If you want more scrap wood project ideas, here’s a few of my favorites!

  • Scrap Wood Lantern
  • Floating wall shelves from scrap wood with industrial details
    Scrap Wood Wall Shelves
  • DIY Guitar Bookends--And Easy and Quick Scrap Wood Project
    Scrap Wood Bookends
  • X Cutting Board
  • How to make a super easy DIY scrap wood fall sign
    Scrap Wood Leaf Sign

If you’d like to save this for later, don’t forget to pin it or share to your favorite social channel.

Pinterest collage of scrap wood at top and lanterns at bottom with text "easy scrap wood outdoor lanterns"

And if you’d like to follow along and see all the latest projects, posts, and videos, I’d love if you’d join our newsletter to stay in the loop!

Until next time, happy building 🙂

Simple DIY Cutting Board–Made From an Old Door!

April 30, 2021 by Shara, Woodshop Diaries

Check out I created a simple DIY cutting board from my parent’s old mahogany front door in this post!

DIY Mahogany cutting board made from old front door leaning against tile backsplash on countertop

When my parents built their current home in 1999, budgets were tight and they didn’t splurge for a whole lot—except the front door.

.

The front door was the one piece that they felt was worth a little extra so they got a solid mahogany front door.  Back in the day, it was quite the beauty. 

.

But after 22 years of sun, rain, and varnish, it needed a little TLC.  I helped my dad replace it a couple weeks ago but they really didn’t want to just throw it away.

Old front door laid on workbench

So I brought it home to see what I can make out of it to keep as a little sentimental remembrance of the original wood door.

.

And I made them a simple DIY cutting board! 

.

Now, making the cutting board was the easy part…cutting down the door was a little more challenging than I expected. But I’ll talk about that later 🙂

.

For now, check out the video for the whole story and to watch it come together. And keep reading below for the written tutorial.

This post contains affiliate links. See policies.

Tools and Materials Used:

  • Prybar and hammer (to remove trim and nails)
  • Screwdriver (to remove door hardware)
  • Circular saw
  • Miter Saw
  • Table Saw
  • Pipe Clamps
  • Wood Glue
  • Sander
  • Router and Chamfer Bit
  • Walrus Oil Furniture Butter

Step 1: Remove Hardware and Trim

First thing was first, I removed all the hardware from the door to get started.  You can probably tell this was all original as well haha.

.

I was going to use my circular saw to cut the sides of the door off first, so I needed a fairly flat surface to run my saw base along. 

.

I used a prybar and a hammer to remove the trim along the bottom and to carefully remove the trim around the glass panel.

Using prybar to remove trim around old wood door glass panel

Step 2: Cut Off One Side of Door

I removed all the nails I could find and then grabbed my circular saw and rip cut to cut off one side of the door.

Using Circular saw to cut off one side of door

I cut it right where the edge of the trim had been.

SURPRISE–“Solid Wood” Wasn’t SOLID WOOD

So, I realize now how naïve I was to think that this side piece was an ACTUAL solid piece of mahogany. 

.

I legitimately thought this side pieces was one solid piece of mahogany and I’d cut this off, run it through the planer, rip it into pieces on the table saw, glue it up into a cutting board any size I wanted and be done with this project.

.

So I was unpleasantly surprised to flip this over and find that the sides here were just small glued together pieces covered in a veneer on both sides. Well, crap.

Close up showing glue seams of little pieces glued together to make door stile

I took this piece to the miter saw to cut off the end and get a better look of what was inside.  Again, I honestly don’t know why I expected that this would have been solid. I know better than to have thought it would be that easy haha.

.

I saw that it looked like the equivalent of 2x2s cut to random lengths and glued together.  That makes sense as I’m assuming building them this way is both cheaper and less prone to warping.

2x2s glued together to make door sides

This was disappointing, BUT still workable. So I moved on to step 3.

Step 3: Rip Boards Along Glue Seams

I cut this piece into shorter lengths on the miter saw and ran them through the table saw along the glue seams to get my solid pieces for the cutting board.

Shara Woodshop Diaries cutting pieces apart along glue lines

I just cut along the glue seams–they didn’t have to be the exact same widths.

.

By the time I cut out the useable pieces from the door side, it was not nearly as much wood as I thought it would be. 

Cut down door pieces laid out on table saw

So I cut off the other door side and the bottom to use as well.

Step 4: Trim Down to Solid Wood

Now, I really didn’t want gaps and seams showing between my boards, so I trimmed these strips along the glue lines down into just solid pieces. I only kept the ones that were 12″ or longer–which, sadly, wasn’t many of them.

Using miter saw to trim strips along glue line to give solid wood pieces

Since these were so short, if I made a normal cutting board with the grain running the length of the board, it would be pretty small.

.

So, I played around with the design to try and utilize as much wood as I could and decided to glue it up like this and use the tall pieces as a handle.

Door pieces laid out on workbench longest to shortest to determine best size of cutting board

Clearly, I changed my mind later, but that was my initial thought.  Bear with me here—I was completely winging this project. The fact the door wasn’t made how I had assumed really threw me off haha.

Step 5: Remove Veneer and Glue Up Cutting Board

Before I did any gluing, I ran these pieces through the table saw again to just barely trim the sides to remove the veneer that had been on the front and back sides of the door. 

Running pieces through table saw to remove veneer layer

This gave the pieces all fresh surfaces and a common thickness so they will glue up fairly evenly.

.

Then, I glued the pieces together in three small sections.

Gluing up section of cutting board in pipe clamps with wood glue

After all three sections had dried, I glued them together into one large piece.

.

Check out the video for more details.

Gluing up multiple sections of cutting board in pipe clamps

Step 6: Trim Cutting Board to Final Size

After the glue dried, I traced out my handle shape and used a jig saw to cut it out.  Long story short, I hated it and ended up deciding to trim it off into a rectangle.

Cutting board glued up and cut down with a handle at top left

Since the grain was running the opposite way than usual, I really thought I could make this extra unique with a cool shape, but rectangles are cool, too, right? Ha.

.

I trimmed this down on the table saw to remove the awkward handle situation.

Cutting off handle on cutting board using table saw

Then I adjusted my miter saw to 45 degrees and mitered the corners since I had rounded them with the jig saw already—this at least smoothed things out a little.

Step 7: Sand and Finish Cutting Board

I used a belt sander to smooth, level, and remove any glue.  If you had a planer large enough, that would be helpful here.

.

I sanded it down from 120 to 400 grit on my orbital sander to get it ready for finish.

.

To soften the edges, I installed a chamfer bit on my router and cut a small chamfer along the top and bottom edges.

Routing a chamfer edge along cutting board corners

Then, removed the dust and used some Walrus Oil Furniture Butter to finish it. 

Applying Walrus Oil Furniture Butter to cutting board

You can use any oil/finish that you prefer here and Walrus Oil actually has a specific cutting board oil as well. This is just what I had handy and it works fine.

.

This may not be my biggest and best project, but it was a fun learning experience and mom and dad got a nice looking way to keep a piece of their old front door.

Finished cutting board on countertop leaning against backsplash

If you enjoyed this DIY cutting board build and want to see what else I get into for future projects, be sure to subscribe to our newsletter so you stay up to date on all the latest happenings.

For more easy cutting board and kitchen ideas, check out these favorites!

  • X Cutting Board
  • 3 Tier Tray
  • Marble and Walnut Cheese Board
  • Flatware Caddy

And if you want to save this for later, don’t forget to pin or share on your favorite social channel.

Pinterest collage with Shara and old door (before) at top and the finished cutting board made from the door at the bottom

Until next time, friends, happy building! 🙂

Easy to Build DIY Outdoor Pet House

April 24, 2021 by Shara, Woodshop Diaries

In this post, I’m sharing this easy to build DIY outdoor pet house you can make with just a few basic tools!

DIY Black and white modern pet house with wooden deck--orange tabby cat hanging out on top

A few years ago I built my favorite shop dog, Lucy, an outdoor dog house. 

.

But as things often happen, she quickly became an inside dog and the outside cats ended up taking it over.  It’s been in pretty rough shape for the last year and it was really too big for the cats anyway.

.

So I decided to replace it with slightly smaller house to better fit them, and use the opportunity to play around with a new design.  This house would also fit a medium sized dog and could be easily modified for larger or smaller pets as needed.

.

I’m sharing the building plans below and the video here: 

This post contains affiliate links. See policies for details.

For this DIY Outdoor Pet House, You Will Need:

Materials:

  • (1) sheet ¾″ plywood
  • (3) 2x4x8 boards
  • (4) 1x6x8 boards
  • 1 ¼″ exterior wood screws
  • 2 ½″ exterior wood screws
  • Exterior Wood Glue
  • 1×2 for door trim (optional)
  • DAP Platinum Patch Exterior Filler
  • DAP Extreme Stretch Caulk
  • Exterior Grade Paint/Stain

Tools:

  • Circular Saw & straight edge/cutting guide
  • Jig Saw
  • Miter Saw (optional–can use circ saw for all cuts if needed)
  • Drill/Driver
  • Nail Gun (optional)
  • Measuring Tape
  • Speed Square

NOTES BEFORE BUILDING:

You can use treated/exterior grade lumber for this project if you’d like. I used untreated lumber and was careful to cover all surfaces with an exterior finish to protect it. That should help it to last several years.

.

The deck on this project is optional and you can easily adjust sizes as needed. This house should fit a small-medium sized dog and most cats.

.

Before you get started, you may find this plywood cutting guide helpful in making some of your cuts.

Overall DIY Outdoor Pet House Dimensions:

Overall dimensions of DIY pet house with deck

Step 1: Cut Plywood Sheet into House Parts

I built the main pet house body from a single sheet of ¾” plywood.

.

I’ve provided a plywood cut diagram here. Read carefully and watch the video…this gets a little hairy, but it’s not difficult:

Plywood cut diagram for DIY pet house project

I first set my Kreg rip cut up for a 24” wide cut and ripped a piece off the end of the plywood sheet (See in the diagram above–that piece on the top?? That’s this piece). 

.

I’ll cut this down to use as the bottom later, but for now, I set it to the side and ripped another strip 24” wide off the remaining sheet (see the multicolor pieces on the right side of the diagram??). 

.

This piece will be the sides and top of the house, so I set it aside with the bottom for now.

.

Cut Front and Back Panels

From the remaining plywood, I began to cut down the front and back sides of the house (see the pieces on the left side of the diagram above??). 

.

I made these 36” wide, so I cut two 36” long pieces first, then started to draw out the roofline on the first piece.

.

I wanted the roofline to be off center to give it a more contemporary look, so I measured 12” from one edge and made a mark—this will be the roof peak. Don’t freak out with all these numbers…just get them close, and you can cut to fit your sides to fit in the next part 🙂

Dimensional diagram of front and back pet house panels

Then, I used my speed square to draw lines 60 degrees off square so the roof peak is 120 degrees.  I used a straight edge to extend these lines, then used my Kreg AccuCut and circular saw to cut along these lines. Check out the video to see it all in action.

.

You could also clamp a straight edge here to make these cuts.

Using a speed square to mark 60 degrees for roof peak of DIY pet house front panel

Once I had one cut down, I traced it onto the other to make two identical pieces for the front and back.

.

Cut Sides and Bottom of Pet House

Now, I pulled out the 24” wide strips I ripped off the plywood sheet at the beginning to start cutting the sides, top and bottom.

.

I started with the longer strip to cut down the sides and top first.

.

Now, most likely, even though you tried to be as accurate and careful as possible, between the measuring and the cutting, your front and back pieces will not be EXACTLY like what the plans say above.  THAT IS OKAY!!!

Shara measuring side of plywood pet house front panel

The front/back panel diagram above is a great guide, but I found it much more accurate to measure each side exactly before cutting–your pieces may be off ⅛″ or so from what’s shown above.

.

So I started with one side and worked my way around cutting to fit the pieces as I went.  The left and right sides of the house will overlap the bottom, so for these pieces, I measured the length of the side and added ¾”.

.

The cuts need to be beveled 30 degrees around the roof for the pieces to fit tight.  So I adjusted my circular saw’s bevel to 30 degrees to make these cuts. 

Close up of angle setting on circ saw bevel

On this first side piece, the bottom edge will be square, and the top is beveled.  So I measured off the square end and set my straight edge up so that the SHORT side of the bevel is the side measurement plus the ¾”.

Using circular saw to cut pieces for side of dog house at 30 degree bevel

This piece should fit the side and hang off the bottom about ¾” so it can overlap the bottom panel when assembled.

.

I repeated measuring and cutting each side the same way making sure to bevel the edges the right direction.

Plywood cuts for side pieces of DIY outdoor pet dog cat house

Now since I already beveled this plywood edge 30 degrees with my first cut, I just flipped it over, measured off the short end, and made another 30 degree cut the same way.  You should only have to make 4 cuts total (shown above). See video for more information.

.

I test fit each piece after cutting, and when I got to the last piece, I cut it just like the other side so that the bottom edge was square, the top was beveled 30 degrees, and it overhung the bottom edge by about ¾”.

.

And finally, I cut the bottom piece 24″ x 36″ to fit with square edges.

Step 2: Cut Out Door Opening

You can make this door any size you want or need. 

.

But I used a scrap piece of plywood to trace out an opening I thought was a good size—it ended up being about 11” tall and 14” wide.

Door cut out diagram to DIY outdoor pet house front panel

I just cut this out with a jig saw. 

Step 3: Prep and Finish Pet House Pieces

Since I was painting these pieces two different colors, I went ahead and finished them before attaching anything.  Honestly, this would have been SO much easier if I had just painted the whole thing one color…but that’s no fun, so I made things more difficult and went two-tone haha.

.

Now, because I was using some lower quality plywood, there were some voids to cover on the edges.  To help better seal this wood, I used DAP Platinum Patch for exterior use on the plywood edges and in any knots or voids in the wood. 

.

I applied it on all the plywood edges on the outside pieces and let it dry well.

Shara using DAP Platinum patch to cover and seal plywood edges

After the putty was dry on the edges, I sanded it smooth and began priming and painting the outside pieces black and the front and back pieces white.

RELATED: How to Paint/Stain Raw Wood

.

I gave them each several coats and once they were dry, I could finally screw them together.

Step 4: Assemble DIY Pet House

I started by attaching the back panel to the bottom panel using 1 ¼″ exterior grade wood screws so that the back was inset about 1 ¾”. I just picked 1 ¾″–you could attach them flush or further in or whatever you wanted.

.

Then, I did the same with the front panel.

Pet house assembly diagram showing front and back panels attached to bottom panel

Once the back and front panels were attached to the bottom, I just wrapped the sides and top around them and screwed them in place. 

Dog house assembly diagram attaching sides to front and back panels

I used some exterior grade wood glue at the angled joints and made sure the front and back panels stayed inset 1 ¾’” from the edges.

Step 5: Seal and Caulk Outdoor Pet House

The pieces fit together really well, and the glue should hold the seams tight, but to cover and seal off any gaps—and also to smooth things out, I used some more DAP platinum patch to cover the screw heads and the seams.

Shara Woodshop Diaries using DAP Platinum Patch filler to seal seams and screw heads on DIY outdoor dog house

And then, to seal off and help waterproof the rest of the house, I used DAP extreme stretch caulk to fill in all the joints around the front and the back panel. 

.

This should just help seal off everything from rain, wind, etc.

Shara Woodshop Diaries caulking along joints in DIY outdoor dog house to seal it

After the caulk dried and I gave the house a final sanding, I touched up the paint and began working on the deck.

Step 6: Assemble Optional Deck

Now, the deck is a totally optional step.  I added it on my old dog house and I liked it, so I added it again here.

.

To build it, I used 2x4s for the frame and 1x6s for the decking.  I cut down my 2x4s to (2) 48″ long pieces and (3) 41″ long pieces.  Then, I cut my 1x6x8 boards in half into (8) 48” long pieces.

.

Before assembling, I stained everything with an exterior stain and sealant so that I could cover all the edges.

.

Then, I assembled the frame using 2 ½” wood screws like shown below.

DIY outdoor pet house deck frame assembly diagram

And once the deck frame was together, I screwed in the decking. 

Diagram showing decking boards attached to frame for DIY pet house

Then, I set the house on the back corner of the deck and used a few screws through the bottom of the house to screw it in.  This was a really tight squeeze, so it might be better to flip it on the back and screw it in place from the bottom side. 

Step 7: Trim Front Door & Add Decorative Details

All that’s left is the trim and decorative details.  I cut some scrap 1x2s to fit around the door opening, stained them with an outdoor stain and sealant, then nailed them in place. 

.

I had intentions of adding an awning here above the door, but I didn’t really have scraps long enough for what I needed for that, so I decided against it. 

.

Lastly, just for a little decorative detail, I attached a flower pot hanger and added a pop of color to the black and white house and called it complete. 

Black and White modern style dog house on wood deck in yard with flower hanging on front

I’m really happy with the result here and excited to trash the old dog house and give the cats a fresh, new hangout. 

.

I think they’ll appreciate the modern design haha.

.

If you’d like to build one for yourself, be sure to check out the video above for more information.  And if you enjoyed the project and can’t want to see more, be sure to subscribe to the newsletter to stay up to date on all the latest builds. 

If you want to save this DIY outdoor pet house project for later, don’t forget to pin it and share it on your favorite social channel!

Pinterest collage showing overall dimensional diagram at top and Shara with orange tabby cat on pet house at bottom with text "how to build a basic outdoor pet house"

Until next time, happy building ????

How to Build a Modern Dresser

April 9, 2021 by Shara, Woodshop Diaries

In this post, I’ll show you how to build a modern dresser with a mid-century style!

DIY plywood mid century modern dresser with 6 drawers and modern legs

Dressers are literally my favorite thing to build. There are so many ways to build a box and add drawers and so many styles you can go with for it.

.

But mid-century modern style has my heart! So, clearly, when a friend asked me to build a DIY mid-century modern dresser, that was a project I could get excited about!

.

If mid century design isn’t your favorite, though, I have plenty more dresser plans to choose from here:

Simple DIY Dresser
DIY Dresser Desk
DIY Modern Dresser
DIY 5 Drawer Dresser
DIY 4 Drawer Dresser

Now in case you’re wondering why this particular mid century modern dresser isn’t finished, the friend I made this for wanted to stain it herself. 

.

So I’m going to show you the build process, but for finish, you’ll have to use your imagination haha.

.

I’ve got the printable plans, and details below, as well as a video right here:

This post contains affiliate links. See policies.

For this DIY Modern Dresser, You Will Need:

Materials:

  • 3 sheets ¾″ plywood
  • 1 ¼ sheets ¼″ plywood
  • (2) 2x4x8 boards
  • Scrap 1x or ¾″ plywood to cut the legs from
  • 1 ¼″ pocket hole screws
  • 2 ½″ pocket hole screws
  • 2″ wood screws
  • 2 ½″ wood screws
  • (6) pair 16″ ball bearing drawer slides–I buy bulk packs of 5
  • Wood Glue
  • Edge banding (optional)

Tools:

  • Circular Saw
  • Kreg Rip Cut & AccuCut Saw Guide (optional–a straight edge works, too)
  • Miter Saw
  • Drill/Driver
  • Kreg Pocket Hole Jig
  • Jig Saw
  • Table Saw
  • Nail Gun (optional)

Printable Plans:

Some Notes about this Modern Dresser Build:

This is a really fun build made almost entirely from plywood. To give the dresser some extra support on the bottom, the bottom frame is made from 2x4s.

.

You can cut the feet for this dresser from 1x material, 2x material, or plywood as desired. I cut mine from 1x poplar scraps I had in my shop.

Posts You May Find Helpful For This Build:

  • How to Cut Plywood Sheets
  • How to Apply Edge Banding
  • How to Use a Pocket Hole Jig
  • How to Build and Install Drawers

Overall Dimensions:

Diagram of overall mid century modern dresser dimensions--38" tall, 60" wide, and 20 ¼" deep

Step 1: Cut Plywood and Assemble Main Dresser Box

I built the main body of this dresser and all the drawers using ¾” birch plywood.

.

This project calls for using 3 sheets, but if you have some scraps, you can probably get away with using 2 full sheets and some scraps to make the last couple drawer fronts.

.

Although I tried to use as much of my scraps as possible, I still had to cut down some larger sheets and for this, I used my circular saw and cutting guides. 

RELATED: Check out how to easily cut down plywood sheets in this post.

Shara Woodshop Diaries cutting down plywood sheet with circular saw

Once I had a top, bottom and two side panels cut for the dresser body, I applied some iron on edge banding to all the sides of the plywood that will be exposed. 

RELATED: How to apply iron on edge banding to cover plywood edges.

.

Once the banding was applied and the pieces were sanded, I used ¾″ pocket holes and 1 ¼″ pocket hole screws to assemble the main body like shown here.

Main dresser body assembled with pocket hole screws digram

RELATED: Check out this post about how to use a pocket hole jig.

.

I used wood glue on all these joints WITH the screws for a more rigid hold.

Step 2: Install Middle Dresser Divider Panel

Once the glue was dry on the main body, I cut and installed a middle divider panel.  I cut this so that it was 1” narrower than the main dresser body so that I could install it 1” inset from the front edge. 

Middle divider panel installed into modern dresser box diagram

I just used pocket holes and screws again here and double checked pretty often that it was centered in the box.

Step 3: Install Modern Dresser Drawer Dividers

I used scrap plywood for this, but you could also use 1x3s or a similar size board.  They don’t have to be an exact width as they’re mainly just for looks.

.

I found some thin strips in my plywood scrap pile and cut them down to fit between the dresser sides and the divider panel.

.

After applying edge banding to the front edges, I glued and nailed two at the top and two at the bottom keeping them 1” inset from the front edge.

Drawer divider diagram showing where and how to add divider pieces into main dresser body

Then, I drilled pocket holes to attach the 4 in the middle.  These needed to be 8 ½” apart, so I cut a spacer block to help keep them in place while I drove the screws.  Again, these were 1” inset from the front edge as well.

.

That completed the main frame of the dresser, so now it was time to move onto my favorite part of every build—the drawers.

Dresser body assembled with dividers sitting on workbench ready for slides

Step 4: Install Drawer Slides

I used 6 pair of 16″ ball bearing drawer slides for this DIY modern dresser build.

Diagram of how to build a modern dresser showing drawer slide placement

I’ve got a detailed guide here about installing drawer slides, but I just installed these 1” inset from the front edge of the dresser directly above each divider piece.

.

I made sure each slide was square and straight before driving the screws.

Shara Woodshop Diaries installing drawer slides into dresser cabinet

Step 5: Build Modern Dresser Drawer Boxes

I ripped some 7″ wide strips off a ¾” plywood sheet to cut down for the drawer boxes.  Then I cut all my drawer box pieces to length from these strips on the miter saw to make 6 identical drawer boxes like this.

.

I also cut the ¼″ plywood bottom panels to size as well.

exploded view of drawer boxes for DIY modern dresser build

The bottom plywood panel sits inside dadoes cut on the drawer box sides, so after the pieces were cut, I began cutting these dadoes. I set my table saw blade height and rip fence up and began cutting the ¼” dadoes. (You can also use a router for this instead.)

.

I get asked pretty often if you have to have a dado blade on the table saw for this. And, no, definitely not.

.

I adjust my rip fence and cut a blade width, then adjust the rip fence again to cut another blade width so that the distance between the outside cuts are ¼”. 

plywood with two blade cuts to make a dado without a dado blade

Then, I adjust again and clean up the middle to give me a ¼” dado.  It’s a little extra work, but so is swapping out a blade for just a few quick cuts.  Whatever works…works 🙂

Shara Woodshop Diaries completing the dado cut on table saw

After all my dadoes were cut, I edge banded the tops of the drawer pieces, drilled pocket holes and assembled the drawer boxes with 1 ¼″ pocket hole screws like shown here.

Overall drawer box dimensions--7" tall, 16" deep and 27 ⅞" wide

Step 6: Install Modern Dresser Drawers

Once all six drawers were assembled, I installed them into the dresser body.

Diagram of drawer boxes installed into dresser frame

Step 7: Add Drawer Fronts

I installed these drawer fronts using 1 ¼” wood screws from the inside of the drawer boxes so that they covered the drawer box openings and were ⅛” from the dresser sides.

Diagram of drawer fronts installed onto dresser drawers with dimensions

The design called for leaving most of these divider pieces exposed and allowing more space than usual between the drawer fronts.  There is nothing scientific or technical here—it’s purely just for looks. 

.

So if you wanted to make your drawer fronts larger to hide the dividers, you definitely can.

Front view of drawer fronts installed onto modern dresser build

Now the dresser body is complete and all that’s left is the base.

Step 8: Assemble Modern Dresser Base Frame

I built the base frame using 2x4s. This is totally optional, but I ran the 2x4s through the planer and trimmed the rounded edges off the 2x4s just to clean them up a little.

RELATED: Check out this post about how to remove rounded board edges.

.

Then, I cut the base frame pieces to length and drilled pocket holes into the ends of the short pieces to assemble a 2×4 frame that will help support the weight of the dresser in the middle.

2x4 base frame assembled using pocket holes and screws to go on bottom of dresser box

I assembled this super basic frame using pocket hole screws making sure to get the piece in the middle centered.

Step 9: Cut Dresser Legs

For the legs, I used some scrap poplar I had in the shop. But, you could also use standard 1x lumber or ¾” plywood for the legs if you wanted.

.

I used this same leg design in a few projects in the past, so if they look familiar, you may recognize them from the dog bed, dog bowl stand, and upholstered storage bench I built previously.

Diagram of mid century modern legs to be cut out to attach to base frame

I actually pulled up the diagram from those plans to copy for this build and traced out the design onto my poplar piece.

.

Once I had the first leg cut out with a jig saw, I sanded it and used it as a template to trace out three more from the same board.

Shara Woodshop Diaries tracing leg shape onto poplar board to cut out

Step 10: Install Modern Dresser Legs

After they were all sanded, I brought the base back out and used some wood glue, a speed square and a couple 2 ½” wood screws per leg to attach them at each corner at a 45 degree angle.

Shara Woodshop Diaries attaching legs to base frame corners

Once the base was together, all that was left was to attach it to the dresser. 

Diagram of legs attached to base frame for how to build a modern dresser project

Step 11: Attach Base to Main Dresser Body

Since the dresser was really heavy with all the drawers installed, I removed them, flipped it upside down and centered the base on the bottom. 

Shara Woodshop Diaries screwing base frame into bottom of dresser box

I used several 2” wood screws to attach the base to the bottom plywood panel, then flipped it back over.

Diagram of base attached to bottom of mid century modern dresser box

Step 12: Attach Back Panel

And finally, I stapled the ¼” plywood backer onto the back of the dresser and reinstalled the drawers.

Diagram of back panel stapled onto back of DIY modern dresser build

And now she’s ready for stain or paint or whatever you would want to finish it with. Honestly, I’m kind of digging the unfinished look, but I know that’s probably not the popular opinion haha.

Completed plywood dresser built from these how to build a modern dresser plans

You can add handles or knobs to this or leave them off for a more minimalist look. But if you wanted to do without hardware, you could use the drawer slides that you can push to open for this instead.

Shara and Lucy with 6 drawer DIY modern dresser build

Either way, it’s a classic dresser design I really hope you enjoyed watching it come together as much as I enjoyed building it!  If you’re interested in building your own, be sure to check out the printable plans here.

.

If you enjoyed this how to build a Modern Dresser Project and want to save it for later, don’t forget to pin it!

Pinterest collage diagram with overall dresser dimensions at top and finished dresser at bottom with text: DIY mid century modern dresser

And don’t forget to follow along and subscribe below so you don’t miss out on what’s coming next!

Until next time, friends, happy building 🙂

How to Make Faux Live Edge Wall Shelves

April 2, 2021 by Shara, Woodshop Diaries

Check out how to make your own DIY faux live edge wall shelves in this post!

DIY Faux Live Edge Shelf made from pine wood hanging on wall with a glass vase

Live edge projects are all over the place these days but, in my tiny town, lumber selection is limited and no one within a two hour drive has much to pick from as far as live edge slabs go.

.

So after thinking about it for almost a year, I finally decided to give making my own FAKE live edge a try from some basic construction lumber.

.

I’m honestly surprised how well these turned out.  You may still be able to tell they’re pine boards if you look close enough, but for about $11 in lumber, I’d say it’s a reasonable knock off.

.

So if you’re ready to see how I made these faux live edge shelves, let’s get building.

.

I’ve got a video here and the step by step instructions below 🙂

This post contains affiliate links. See policies.

.

I wanted to try something small for my first attempt at faking live edges, so I made two small shelves from a single 2×10.  These were really great for getting started and I definitely want to try this again on a larger scale project in the future–so stay tuned 🙂

To Make DIY Faux Live Edge Shelves, You Will Need:

  • (1) 2x10x8 board (will make two 24″ long shelves per board)
  • Jig Saw
  • Angle Grinder
  • 40 grit flap disc
  • Drill (driver optional)
  • 3″ wood screws
  • Wood glue
  • Stain (see step 5)
  • Wire brush (optional)
  • 80 grit sandpaper (optional)

Step 1: Cut 2×10 Board into Pieces

I began by cutting the 2×10 board into four pieces roughly 24” long—they didn’t have to be exact.  I used two pieces for each shelf. You can use a jig saw, circ saw, or miter saw to cut these.

two pieces of 2x10 board laid on workbench to make one shelf

Then, I separated the boards into pairs–two pieces for each shelf. 

Step 2: Trace and Cut Faux Live Edge on Back Piece

I began with the piece I wanted to use for the back and used a pencil to kind of freehand a faux live edge shape on the top and bottom edges. 

Shara Woodshop Diaries tracing DIY faux live edge onto back panel of floating shelf

Ideally, you’d want to find a board with some crooked grain that you can trace along.  The more you can trace along the grain, the more realistic it will look.

.

Wildly crooked grain isn’t super common among basic construction grade pine, so I just kind of tried to keep the shape as realistic looking as possible—nothing crazy haha.

.

Then, I used a jig saw to cut along these lines.  You can bevel the blade on the jig saw if you’d like—I tried it with and without a bevel and found it a little easier to cut if I didn’t bevel it.

Shara Woodshop Diaries using Ryobi jig saw to cut a fake live edge onto 2x10 board

One of the best parts of this project is that it leaves room for creativity–there’s no right or wrong in this process and you can simply “free style” it however you want.

Step 3: Shape Back Panel Live Edges

Once both fake live edges were cut on the back panel piece, I clamped it to the workbench and attached a 40 grit flap disc into my Ryobi HP cordless angle grinder. 

Shara Woodshop Diaries installing a flap disc into angle grinder

Now, there are specific angle grinder discs made for wood carving.  And they’re pretty pricey.  I didn’t want to invest in expensive discs just to try one project and find out I didn’t enjoy wood carving with an angle grinder and never use them again. 

.

So I tried the 40 grit flap disc to kind of test things out.  It worked really well for this small project, but for the future, I think I’ll be investing in some specific carving discs because I thoroughly enjoyed this process. 

Using angle grinder to carve fake live edge onto pine board

This is where you can just turn on your music and free style.  I sanded all over these edges to give it a rough, uneven texture to simulate what a real live edge would look like.  I carved some places out more than others and tried to just get creative here.

.

I did both sides of the board and also did a little on the board ends. Basically, I just used the grinder to sand all the edges into the shape I wanted.

Shara Woodshop Diaries holding DIY faux live edge pine board with edges carved using angle grinder

Step 4: Cut and Shape Live Edge on Shelf Board

Once I was happy with the general shape of this back board, I worked on the shelf board.

.

I’ll be gluing and screwing this board onto the back board, so to give it a smooth, square surface to attach to, I squared off one board edge on the table saw. This is totally optional and if you don’t have a table saw, you can get away with skipping this step.

.

Then, I repeated the steps with the jig saw and angle grinder on the front edge of this piece.  You can make this shelf piece as deep as you want, but I ended up cutting off enough to make the shelf about 7” deep.

Using angle grinder to carve front edge of shelf board

Step 5: Sand and Finish Shelf Pieces

Once both pieces were cut and shaped, I gave them a good sanding just to smooth out the edges a little.  The angle grinder left some scratches on the edges and I was careful not to sand all of these off as they add to the character of the piece.

Unfinished back and shelf pieces dry fit together on workbench

Then it was time to apply stain.  I think the finish process made a big difference on how well these turned out, but it was a lot of trial and error to figure out what looked best.

.

I kind of put together a “recipe” that seemed to work well, but feel free to experiment as you wish because there is no science to this haha.

.

I applied a golden pecan stain all over the entire back and shelf board, followed by special walnut stain all over both boards as well.

Using medium stain color on fake live edge boards

Then, I applied dark Kona stain to just the rough “faux live edges” to help highlight them.

Applying dark Kona stain to DIY faux live edges to highlight fake bark

After the boards were stained, I used a wire brush to scrape some indentions on the live edges, then applied a little more of the Kona stain into these indentions. 

Using a wire brush on board edges to simulate fake bark

This almost gave the appearance of bark.  You could beat up these edges a little more with a hammer or some chisels if you wanted, too.

.

Then, just to soften and blend in the color variation, I hand sanded around the edges with 80 grit paper and applied some special walnut where the finish was sanded off. 

sand board edges to blend various stain colors

This just helped blend in the colors a little and made it look more natural.

Step 6: Attach Shelf to Back Panel

Once both pieces were stained, I used some wood glue and 3” wood screws to attach the shelf piece onto the back piece.  I used three screws per shelf.

.

These were surprisingly sturdy, but if you felt you needed more strength, you could use longer screws, or add some corner brackets, too.

Apply glue to attach shelf board to back panel

I used a square to keep the shelf square to the back panel while I drove the screws. 

.

Now, I made these for my dad and he wanted the shelf piece to be attached toward the bottom of the back piece.  I’m not sure why, but that’s what I did haha.

Using 3" wood screws to attach shelf board onto faux live edge back panel

But, you could also flip these upside down and have the shelf be at the top and add some hooks underneath to use in an entryway for dog leashes, coats, hats, etc. 

Step 7: Hang Shelves on Wall

Once the glue was dry, I gave the shelves a couple coats of clear poly and used some 3” wood screws to attach them into the studs in the wall. 

.

I just hung this one for pictures before I installed them in my Dad’s office, so I only used one screw in the center.

.

But I’d recommend using at least two screws per shelf.  You can screw straight through the back panel into either wall anchors or just screw directly into the wall studs.

Front view of DIY faux live edge shelves showing edge detail

I was seriously impressed with how realistic these came out.  I’m definitely going to try this fake live edge technique on a larger scale like a coffee table or side table soon. 

Close up of corner of DIY faux live edge shelf where the wire brush made indentions

But these shelves were the perfect way to kind of test the waters and learn a few things.

.

If you enjoyed this project and can’t wait to see more, I’d love if you’d subscribe so you don’t miss out on what’s coming next.

For more one board projects, check out a few of my favorites here:

  • One board Shoe Bench
  • How to Build a DIY Bar Cart from One Board
    One Board Bar Cart
  • One Board Corner Shelves

And if you’d like to save this DIY faux live edge project for later, don’t forget to pin it!

Pinterest collage of Shara holding unfinished fake live edge board at top and completed faux live edge shelves hanging on wall at bottom

Until next time, friends, happy building!

DIY Grill Cart & BBQ Prep Table

March 26, 2021 by Shara, Woodshop Diaries

mobile bbq cart prep table small

In this post, I’ll show you how to build this easy DIY grill cart BBQ prep table!

*This project was sponsored by The Home Depot as part of the ProSpective Tool Review Program. This post also contains affiliate links. See policies.

Shara holding onto handle of mobile DIY grill cart with portable grill on top and cooler on bottom

After I created our garden patio a few weeks ago, I received several requests for DIY grill cart/BBQ station and prep table plans. So I built this one!

Now, we don’t do a whole lot of grilling so I really didn’t want anything where the grill was built into the project. 

So I built this cart kind of “basic” so that it can stay versatile and be used for lots of things–not just for grilling! 

You can set a small grill on top and use it as a grill station, use it as a BBQ prep table next to your existing grill, use it as a bar cart, a serving table for outdoor parties, etc.

But, you could also use it as a simple utility cart to roll around the yard and collect your vegetable harvest if you have a large garden.

I’ve got a video tutorial and the woodworking plans below. So, if you’re ready to see it come together, let’s get building!

Tools & Materials

Tools:

  • Ryobi HP Drill/Driver
  • Ryobi HP Jig Saw
  • Miter Saw (Optional)

Materials:

  • (2) 2x6x8 boards
  • (4) 2x4x8 boards
  • (5) 1x6x8 boards
  • (2) 1x2x8 furring strips or boards
  • 1 ¼″ wooden dowel
  • (2) swivel & lock casters
  • (2) fixed casters
  • 1 ¼″ exterior wood screws
  • 2 ½″ exterior wood screws
  • 2 ⅞″ black timer frame screws
  • Exterior Finish

What to Know Before Building a DIY Grill Cart & Prep Table

This is an EXCELLENT weekend woodworking project that you can build in just a few hours.

It uses minimal tools, standard materials and very simple joinery methods, so it’s a great beginner woodworking project if you’re just getting started or looking for a simple build.

What type of wood should you use?

To keep costs low and assembly easy, I just used some basic untreated pine/whitewood construction lumber here—some 2x6s, 2x4s, 1x6s, and a couple furring strips.

Typically, you don’t want to use untreated pine for an outdoor project as it’s not resistant to moisture. So, basically, it just won’t last as long when exposed to the elements.

So you could definitely use treated, red wood or cedar wood for this build if you wanted something that will last a long time. Just don’t put any food in direct contact with treated lumber.

But I plan to keep this under cover on the porch and the untreated wood will still last several years especially if I apply an outdoor sealant.

Overall dimensions

The overall dimensions for this project are 36″ tall x 27″ deep x 63″ long. Note that this includes the caster wheels.

If you opt for a different size or style caster wheel than what’s linked above, your height may vary.

Overall dimensions of grill cart

How to Build a DIY Mobile BBQ Cart and Prep Table

If you’re ready to head to the shop, let’s get building!

I’ve shared the step by step instructions below with several helpful tips along the way, but if you prefer to watch, you can check out the build video here as well.

If you prefer to print your plans, grab the printable version of the plans below here:

Step 1: Cut Grill Cart Frame Pieces

The first thing I did was cut down my frame pieces.

I get a lot of comments from people that if they had a shop full of tools, they could build this or that, too. 

And while certain tools make the job easier, I started out several years ago with just a hammer and a jig saw. 

RELATED: Check out my list of 5 Tools I Recommend Getting Started With here!

And I was always surprised at what you could build with just those two tools if you got creative.

Using a jig saw and a square to cut pieces for grill cart frame

That said, this project could easily be completed with just a drill and a jig saw if that’s all you had. 

A miter saw would make the straight cuts a little quicker, but any saw will work for the straight cuts.

Here’s the cut list for the frame pieces:

2x4s:

  • (4) @ 27 ½″ long (legs)
  • (2) @ 24″ long (leg stretchers)
  • (2) @ 21″ long (bottom tray short sides)
  • (2) @ 48″ long (bottom tray long sides)

2x6s:

  • (2) @ 24″ long
  • (2) @ 63″ long
2x4 and 2x6 pieces cut and laid out on workbench for grill cart

Once everything was cut, I gave the pieces a good sanding before assembling anything.

Prefer to print? Grab printable plans for this outdoor cart here.

Step 2: Cut Out Curve on Top Cart Sides

Before assembling, I needed to cut a curve out on one end of both the long, top 2×6 pieces where the handle will go later.

So I found some round objects in the shop to trace the curve.

I felt like the story of the three little bears trying to trace this curve.  I tried a paint can, but it was too small. 

So I grabbed a 5 gallon bucket and tried tracing around the top and it was too big.  So I flipped the bucket over and traced the bottom and it was just right haha.

Using a Home Depot bucket to trace curves on 2x6 board

Take note that I left about 1 ½″ between the top edge and the curve on the 2x6s to attach the handle between later.

Then I used the new Ryobi 18V HP cordless jig saw to cut out this curve.

Close up of Ryobi HP jig saw used to cut curves on 2x6 boards for cart handle

Check out the video to see it in action and check out more details on the saw here on The Home Depot website.

Step 3: Build Leg Subassemblies

I built this project in basically three sections—two leg sub assemblies, a bottom tray, and a top frame. So I started with the legs first.

I used 2 ½” exterior screws to assemble two leg assemblies.  These leg assemblies were basically just a bottom 2×4 stretcher attached between two 2×4 legs.

graphic showing how to assemble leg assemblies for mobile bbq cart

NOTE: Don’t forget to predrill all the holes before driving the screws. These 2x4s can tend to split if you skip predrilling.

Step 4: Assemble Bottom Grill Cart Tray Frame

Then, I used 2 ½” exterior screws to assemble a tray made from 2x4s that would fit into the leg assemblies.

graphic showing bottom frame assembled for mobile bbq station

Step 5: Assemble Top Cart Frame

And lastly, I assembled a top frame using the 2x6s from the cut list.

graphic showing dimensions of top frame pieces

You could use more 2 ½” wood screws for this, but because these screws will be seen, I opted for a more decorative option and used these 2 ⅞” timber screws.

Close up of timber screws used on top frame assembly of grill station

Structurally, they’re a little overkill, but I liked the black hardware accents here, so I used them for this top frame.

I used a speed square to help me keep my pieces square while assembling. 

Using a speed square to keep pieces in place while driving screws

Step 6: Assemble the Grill Cart BBQ Table

Once the legs, the bottom tray, and the top frame sub assemblies were together, it was time to start assembling the cart.

I flipped the top frame upside down and screwed the leg assemblies inside the frame so they were ¾” down from the top edge.

Using timber screws to attach grill cart frame together

Again, I used timber screws for this for a little more visual interest.

graphic showing top frame attached to leg assemblies of mobile grill cart BBQ station

Once the legs were in place, I flipped the cart right side up and installed the bottom tray.  It was a tight fit, so I used a rubber mallet to tap it into place.

Before attaching anything, I made sure the legs were square to the top, then I screwed the tray in using more timber screws.

Bottom tray frame installed between leg assemblies

Step 7: Install Slat Supports & Handle

I wanted the slats for the top and bottom to simply sit in place so they could be removed later if I decided to replace them with concrete or some kind of a tile top.

So, I cut furring strips (you can also use 1x2s, but furring strips are cheaper) to screw between the legs ¾” down from the top edge so the slats could just rest on them.

I also added these along the bottom edge of the bottom tray.

graphic showing furring strips attached for top and bottom grill cart slats

For the handle, I measured and cut a 1 ¼″ wooden dowel to fit between the ends of the top frame where the curve was.

graphic showing dowel rod handle attached between grill cart frame

I screwed this dowel in place using timber screws.

Step 8: Add Caster Wheels to Grill Cart

Now the frame is complete, and it was time to add the wheels. I got two casters that swivel and lock for the front and two fixed casters for the back.

Placing casters on bottom of mobile grill cart

I used some 1 ¼″ wood screws with washers to install these onto the bottom braces of the leg assemblies.

The plate on the fixed casters was a little bigger than the 2×4 here, so I had to drive these screws at a slight angle, but it was fine.

Attaching fixed plate casters to bottom of grill cart

I flipped the cart over and all that was left was the slats.

Step 9: Add Top and Bottom Tray Slats

I cut 1×6 slats for the top and bottom trays and simply set them in place on the strips from step 7.

Graphic showing slats placed onto top and bottom tray of grill cart

I used 9 on the top and 8 on the bottom. There should be some gaps between the boards for water drainage since this will be outside.

You could definitely screw these into the furring strips if you wanted.

Step 10: Finish Outdoor Mobile Grill Cart

Now, I actually bought an outdoor stain and sealant to use on this piece for finish, but it was way more orange than I expected when I applied it, so I decided to just give it a few coats of clear outdoor poly instead. 

You can use whatever outdoor sealer you prefer.  But if you plan to keep it out in the elements, outdoor paint would probably be the most durable/long lasting option.

I plan to keep this under cover for the most part, so it should last a good while as is.

I added a couple hooks for cooking utensils and got it set up and ready to grill.

BBQ prep table on wheels with grill on top and cooler below and bag of charcoal ready to cook

This was a super simple project, but was really fun to put together.  We will definitely be using this outside this year for both cooking and entertaining. 

Want to build your own? Check out the printable building plans here.

You can grab the little portable grill here and the cooler here if you need one for your own cart! 🙂

Mobile DIY grill station with cooler and portable grill--basic BBQ Prep table cart

If you need some extra work or serving space for your patio, porch, garden, or grill, this is a really basic and inexpensive project you can throw together in a weekend. 

Close up of top of DIY grill cart with removeable slats

If you’d like to stay up to date on all the latest projects and plans, be sure to subscribe to the newsletter for priority access to new content!

For more outdoor project ideas, check out these favorites:

DIY Privacy Fence
DIY Outdoor Table & Bench
How to make your own DIY concrete planter pot with wooden base
DIY Outdoor Chair
DIY Concrete Landscape Curb
How to Hide Outdoor Eye Sores

I really hope you enjoyed this DIY grill cart build and if you’d like to save it for later, don’t forget to pin it!

Pinterest graphic showing cart overall dimensions at top and Shara Woodshop Diaries grilling on bottom

Until next time, happy building ????

DIY Cane Linen Cabinet

March 19, 2021 by Shara, Woodshop Diaries

In this post, I’ll show you how to build this DIY cane linen cabinet!

This post is sponsored by Kreg Tool and contains affiliate links. See policies.

Shara holding tall linen cabinet door open to show what's inside

For whatever reason, I’ve been obsessed lately with tall, skinny cabinet designs.  Nothing fancy, just simple storage cabinets that don’t take up a large footprint.

.

I’ve built a few before, but they were all on the larger scale. And while I had a break between some bigger projects I’m working on, I thought this smaller version would be a fun build I could enjoy making for myself. 

.

Plus, I’ve had this cane webbing in a drawer in my shop for well over a year just waiting for a project to use it on.

test fitting a roll of cane webbing onto linen cabinet door

So clearly, this seemed like the perfect project to tackle this week ????

.

I’ve partnered with my friends at Kreg Tool to provide the building plans for free here if you’d like to build one, too and I’ve got the video and additional info on it below:

Overall Dimensions and Additional Info:

Overall size of DIY tall pantry cabinet--19 ½" wide, 14 ¾" deep, 56 ¾" tall.

If you’ve seen many of my projects or videos, you probably notice that I use a lot of plywood.  Since this was a fairly small project, I was able to utilize several of my scraps.

.

However, if you don’t have a shop full of scraps, I have provided a cut diagram in the plans for how to cut these pieces from a full sheet.

For this Linen Cabinet Build, You Will Need:

Materials:

  • (1) 2x2x8 board
  • (1) Full sheet ¾” plywood
  • (1) Full sheet ¼” plywood
  • (5) 1x3x8 boards
  • 4 ‘ piece small crown molding
  • APPOX 18” x 36″ piece cane webbing (trim to fit)
  • (1) ¼” x ¾” x 8′ lattice trim (optional)
  • (1) pair full overlay concealed hinges for frameless cabinets
  • 2″ wood screws
  • 1 ¼″ pocket hole screws
  • 2 ½″ pocket hole screws
  • Shelf Pins
  • Edge Banding (optional)

Tools:

  • Circular Saw
  • Kreg Rip Cut (optional)
  • Miter Saw
  • Kreg 720 Pocket Hole Jig
  • Kreg Shelf Pin Jig
  • Kreg Concealed Hinge Jig
  • Drill
  • Staple gun
  • Nail gun

Step 1: Assemble Linen Cabinet Box

I used my circular saw to cut down my plywood pieces to build the main box of the cabinet.

Using a circular saw and rip cut to cut a plywood sheet

RELATED: Check out this post for how to cut plywood accurately with a circular saw!

.

I cut two long side panels, two small middle panels and two scrap plywood strips to build the cabinet carcass.

plywood pieces laid out on workbench to build linen cabinet carcass

Before assembling anything, I applied iron on edge banding to the front edge of the sides and middle panels as these edges will be exposed in the finished project. 

.

Edge banding is always an optional step, but does look a little cleaner, so I like to add it.

RELATED: Check out this post for how to apply iron on edge banding!

.

Once the edge banding was on and the pieces were sanded smooth, I brought out my Kreg 720 pocket hole jig to drill pocket holes to assemble the cabinet.

RELATED: Check out this post to help you decide which pocket hole jig is best for your shop!

Using a drill to drill pocket holes into plywood panel with Kreg 720

I drilled holes along the edges of the two middle panels and into the ends of the two plywood strips as well.

RELATED: Learn how to use a pocket hole jig in this post!

.

Then, I assembled the cabinet carcass using pocket hole screws.  You can use glue here as well if you want.

.

I put the thin strips at the top, and the solid panels at the bottom.  Just a note: you could use a solid piece for the top, I was just saving wood. 

Assembling linen cabinet carcass using pocket holes and screws

I installed my second middle panel 7 ½” up from the bottom. 

Installing middle shelf into tall pantry cabinet with pocket hole screws

Once the cabinet was together, I went ahead and used my shelf pin jig to drill shelf pin holes along the cabinet sides to install adjustable shelves later.

Using a shelf pin jig to drill shelf pin holes into cabinet sides

RELATED: Check out the shelf pin jig in this list of 10 must have tools for cabinet building!

Step 2: Add Back Panel to Linen Cabinet

Then, I cut a ¼″ plywood panel to fit over the back and stapled it in place.

Stapling back panel in place on linen cabinet

Step 3: Trim Out the Sides

Now it was time to dress the cabinet up a bit.  I trimmed out the side panels with 1×3 boards just to add some detail. 

.

I applied some glue and clamped the piece onto the front first.  I wanted these pieces to hang over the front edge of the cabinet ¾” so that the door would sit inside this section flush across the front.

.

I used a scrap piece of wood to get this piece positioned correctly and clamped in place. Once it was in place, I could use brad nails to secure it.

Brad nailing side panel trim onto DIY pantry cabinet

Then I glued and nailed in the rest of the pieces on the back edge, top and bottom.

.

I did this on both sides and then added one more piece at the top on the front side as well.

Using brad nailer to attach front face frame piece to linen cabinet

Step 4: Build Cabinet Door Frame

Next, I cut the 1×3 pieces to make the door frame.  Don’t forget…All the measurements for this door and the entire build can be found in the plans here.

.

I used wood glue and pocket hole screws to assemble the door frame. 

Door frame for tall pantry cabinet assembled

You don’t have to do this step, but I wanted to hide the holes, so I used some wood glue to glue pocket hole plugs into the holes on the frame.

RELATED: Check out this post for 4 ways to fill a pocket hole!

Using pocket hole plugs to fill pocket holes on back side of door frame

After the glue dried on the plugs, I gave it a good sanding and used my concealed hinge jig to drill cup holes for full overlay hinges for frameless cabinets.

attaching concealed hinges to cabinet door

I screwed the hinges in place on the door, then installed it onto the cabinet.  I removed the door later to install the cane panel, but for now, I moved on to the rest of the build.

.

RELATED: Check out this post for how to install and adjust concealed cabinet hinges!

Installing door into pantry cabinet

Step 5: Attach Top Panel to Linen Cabinet

I cut my top panel from ¾″ plywood so that it would overhang both sides and the front about 1 ¼″ to give me room to attach the crown molding later.

.

To cover the edges, I applied edge banding around the front and sides, then I centered it in place and used wood screws through the top supports to secure it.

Screwing top plywood panel onto top of linen cabinet frame

Step 6: Build and Install Drawer Box

I cut the pieces to assemble the drawer box and applied edge banding to the top edges to cover the plys. Again, this is optional, I just think it looks cleaner.

.

Now, this is a tiny drawer and I felt that using regular drawer slides was a little overkill.  So I literally just made this a box that slides into the cubby.  Of course, if you prefer, you can definitely add slides.

Shara Woodshop Diaries sliding small drawer into bottom of linen cabinet

That said, since this is such a small drawer, instead of my usual dadoes and pocket hole method, I just used wood glue and brad nails to assemble the box, then cut and stapled a ¼” plywood panel onto the bottom. 

using staple gun to install ¼" plywood drawer bottom into drawer box

You can build them however you prefer, but whatever you do, leave a little wiggle room (about ¼″) on the sides to slide in and out. I learned that lesson the hard way 🙂 ha.

.

Just like for the door frame, I cut the 1x3s to use for the drawer front. 

.

You’ll see in the video, I glued these pieces onto the drawer individually, but in hindsight, it would have been much easier to pocket hole join the frame together just like I did with the door and glue/nail it in place as one piece–so that’s what I recommend in the plans.

attaching cane linen cabinet drawer front

Step 7: Add Crown Molding

To give it a little decorative detail, I cut to fit crown molding along the top of the cabinet.  I was at the mercy of whatever the lumber yard happened to have that wasn’t already primed, so I ended up with this poplar trim. 

using nail gun to attach crown molding along top edge of linen cabinet

It’s a little darker than the rest of the cabinet, but it is what it is ha.

Step 8: Build and Attach the Base

I built the cabinet base from 2x2s and used pocket holes and screws to assemble it.  I made this so that it fit the exact size of the bottom of the cabinet.

.

Then, I screwed it in from the bottom side.

using screws to attach base frame to tall pantry cabinet box

Step 9: Finish and Install Cane Door Panel

Before applying any finish, I puttied all the nail holes and sanded well. Now, if you plan to stain or paint the door, it’s best to do so before attaching the cane.

.

I just gave my top cabinet a couple coats of clear poly and painted the base SW Iron Ore.

Shara painting linen cabinet base

Before I painted the base, I removed the door from the hinges on the cabinet so between coats of paint, I could install the cane panel.

.

There are a lot of different ways to attach this cane and I tested out a few different methods on some test pieces before deciding to just keep it really simple and use staples. 

.

I bought my roll of cane webbing 18″ x 36″. So I centered the cane over the door opening and trimmed it down with scissors (regular general purpose scissors work fine) so there was about 1” overhang on each side of the opening.

rolling out cane webbing to attach to cabinet door

Then, I used staples to secure it, slowly working my way down and pulling as tight as I could. 

.

NOTE: Pulling as tight as I could still left some “waves” in the cane material. Nothing major, BUT…

.

If you want a tighter panel, you can try soaking your cane in water for an hour or so, then install it while it’s wet. Pull tight and staple, then as it dries, it will shrink some and pull itself tighter. This might help give you a tighter cane surface.

using staple gun to attach cane webbing to back side of cabinet door

Once the cane was secure, I used some thin scrap strips (or you could also use lattice strips) to just cover the edges to help protect it from unraveling and just trim out the rough edges. 

.

I just stapled these in place making sure not to place them where they will interfere with the hinges.

stapling thin trim pieces around cane edges on back side of cabinet door

I installed the door back in place, gave the cabinet a few coats of poly, added some handles, and finally cut a couple plywood shelves to fit inside on shelf pins.

.

And it was finished.

Finished DIY cane door linen cabinet or tall pantry cabinet with door open and adjustable shelves inside

If you wanted to add a small stop block to the piece above the drawer, you could, but I just left it as is.

.

This simple cabinet will be great for a small bathroom for a little extra towel storage or I could use it in an entryway to keep dog leashes, gloves, whatever. 

DIY cane door cabinet natural color with black painted base

Honestly, I’m still deciding how I want to use it—I just build it first, and find a place for it later haha.

.

So I hope you’ve enjoyed watching this project as much as I enjoyed making it.  And if you’d like to make your own, don’t forget to check out the free plans here.

.

Also, don’t forget to pin it!

Pinterest collage of cane door cabinet overall dimensions at top and Shara standing next to finished cabinet below

And if you aren’t already subscribed to my newsletter, I’d love if you’d join along so you don’t miss out on all the projects coming next!

Until next time, friends, happy building ????

Backyard Makeover–How to Create a Garden Patio

March 13, 2021 by Shara, Woodshop Diaries

In this post, I’m sharing about how we gave our backyard a giant makeover for spring and how to create a garden patio you can enjoy through all the seasons!!

.

*I partnered with my friends at The Home Depot and Vigoro to bring this project to life. This post contains affiliate links. See policies.

Shara hanging plant pots in hangers on garden privacy fence

If you’ve been following along very long, you know that we live in a garage apartment.  Basically, we bought 8 acres, put up a 30×50 garage–we live in half and my shop is the other half.

.

This was actually supposed to be a very temporary living space while we built a “real house” next to it on our property, but as things often happen, life didn’t go as planned and the house hasn’t been built.

.

We are about to head into our third summer here. I’m not complaining, BUT since this was supposed to be temporary, we never added any kind of outdoor space (like a deck or patio) and three summers is just too many to waste sitting inside.

backyard before the makeover--empty spot with no grass

So this spring, I decided it was time to give the yard a refresh and set up a garden patio–a space we can both work, grow and relax.

.

So if you’re ready to see how I transformed this muddy mess into a private garden patio, let’s get building 🙂

.

Check out the video I created showing the whole backyard makeover and I’ve also got the written tutorial below as well.

My Two Goals for this DIY Garden Patio/Back Yard Makeover

I had two goals with this project:

  1. The main goal was to expand our growing capacity and build a bigger, bolder, better garden in what was this wasted space next to the house. 
  2. And the second was to create an outdoor space we can actually enjoy spending time in.

.

So, the very first thing we needed was a little more privacy.

Products and Materials Used in the Makeover:

I will link specific products throughout the post below, but here’s a quick list of the items we used in this back yard makeover in case you just want to shop the space:

  • Vigoro Antique Iron Raised Beds
  • Vigoro Barrel Planters
  • Vigoro Elevated Cedar Planters
  • Vigoro Pond Pebbles
  • Vigoro Mexican Beach Pebbles
  • Vigoro Black Mulch
  • Vigoro Garden Soil
  • Vigoro Potting Soil
  • Heavy Duty Landscape Mesh
  • Garden Staples
  • Vigoro No Dig Edging Kit
  • Stepping Stones
  • Pot Hangers on Fence
  • Bamboo Plant Labels
  • Plastic Plant Label Tags

Step 1: Add Some Privacy to the Patio

I kicked off the project by adding a privacy fence along the back side of what will become our new garden patio.

Shara adding caps on top of privacy fence posts

I kept this pretty basic and just made a straight privacy fence solid on the bottom with lattice on the top.

.

You can check out the whole post about how I built this privacy fence here.

Step 2: Prepare the Ground for Garden Cover

Now I measured this area out and decided to make this garden space about 22 ft x 22ft.  I used some scrap sticks to roughly mark the corners of my square.

.

Then, I used some Vigoro Heavy Duty landscape mesh and garden staples to line the entire area square. This will just help prevent weeds from growing up in our garden and in the rock and mulch. 

Shara using garden staples to secure landscape fabric in new garden area

*I had to come back later and fill in some spots where I got creative with the edging haha.

.

Speaking of edging, once the mesh was in place, I used this Vigoro No-Dig Edging to outline the garden and to separate where I would have mulch vs dark rock, vs lighter rock.

Using rubber stakes to secure no dig edging around outside of landscape garden area

If you saw my video about how I built a faux fence to hide my ugly well house back last fall, you may remember seeing this edging before.  It’s SUPER easy to install and it’s flexible so you can lay it out in any shape you want.

.

You literally just use a rubber mallet to stake the edging in place—no digging required. 

Securing no dig edging to outline backyard makeover space

I was totally winging it here with my design, so I just kind of outlined the rough shape I wanted the garden to take. Once I had the edging installed, I went back and added mesh anywhere that wasn’t already covered.

.

Now, the back right corner was a high spot.  I decided instead of doing a bunch of digging and leveling, I would just use this as part of the design.  I used a barrel planter in this back corner laid on its side so it looks like it’s kind of pouring rock out into the garden.

Outlining rock sections in garden makeover space

So I installed some edging going out from that corner and then tied the left and right edging together to make a little walkway from the front porch.

.

Lucy helped me decide how to lay out the walkway 🙂 She’s the best helper haha.

landscape edging installed in curved walkway

Step 3: Add Garden Beds

Before filling up this space with the rock and mulch, I added the raised beds.

.

I wanted something that was going to withstand the weather, so picked out these powder coated raised beds by Vigoro to put in the middle. 

.

They were really easy to put together and once they were assembled, I spaced them out evenly and did my best to level the ground underneath them to get them to sit flat. 

Backyard makeover with mesh laid down and raised garden beds in place

Since the ground was so wet, that was pretty simple—I just stomped around until they were level haha. But, if your ground wasn’t so easy to work with, you could lift a section of the mesh up and dig out just the area you needed.

Step 4: Add the Ground Cover

For this project, I used Vigoro Pond Pebbles for the middle section, Mexican Beach Pebbles for the small area next to the house, and black mulch for the outside border and walkway.

Black mulch, pond pebbles, and Mexican beach pebble bags laying side by side on ground

I spread the bags out over the area, cut them open and spread the rock around about 2-3 inches thick all the way up to the edging.

.

HELPFUL TIP: If you find these products on The Home Depot website, you can type in the size of the area you are covering and it’ll figure how many bags you will need 🙂

.

I just used a metal rake to evenly spread out all the pond pebbles after I had them out on the ground.

.

Then, I filled in the area over by the house with these Mexican beach pebbles to give it some contrast.

Shara spreading Mexican beach pebbles next to house

Then, I added the black mulch around the outside and down the walkway.

Shara dumping bag of black mulch in outside section of garden space in backyard makeover

While I was at The Home Depot, I also picked up some stepping stones to add to the black mulch walkway. 

.

I tried to casually walk and estimate my foot steps so that I could place these at a natural distance apart and set them in place in the mulch.

Installing stepping stones in black mulch walkway of backyard makeover

I’m sure there’s a way more scientific approach to that, but this worked haha.

Step 5: Add Additional Planters to Garden Patio

In addition to the raised beds in the center of the patio, I added two more sets of planters—three elevated cedar planter beds along the fence, and some barrel planters at the corners. 

.

The barrel planters just simply set in place.

Shara planting flowers in barrel planters at corner of new updated garden patio

But the elevated cedar planters require a little assembly. Nothing difficult and no tools required–you just use a rubber mallet to tap the pieces together.

.

But, what I love about these particular cedar planters is that I can buy the kit with precut pieces and put it together in about 5 minutes.

Shara adding plant labels to herbs in raised cedar garden bed

I had actually planned to build a potting bench for this space, but when I got these raised beds and put them together, I decided one of these would work perfect as a potting bench and the kit was cheaper than I could have bought the wood to build one.

Step 6: Add Garden Soil

After all the raised beds, barrel planters, and elevated cedar planters were in place, assembled, and level, I filled them all with garden soil to plant herbs and flowers in except for the one planter I will use as a potting bench.

Pouring bags of garden soil into raised garden beds of garden patio makeover

To finish up, I added some little pot hangers and pots on the fence posts and some plant labels in all the beds.

.

I did manage to find a few flowers locally, but right now it’s slim pickings as it’s still a little early for flowers and planting in our area.  But as soon as it warms up, these planters will be ready. 

Shara hanging pots of flowers on privacy fence
DIY Privacy Fence

And so will the rest of this garden.  I’m so excited about this back yard makeover, our new garden, and that we will finally have somewhere to spend time in outside this summer.

Wide shot of whole backyard makeover space with garden beds and rock and mulch

I’m definitely brainstorming some seating and entertainment options to add to this garden patio space and possibly a swing or a firepit, too.

.

If you’re anxious to see what I come up with, be sure to subscribe to my newsletter below so you don’t miss out on those upcoming projects!

In the mean time, if you’d like to see some more outdoor ideas, check out a few of my favorites here:

  • DIY Privacy Fence
  • DIY Louvered Planter Box
  • How to Hide Outdoor Eye Sores
  • How to make your own DIY concrete planter pot with wooden base
    DIY Outdoor Chair

I hope this has inspired you to quit waiting for someday to build a better garden.  Bring on spring now and start enjoying it.

Pinterest collage of before and after DIY backyard makeover and garden patio

Until next time, friends, happy building ????

How to Build a DIY Privacy Fence

March 12, 2021 by Shara, Woodshop Diaries

In this post, I will show you how to build a DIY privacy fence to add to your back yard, garden, or patio!

Shara Woodshop Diaries in new garden with privacy fence in back

We recently gave our yard a much needed makeover. We basically took a muddy, empty space next to the house and transformed it into a private garden patio!

.

Right now, it’s mostly garden, but I’ll be adding some seating and decor to the space all summer long to make it a great spot to relax as well 🙂

.

But before we even got to any of the garden stuff, the first thing we needed here was a privacy fence. We own 8 acres, but have no trees and several neighbors.

.

So priority number 1 was to block out some of the view.

Garden patio before fence installed

We kept this privacy fence very simple with a solid bottom half and lattice screened top half. Ours spanned about 32 ft long with 5 posts and four panels, but you could easily modify the size to fit your own space.

.

If you’re ready to see how I built it, let’s get to it.

This post contains affiliate links. See policies.

For this DIY Privacy Fence, We Used:

  • (5) 4x4x8 posts *TREATED*
  • (12) 2x4x8 posts *TREATED*
  • (32) 1x6x6 fence pickets *TREATED*
  • (2) 4×8 sheets *TREATED* lattice
  • (5) fence post caps
  • (2-3) bags concrete mix
  • 2 ½″ pocket hole screws (rated for outdoor use)
  • 1 ¼″ outdoor wood screws
  • Staples (optional)
  • Saw (any saw you prefer that can cut straight lines)
  • Pocket Hole Jig
  • Drill/Driver
  • 4 ft level
  • Line Level Kit and string
  • Measuring tape
  • Staple Gun (optional)
  • Post Hole Digger

NOTE: Since this is an outdoor fence, it’s best to use treated wood and fasteners that are designed for use in treated wood. Cedar wood is also an option, but is FAR more expensive than treated.

Step 1: Dig Fence Post Holes

First, I determined where I wanted my fence and began laying out the pieces.

.

Now, for my fence, I was using 1×6 pickets at the bottom. A 1×6 is actually 5 ½″ wide. So 16 boards x 5 ½″ wide each is 88″. So I laid my 4×4 posts out on the ground so there was 88″ between each of them.

fence posts spaced out 88"

I used a string tied around two scrap wood stakes I drove in the ground to mark the line I wanted the fence to run down.

Fence posts laid out on ground with string pulled to keep straight

My fence was going about 32′ out, so I made sure my string spanned out at least 32′. Pulling the string will just help keep the fence in a straight line as we dig the holes.

.

Now I could dig the post holes along the string at the end of each post.

.

I used a post hole digger to dig out holes about 24″ deep at each post.

24" deep post hole for privacy fence

NOTE: You need to make sure there are no water, electrical, fiber optic etc lines where you plan to dig. Always check your local/state rules for digging BEFORE you break any ground.

Step 2: Level the Fence Posts

Once the holes were dug, we dropped the two outer posts into their holes.

.

I used the string from step 1 to tie around one of the fence posts about 3″ from the top. Then I pulled it tight and tied around the other fence post 3″ from the top.

.

The posts will be wobbly, so it’s best to have some help with this step to hold each post up straight.

close up of line level on fence posts

I used a line level on the string to see if the posts were level. We raised/lowered the posts as needed to get the string level (WITHOUT MOVING THE STRING UP OR DOWN THE POST).

.

If one post needs to go down some, dig the hole out more, if it needs to come up, fill the hole in a little.

.

The goal here is simply to get the tops of the posts level.

.

Once we got the outside posts level, we filled in those holes with concrete mix and used a 4 ft level to make sure each post was standing up straight both ways and not leaning.

.

After the outside posts were in place, we installed the three middle posts the same way. We made sure that the top of each post was 3″ above the level string so all the fence posts stayed at the same level.

Installing fence posts into post holes and leveling with concrete mix

You can see I recruited my Dad to help me here–it’s really a two person job. He pours the concrete while I hold the posts level.

.

Once all five posts were in the ground, straight up and down, level across the top, and the holes filled with concrete, I let it set over night before coming to finish the rest the next day.

Five fence posts in the ground and level

Our ground was super wet because it had rained several days prior to this, so there was plenty of moisture for the concrete to set up. However, if your ground is dry, you can pour some water over these holes to wet the concrete mix so it can harden.

Step 3: Install Privacy Fence Slats

I measured between each post and cut three 2x4s to fit for each section. Theoretically, they should be 88″ long, but it’s best to measure and cut to fit here as they likely moved +/- 1″ in the setting process.

.

HELPFUL TIP: Cut each board SLIGHTLY (1/16″ or so) longer than your measurement for a tight fit. This is helpful if you are working alone and don’t have help holding the pieces as you are driving the screws. You can hammer the board into place so it will stay as you are driving the screws.

.

I used a pocket hole jig to drill 1 ½″ pocket holes into the ends of these boards, then installed them using Blue Kote (these are outdoor rated) 2 ½″ pocket hole screws.

RELATED: Check out this post on how to use a pocket hole jig.

Drilling pocket holes in end of fence support slat

I started at the top and installed the first board about 3 ½″ down from the top. I kept all these boards flush to the back side of the fence posts.

Slat spacing for privacy fence

Then, I installed the second board 20″ down from the top board.

Attaching framing between fence posts using pocket holes and a level

And finally the bottom board was 32″ down from the middle board.

.

I used these measurements PLUS a level to keep everything as level and straight as possible.

Step 4: Add Solid Fence Boards to Privacy Fence

Now all the bracing is in place, it’s time to fill it in and add the privacy part 🙂

.

For the bottom portion of this fence, I used 1x6x6 fence pickets. Since these come in 6′ boards, I used my miter saw to cut them to 34″ pieces so I could get two pieces from each board.

.

To install these, I simply marked the center line of the middle and bottom slats between each post and lined up the edge of one of my fence boards with that mark. I screwed in place using 1 ¼″ outdoor rated wood screws.

Attaching middle fence picket to privacy fence frame

I worked my way out adding boards until I had 8 boards on the left of my center mark and 8 boards on the right of my center mark.

.

NOTE: Use two screws at the top and two at the bottom of each board. The image below shows only one screw per board, but I went back and added the extra screws once they were all in place.

Screwing fence pickets into privacy fence frame

Step 5: Attach Lattice to Top of Privacy Fence

NOTE: Lattice sheets come in 4×8 and 2×8 panels. I bought 4×8 and cut them in half because it was cheaper that way. However, if you didn’t want to cut it in half, you could buy 2×8 sheets for this.

.

So first, I used a jig saw to cut my lattice sheets down the middle to give me 2×8 pieces. Then, I measured between each post and cut these lattice sheets to about 3″ longer than the distance between each post.

Using jig saw to cut lattice panels in half

That will give me 1 ½″ overlap on each side of the opening to attach to the posts.

.

I placed these on the back side of the fence and used a staple gun and staples to attach. Now…confession time. These staples will probably need to be replaced eventually as they aren’t rated for outdoor use.

Stapling lattice panels onto back side of privacy fence

I had intended on attaching this with screws, but as I was building this, I ran out and used staples instead. They’ll hold for a while, but will eventually rust out.

.

So I recommend using outdoor rated screws OR you can get some outdoor rated staples for this.

Step 6: Attach Fence Post Caps

The final step was to add the post caps. You can buy tons of different styles of these or even make your own.

.

I kept it pretty basic and just added these wooden caps. The instructions say to use caulk to attach, but I used some outdoor rated wood glue. I would imagine either would work fine.

Shara Woodshop Diaries gluing fence post caps on top of privacy fence posts

And once the glue was dry, the fence was complete!

.

Fresh, wet treated wood usually doesn’t take paint or stain very well, so for now, we are leaving it as is. But after a few months, after it’s had time to dry out a little, we may go back and stain it…I’m still deciding 🙂

Completed privacy fence behind garden patio space in side yard

So if you’re looking to add a little privacy to your own yard this spring or summer, I hope you find this DIY privacy fence tutorial helpful!

.

PS I added these cute little plant pot hangers and some flowers to the fence to give it a little pop of color.

Shara Woodshop Diaries hanging a plant pot on a hanger attached to new DIY privacy fence

If you want to see more of this space, check out our full back yard makeover post to get some fun ideas!

.

For more outdoor project ideas, check out some of these favorites!

  • DIY Outdoor Table & Bench
  • DIY Louvered Planter Box
  • DIY Front Porch Wagon
  • DIY Raised Garden Bed

If you’d like to stay caught up on all the latest projects, be sure to subscribe to the newsletter below.

And if you want to save this for later, don’t forget to pin it!

Pinterest collage building a privacy fence in process and after

Until next time, friends, happy building 🙂

Home Office DIY File Cabinet

March 5, 2021 by Shara, Woodshop Diaries

Learn how to build your own DIY File Cabinet in this post!

This project was sponsored by my friends at DAP. This post contains affiliate links. See policies.

DIY file cabinet made from plywood and 2x4s with drawers open

I’m bringing you another fun build to add to the matching series I’ve been building for my Dad’s office.  This time, it’s a DIY filing cabinet.  

.

If you’ve followed this whole series, you may be thinking—haven’t you already made your Dad filing cabinets for his office? 

.

And yes—I did.  I built these modular file cabinets for my dad to set his large stencil cutting machine on in his office back last fall.

.

But apparently that wasn’t enough for all his papers, so I’m back at it building another one—this time in a design that matches the style I built his recent table, desk, armoire, and shelf.

Collage of matching Home Office Furniture Pieces

This is a very basic cabinet that works well as a file cabinet, but could also make a nice printer cabinet, or even a side table or nightstand.

.

I’ve got the step by step plans to build it below, but if you prefer a video, I’ve got that, too 🙂

Tools and Materials for DIY File Cabinet:

Tools:

  • Miter Saw
  • Circular Saw
  • Drill/Driver
  • Pocket Hole Jig
  • Table saw and/or router (optional)

Materials:

  • (3) 2x4x8 boards
  • (2) 2x2x8 boards (I make my own 2x2s using this tutorial)
  • (1) sheet ¾″ plywood
  • (½) sheet ¼″ plywood
  • (4) 8′ sticks cove molding
  • (2) pair 16″ ball bearing drawer slides (I buy the bulk package)
  • 2 ½″ pocket hole screws
  • 2″ wood screws
  • 1 ¼″ pocket hole screws
  • 1″ wood screws
  • Weldwood Wood Glue
  • RapidFuse Glue

Overall Dimensions:

Overall dimensions of DIY file cabinet--30 ¾" tall, 30" wide, 22" deep

Step 1: Assemble Cabinet Legs

If you’ve seen the matching table, desk, or shelf projects already, this may sound like a broken record.  I built these projects all with matching legs made from 2x4s, so the leg building process is the same as in the previous projects.

.

I trimmed down my 2x4s to about 32″ long, paired them up, then glued them together into 4 pair to make 4 total legs for this cabinet.

Shara Woodshop Diaries using DAP Weldwood glue to assemble table legs made of 2x4s

Once the glue was dry, I cleaned up the edges on the table saw and trimmed them down to 3” square posts. Basically, I trimmed about ¼″ off each glued edge.

RELATED: Check out how to clean up and square edges with this tutorial!

Shara Woodshop Diaries trimming table legs down on table saw

NOTE: You don’t HAVE to trim these down, but it does look a little cleaner. If you don’t trim them, you may need to adjust a few measurements in the project.

.

I cut them to 30″ long on the miter saw and then, just to add a little decorative detail, I adjusted my miter saw to 60 degrees and trimmed a taper on two sides of each leg at the bottom from the center out.

Table leg overall dimensions

Step 2: Assemble Side Panels

I used my circular saw to cut down some ¾” plywood pieces for the side panels, then used my miter saw to cut down some 2×2 pieces for the frame.

RELATED: Check out how to cut plywood in this post.

ALSO RELATED: Check out how to make your own 2x2s in this post.

.

For assembly, I kept things simple and quick by using pocket holes and screws.  Of course, if you prefer another joinery method, you’re welcome to use your own method of choice.

RELATED: Learn how to use a pocket hole jig in this post!

Shara using Kreg 720 pocket hole jig to drill holes in plywood panel

I drilled pocket holes along the edges of each plywood panel and into the ends of the 2×2 frame pieces. 

.

I’ve mentioned this before, but when I use 2x2s with pocket holes, I usually just use some wood glue and 1 screw per joint.  When I’ve used 2 screws, they tend to split easily.

.

Then I began assembling two side panels using pocket hole screws and wood glue.

Dimensional diagram of side panel assembly with 2x2s and plywood

I made sure to assemble these so that all the pieces were flush to the inside of the legs.

Step 3: Assemble File Cabinet Frame

I assembled the rest of the frame using 2x2s, pocket hole screws and wood glue.

Dimensional diagram of file cabinet frame

Note that I attached the bottom 2x2s so that they were in line with the ones on the sides–24″ gap between the top and bottom.

.

TIP: Many times you guys ask how I make sure things aren’t crooked with only using 1 pocket hole screw. A lot of times, I do that by assembling everything quick before the glue has time to set up, then setting it on my table saw (since it’s a known flat surface) and adjusting as needed until the feet are flat.

Shara setting cabinet frame on table saw to check for wobble

If your floor is level, you can also use your floor.  But my shop floor is definitely not level, so it’s impossible to level anything off of it haha.

.

This time, it was flat without any adjustments, so I left it there while I took a lunch break so the glue can dry and lock it in place 🙂

Step 4: Attach Top of Cabinet

I cut the top from ¾” plywood and edge banded it. Then, I set on top, centered it and attached. 

.

There should be about ½″ overhang on each side and 1″ overhang along the front edge.

Dimensional diagram of top attached to cabinet bottom

I used 2” wood screws to attach the top to the frame through the top 2x2s at the front and the back.

Step 5: Install File Cabinet Drawer Slides

I installed 16” ball bearing drawer slides into the cabinet.  I installed these 1 ½” inset since the drawer fronts will be about that thick. 

Diagram showing where to mount drawer slides into file cabinet carcass

Now, you can definitely use longer slides if you want…I buy my drawer slides in bulk and usually stick with 16” because they are a pretty universal size I can use in almost any project. 

.

So that’s what I keep on hand.  But if you want to make larger drawers for this, go for it.

RELATED: For more information on how to size, build and install drawers and drawer slides, check out this drawer building guide!

Step 6: Build File Cabinet Drawers

I cut my drawer box pieces from ¾″ plywood and once I had them cut to size (see diagram below), I used my table saw to cut ¼” dadoes along the bottom of each piece to install the drawer bottoms into.

RELATED: Check out this post on how I build drawer boxes!

.

HERE’S A TIP: You don’t have to have a dado blade in your table saw to cut dadoes–you can just make one cut, move your rip fence slightly over and make another cut until your cut is ¼″ wide.

.

If you don’t have a table saw, you can use a circular saw and a straight edge (like I did with this DIY pie carrier project) or a router to cut your dadoes. OR, skip the dadoes altogether and just staple the bottom in place later.

Adding the File Cabinet Option

Obviously, you don’t have to make this a DIY file cabinet–you can use these as normal, every day drawers. But, if you do want to add the file rails, here’s how I did it.

.

When I made my dad’s other filing cabinets, I used ¼” plywood as the rails for the folders to slide on.  I wanted to do the same thing here, so I needed to cut dadoes on the drawer box sides to slide the plywood into.

Plywood rails used for file folders to hang on in modular file cabinet build

I only need to cut these on the side pieces—not the front and back.  And they each need to be cut about 13” from the edge. 

.

So I didn’t get confused, I made a mark roughly where the cuts needed to be, adjusted the table saw, and cut my dadoes.

Exploded dimensional diagram of drawer boxes

Again, if you don’t have a table saw, you can use a router OR a circular saw and straight edge to cut these dadoes.

.

Since these drawers were made using plywood, I edge banded the top edges just to give it a cleaner, more professional look. This is optional, but really takes the project up a notch.

RELATED: Learn how to apply edge banding in this post!

.

I drilled pocket holes into the drawer box pieces and assembled using pocket hole screws.  I cut a ¼” plywood bottom to insert into the dadoes along the bottom of the boxes.

Overall dimensions of drawer boxes for file cabinet

After the whole box was together, I cut some more ¼″ plywood to make the file folder rails.

.

I used a thin scrap piece to glue and screw into the front edge of the drawer box.  I attached with 1″ wood screws so that there was about ¼” sticking up over the edge so the file folder tabs can hang over.

Shara screwing ¼" plywood file folder rails into box

Then, I dropped a piece of ¼” plywood down the dadoes I cut earlier. 

Diagram showing plywood file folder rails installed into drawer box

Step 7: Install Drawers into Cabinet

Originally I planned to install these drawers so the file folder part of the drawer was towards the front.  But then, I got to thinking that the small space in the back might be hard to get to. 

.

It’s a small space, but you can fit some extra files, papers, cords, whatever in there and I hated for it to go to waste.

.

So I faced those toward the front so they’re a little easier to access.

RELATED: I’ve got a detailed guide on how to build and install drawer boxes here.

Diagram showing drawer boxes installed into cabinet with 1 ½" gap between them

Honestly, though, I’m not really sure this was a better option because once I got this cabinet finished, I realized that the papers in the files may have to be pulled out at an angle to avoid hitting the drawer front and the frame pieces above it. 

File cabinet drawer open showing locations of plywood file folder rails

It’ll be fine, but in hindsight, I should have stuck with my original plan of keeping the file folder part of the drawer towards the front.  Live and learn.

Step 8: Add Drawer Fronts and Trim

Similar to the matching pieces from this build series, I cut to fit cove molding to glue around the edges of the drawer fronts.

Dimensional diagram of drawer fronts for DIY file cabinet

Now in my previous projects in this series when I added the trim here, I used wood glue and painters tape.  It worked well, but I had to wait a few hours to attach the drawer fronts because of the glue.

.

I’ve seen several people do this before, but it never crossed my mind to use this method here until DAP sent me some RapidFuse.  As soon as I opened the box, I immediately knew what I could use this for.

.

So this time, I used wood glue on the trim pieces, but added a few dots of RapidFuse as well.

Applying RapidFuse glue between wood glue on drawer front

The RapidFuse will hold the pieces in place while the glue cures, so I still get the strength of the wood glue, but can almost immediately move on to the next part of the project and attach them.

.

I literally can’t believe I didn’t think of doing this before now.

Shara using Rapid Fuse to secure cove trim around drawer front edges

Once the trim was secure, I installed the drawer fronts onto the drawer boxes using wood screws from the inside. 

.

As a note, you’ll have to remove the ¼” plywood piece in order to screw these in place.  Good thing I made those removeable haha.

Diagram of drawer fronts attaching onto drawer boxes

Step 9: Install Final Trim and Finish

And the final step was adding the cove molding around the sides.

.

I cut to fit cove molding to line the side panels and this time, instead of using wood glue and RapidFuse to attach, I just used RapidFuse.

Shara using RapidFuse to attach trim pieces to side of DIY file cabinet

Honestly, I was just curious and it was just sitting on the work bench so I thought I’d try it haha.

.

I used wood glue on the drawer fronts since those will be handled a lot, but since the sides will probably rarely be touched, I thought I could save some time having to sand off any messy glue squeeze out and just use RapidFuse here.

Diagram showing where to attach cove molding around side panels of file cabinet

I kept with the theme and just gave this a few coats of Polycrylic, added some handles, and it was ready to hand over to my dad.

.

Now, as a side note—you can definitely add a back panel if you want—you can either cut and staple ¼” plywood on the back or rabbet the back and insert the panel so it’s flush.  However, I didn’t add a back here.

Attach back panel diagram with dimensions

I know this is crazy, but I don’t really like adding back or bottom panels onto things with drawers—I like to leave things easily accessible in case something gets stuck.

.

I once had a bad experience with an expensive store bought dresser and it’s changed how I build my own haha.

.

So anyway, that completes part 4 of the matching office furniture set–a DIY file cabinet.  That MAY be the end, but there may ALSO be one more piece to finish this whole series off.  You’ll have to stay tuned to find out *wink wink* 

DIY file cabinet built from plywood and 2x4s with clear natural finish and modern black handles

So if you aren’t already subscribed to my newsletter, be sure to subscribe below so you don’t miss it or any of the other fun projects I’ve got coming out soon!

If you’ve enjoyed this project, don’t forget to pin it AND be sure to check out all the matching pieces here:

  • Matching DIY Writing Desk
  • Matching DIY Shelf with Drawers
  • Matching DIY Computer Desk
Pinterest graphic showing overall dimensional diagram at top and file cabinet drawer open with file inside at bottom

Until next time, friends, happy building! ????

  • « Previous Page
  • 1
  • …
  • 5
  • 6
  • 7
  • 8
  • 9
  • …
  • 16
  • Next Page »

Hi! I'm Shara, the designer, maker, and videographer behind Woodshop Diaries. Let's get building, friends :)

Learn more →

Woodworking Tips & Guides

  • How to make simple Shaker style cabinet doors!!
    DIY Simple Shaker Cabinet Doors
  • 5 Tools To Get Started Woodworking
  • DIY Kitchen Cabinets–From Only Plywood
  • How to Square Board Edges and Make Your Own 2x2s

Footer

↑ back to top

Tips to Take Your Projects to the Next Level

--5 Secrets to Professional Looking DIY Furniture

--How to Properly Paint Wood Furniture

--How to EASILY Cover Plywood Edges

--How to Sand Wood

--10 Must Have Tools for Furniture and Cabinet Building

Printable Building Plans

Check out our shop to browse printable PDF building plans!

Website Policies

This website is for entertainment purposes. Using any information provided is to be at your own risk.

This site uses cookies to provide you with a better experience.

All images and text on this site are property of Woodshop Diaries, LLC. Please be respectful and don't steal this content.

See Policies and Privacy page on this site for more information.

Want to get in touch? Contact Us Here

Copyright © 2026